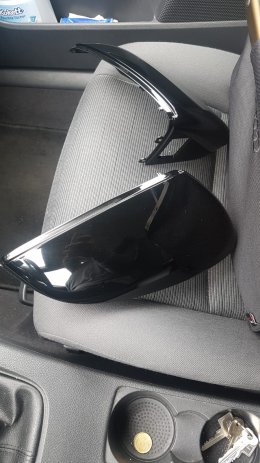
Have changed my S3 caps to the black edition ones and thought it would be helpful to share the process.
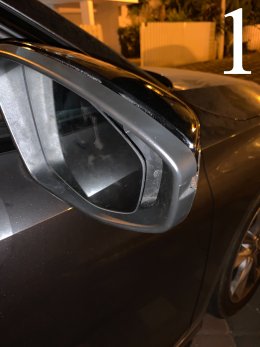
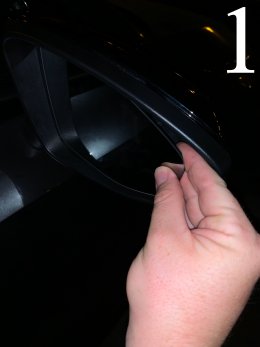
1.at first adjusting the mirror to an angel that will provide you the maximum access to be able to fit your fingers behind the mirror itself.
2.Squeezing your fingers under the mirror and then pressing it outside evenly,it will snap out in one click.
You have to put some pressure on it and Secure it from falling (it won’t fall completely out because it’s cable connected) with your other hand.
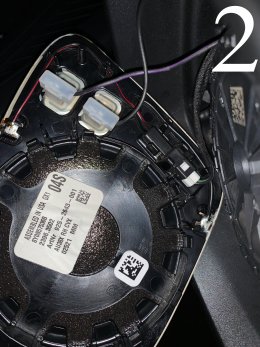
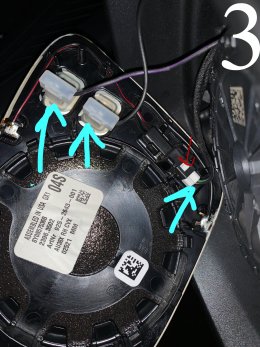
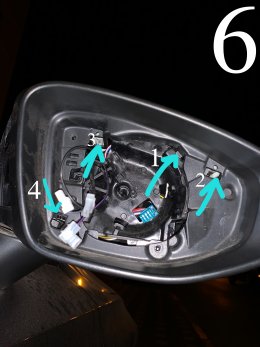
3.now when the mirror is out you have to remove the three wires,2 plugs that you just have to pull out (make shore to remember which one connected where,they both look black but one of them has a small purple strip on it).
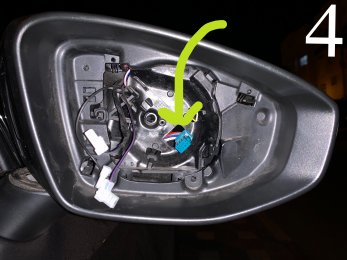
The third one is a clipped plug,you have to unclip it,you can use a small screw driver to press on the clip (red arrow location) for easier removal.
don’t forget to place the mirror in a safe place.
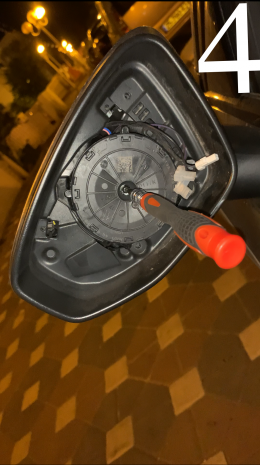
4.after the mirror is removed we have to remove the mirror motor.
It has a small torx screw in the middle (sorry for not checking the size,but it’s a small one).
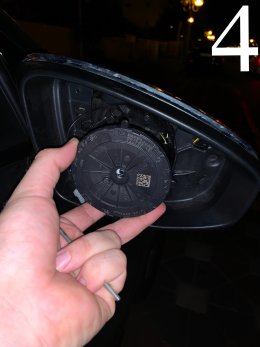
When the torx is removed you have to pull it a bit to get access for the plug behind.
Simple plug nothing special just have to wiggle it a bit and press on it to get out.
Don’t worry about the exact location,it can be mounted only in one direction.
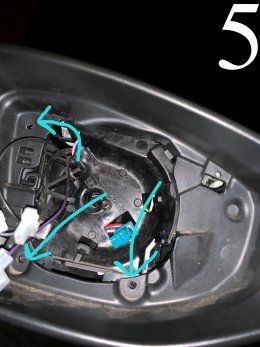
5.remove the 3 additional torx that hold the mirror frame.
This torx is bigger by 1-2 sizes than the mirror motor one (they are already taken off in the picture,but I have marked the location).
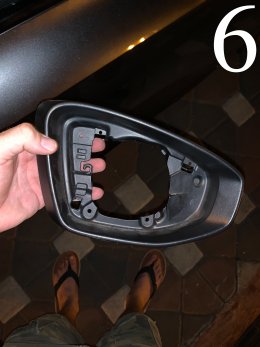
6.now when it’s a clear we have to start unclipping the mirror plastic frame from the cover.
At first I suggest just to gently wiggle it a bit from all directions to get it a bit looser.
It has 4 clips,3 in the upper part and one in the lower part.
I suggest starting from this upper clip.
You have to press on it with something (I used the orange plastic trim remover tool set).
While pressing the clip you have to pull the mirror frame (black plastic) towards you.
Then you will feel it pops out.
Checked if it popped out and only then start to work on the 2 additional upper ones.
I didn’t used the trim tool for this two,I took a thin screwdriver and pushed it between the clip and the clip mount to unclip it.
Do it while you pull slightly the frame mirror toward you.
After the additional 2 clips are free we have to do the same with the Lower clip.
I used the same method with the thin screw driver.
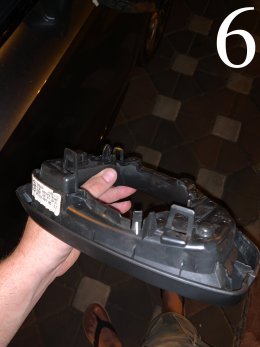
After the button clip is free you have to remove the plastic black frame and than gently wiggle the cover itself (the part behind the mirror frame) toward the outside direction opposite to you.
It needs some wiggle to get free,do it gently.
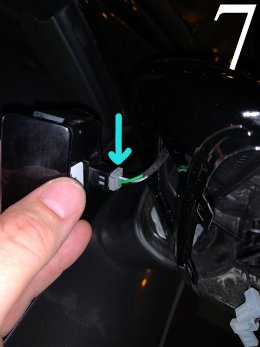
7.if you have side assist you have to disassemble the light while the mirror cap is completely loose.
The light has one small electric plug,don’t try to disconnect it while the light is on the cover itself.
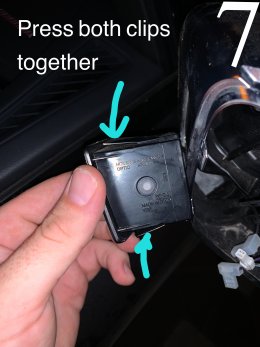
To remove the light you have to press a built in plastic clips above it and below it and push it towards the outside while keeping the clips pressed with you fingers.
When the light pops out you can unclip the electric plug.
When connecting it back in the new mirror cap just take the cable out of the hole connect it and then press it in back.
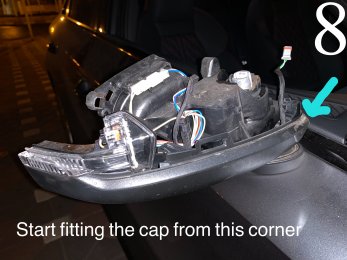
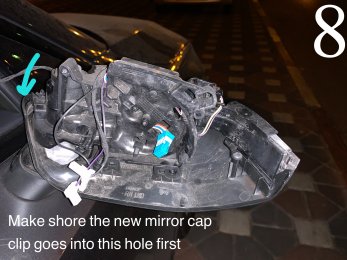
8.when fitting the new mirror cap you have to start fitting it from the outside corner of the mirror,you will see there is a clip that locks it in a clip mount on the outside corner.
9.after fitting the new mirror cap and connecting back the side assist light you have to clip back the mirror frame.
Place it in place and then press it all together while pressing with the second hand behind the mirror cap.
You will hear it clicks back together.
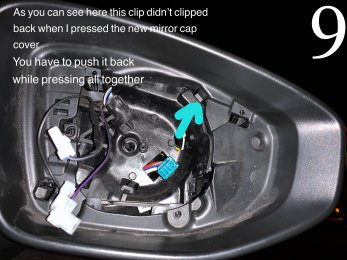
In this moment all the clips should clip back but one of the upper ones probably will stay unclipped.
It will be the one that we started the removal process from it.
You have to do the same and just press on the clip with the trim tool an press it all together ones again until you hear it clicks.
Once again check that all clips are clipped.
Put back the 3 bolts.
Put back the mirror motor and plug it back.
Connect the mirror to the wiring and then locate it as it was before and push it in the center,it will clip back together.
Hope it will help somebody.
Be patient and careful,don’t apply too much pressure so you won’t brake something.
1.at first adjusting the mirror to an angel that will provide you the maximum access to be able to fit your fingers behind the mirror itself.
2.Squeezing your fingers under the mirror and then pressing it outside evenly,it will snap out in one click.
You have to put some pressure on it and Secure it from falling (it won’t fall completely out because it’s cable connected) with your other hand.
3.now when the mirror is out you have to remove the three wires,2 plugs that you just have to pull out (make shore to remember which one connected where,they both look black but one of them has a small purple strip on it).
The third one is a clipped plug,you have to unclip it,you can use a small screw driver to press on the clip (red arrow location) for easier removal.
don’t forget to place the mirror in a safe place.
4.after the mirror is removed we have to remove the mirror motor.
It has a small torx screw in the middle (sorry for not checking the size,but it’s a small one).
When the torx is removed you have to pull it a bit to get access for the plug behind.
Simple plug nothing special just have to wiggle it a bit and press on it to get out.
Don’t worry about the exact location,it can be mounted only in one direction.
5.remove the 3 additional torx that hold the mirror frame.
This torx is bigger by 1-2 sizes than the mirror motor one (they are already taken off in the picture,but I have marked the location).
6.now when it’s a clear we have to start unclipping the mirror plastic frame from the cover.
At first I suggest just to gently wiggle it a bit from all directions to get it a bit looser.
It has 4 clips,3 in the upper part and one in the lower part.
I suggest starting from this upper clip.
You have to press on it with something (I used the orange plastic trim remover tool set).
While pressing the clip you have to pull the mirror frame (black plastic) towards you.
Then you will feel it pops out.
Checked if it popped out and only then start to work on the 2 additional upper ones.
I didn’t used the trim tool for this two,I took a thin screwdriver and pushed it between the clip and the clip mount to unclip it.
Do it while you pull slightly the frame mirror toward you.
After the additional 2 clips are free we have to do the same with the Lower clip.
I used the same method with the thin screw driver.
After the button clip is free you have to remove the plastic black frame and than gently wiggle the cover itself (the part behind the mirror frame) toward the outside direction opposite to you.
It needs some wiggle to get free,do it gently.
7.if you have side assist you have to disassemble the light while the mirror cap is completely loose.
The light has one small electric plug,don’t try to disconnect it while the light is on the cover itself.
To remove the light you have to press a built in plastic clips above it and below it and push it towards the outside while keeping the clips pressed with you fingers.
When the light pops out you can unclip the electric plug.
When connecting it back in the new mirror cap just take the cable out of the hole connect it and then press it in back.
8.when fitting the new mirror cap you have to start fitting it from the outside corner of the mirror,you will see there is a clip that locks it in a clip mount on the outside corner.
9.after fitting the new mirror cap and connecting back the side assist light you have to clip back the mirror frame.
Place it in place and then press it all together while pressing with the second hand behind the mirror cap.
You will hear it clicks back together.
In this moment all the clips should clip back but one of the upper ones probably will stay unclipped.
It will be the one that we started the removal process from it.
You have to do the same and just press on the clip with the trim tool an press it all together ones again until you hear it clicks.
Once again check that all clips are clipped.
Put back the 3 bolts.
Put back the mirror motor and plug it back.
Connect the mirror to the wiring and then locate it as it was before and push it in the center,it will clip back together.
Hope it will help somebody.
Be patient and careful,don’t apply too much pressure so you won’t brake something.
Attachments
-
 5256C590-8F80-4076-BA1D-FCAD91AA96F9.jpeg1.7 MB · Views: 381
 -
 809AD8EC-5464-4773-A87F-8E6FDA1EB1D9.jpeg3.2 MB · Views: 271
 -
 C49120A7-261F-4625-AF35-8D339E17A2B9.jpeg3.1 MB · Views: 288
 -
 0167E523-9D25-4C35-9C7F-3F6F97EE5B33.png4.1 MB · Views: 270
 -
 1C181484-8A50-4122-82B0-8CF4C8FED320.jpeg1.4 MB · Views: 265
 -
 4B19D052-7C75-4B0B-BAE0-D29652C55410.jpeg2.1 MB · Views: 250
 -
 C6A04C23-D886-4F49-A9E7-A96F3FBF1AE4.jpeg1.6 MB · Views: 275
 -
 D232D4F0-AF28-4286-B1D8-80918E48CA5E.jpeg963.7 KB · Views: 270
 -
 EE09A2E0-3222-4251-BCAE-64E934152D61.jpeg1.7 MB · Views: 253
 -
 F13E99BA-29CD-442B-A6BD-25E0FB4B83A6.jpeg1.9 MB · Views: 248
 -
 D9AA6F8A-393C-4D7A-A52A-1E4E6CB3E82A.jpeg1.7 MB · Views: 273
 -
 6EF84997-2959-49D4-9053-7018576AD1AC.jpeg1.4 MB · Views: 257
 -
 0EA701A0-C4FC-4450-8494-B8D52395AE9D.jpeg1.7 MB · Views: 243
 -
 673F999D-C594-4386-96EB-0E12F163B85D.jpeg2.4 MB · Views: 243
 -
 C188E4E9-8915-4838-AD48-036F759A31D5.jpeg2.5 MB · Views: 249
 -
 1EEA0409-1EA4-4077-B844-0D868A640396.jpeg2.3 MB · Views: 263
Last edited: