S2 Coupe restore thread.

Started to remove the carpet
1646822188040


Airbag module & bracket needs to be removed before it will slide out
1646822223460


Carpet is out
1646822279636


So it would appear the car had a few leaks
1646822294214

1646822298949

1646822304364

Now the outer corner door seals are missing and new ones have been ordered and the inner ones are in a bad way so again new ones have been ordered. Other than the sunroof, which also waiting on a new seal. Should I be looking anywhere else for leaks. Or just sit in the car and get some with a hose pipe to spray the car and see what comes in?
1646822314789


So the underlay has gone a bit rotten in one area. Could I just use normal carpet underlay of a similar material or would I be best trying to find special Automotive underlay?
1646822320712


Carpet is ready to be cleaned
1646822327665

Will give it a good hover first then hit it with an array of cleaning products and machines.
1646822332770
 
  • Like
Reactions: Charlie Farley
After a quick hover the carpet was hit with a chemical mixture of Vanish, vax carpet solution, dettol laundry & washing up liquid. Then scrubbing, pressure washing and a carpet cleaner it's come up nice and clean. Left it out in the sun and it has dried a little but will have to bring it in the house and get the heaters & dehumidifier on it. Mrs is not going to be happy.
1646822412200

Managed to find some wool underlay locally. As I going to be even further in the doghouse if that carpet has to spend days in the house while I wait for underlay. Looks the same sort of stuff to me just not as green!
1646822418932


Downside I had to buy 15m2 meters of the stuff
coocoo.gif
lmao.gif
If anyone needs any underlay just let me know
thumb.gif

1646822424153

Least now I can sort the underlay tomorrow and if the carpet dry's out then that can also be put back in the car. Which equals a happy wife for about 5 minutes!
 
  • Like
Reactions: Charlie Farley and bobby singh
Very good work - almost there now :)
Have you got a picture of the wiring from under the fuse box area? On mine there are plenty of connectors (oem) just connected together and then wrapped around the main loom. Doesn't look very oem to me but can not see any bracket etc to house them.
 
Very good work - almost there now :)
Have you got a picture of the wiring from under the fuse box area? On mine there are plenty of connectors (oem) just connected together and then wrapped around the main loom. Doesn't look very oem to me but can not see any bracket etc to house them.

I've also got a lot of lose connectors! Nothing like that on the A4 B5 of a similar age!
View attachment 251006
View attachment 251007
Have to tape this one up as it's just going to rattle. It's also labelled airbag as well:wtf:
View attachment 251008
View attachment 251009
 
  • Like
Reactions: Charlie Farley
Finished off the underlay and got the carpet in.

Built up the underlay to the same depth as the air vent
1647032920556

1647032930193


Refitted the carpet, but still found the single 10mm strip along the edge was not enough to stop the carpet from bowing if push down so added an extra 10mm strip
1647032939050

Refitted the carpets. car no longer has a horrible damp smell, and the carpet fits nicely along the edge, No more sagging, there is enough of that in my life
lmao.gif

1647032949106


Started to clean up the interior trim
1647032957010


Used hot water mixed with dettol washing detergent, vanish and fairly liquid to clean the trim panels
1647032962752


Also replaced all the bulbs, as it's not a 2 minute job to replace them when they fail.

Found these on the harness as well no idea why they needed to extend the harness
confused.gif
anyway they have been removed and binned!
1647032972477
 
  • Like
Reactions: tr7, Charlie Farley and bobby singh
Started to get more of the interior trim in the car before rain stopped play
1647033129126


The seats along with every other trim panel on the car has been thoroughly cleaned. Seats still need to go to a processional leather restorer, as the drivers side bolster is badly scuffed.
1647033135759


Also fixed one of the door card where the last person that removed them decided just prying them off was the best method of removal. Cut the ends off a couple of screws, heated them up and let them melt into the plastic. Refitted it the card and it held without any issue.
1647033141596
 
  • Like
Reactions: Charlie Farley and Sandra
Replacing the heater matrix is a job on my list. What to get it done before it springs a leak, as I know it will do at one point.
 
Refitted the interior today. Gone is the mouldy smell and most of the dirt.
1647124776218

1647124786762

Carpets now fit under the side plastic trims and don't bow out
1647124793019


Was going to put some fuel in the car, but it was getting late so will do that in the morning, as if there was a leak would rather fix it when I have plenty of daylight.

Even got the wheel trims on
1647124801009


Sill loads of jobs to do on the car and I need to look at the alignment.
 
  • Like
Reactions: tr7, Frizzley and Sandra
Got the car started over the weekend for the first time in 11 weeks. Had a little leak from the stainless compression joints so just tightened them up a bit more and the problem was fixed. Thankfully it's the only fuel leak I found.
1647546529922


Got my new sunroof seal with my tradition order, so took apart the "good" sunroof that came with the car. However While I was trying to figure out how to remove the glass panel from the mechanism it became clear the rust free panel was anything but!

So this morning I spent 3 hours slowly removing the frame from the glass.
1647546660941


When the main frame was removed there was still another section of the frame to remove
1647546668436


Will try and remove all of the old glass adhesive with a toffee wheel
1647546674267

The frame I'm going to get basted and powder coated.
1647546682376


Once that's done then I'll see if I can get a glass company to glue the sections together or I'll do it myself. Thankfully there are some little tabs that hold the frame to the glass so alignment should be easy enough. So what was a simple job of fitting a new seal as turned it a bigger and far more costly job.

On a more positive note, I also got my new rear arb bushes so was able to complete the final suspension job.
1647546693359
 
  • Like
Reactions: tr7
Did some basic alignment on the car, so that the rear & front wheels are all pointing in a similar direction to the opposite side. I've only got to drive it a couple of miles to get the the alignment place on the 25th and it's all 30mph roads, so should be good enough.

Found a wood working clamp holds the steering good enough
1647546839550

Then used my usual method to rest the wheels on which is 2 bits of plastic, one side being smooth and the other very rough and applied WD40 between the rough & smooth surface's. I found that to pieces of smooth plastic together with grease or WD40 causes the plastic to just about to stick together and you get very little movement between the two surfaces.
1647546846146


Tomorrow I need to look at the handbrake cable, as the one that is 50mm too long had the be on the side of the exhaust
irked.gif
So it a little to close for my liking. Will but some heat rap around the cable as a temporary measure until I place an order with tradition again at the end of the month.

Fixed a few issues on the to do list.

First was a smell of fuel in the car. Turns out when I was putting the sender cover back on the seal had folded into the tank on one side. took only a minute to correct the issue but about 20 minutes to strip the boot area.

Next up was the aerial, I was not getting any reception from the Sony radio that was in the car. It was also switching it's self on and off depending on how the wires were bent! So test fitted an old Audi head unit, switched it on and had perfect radio reception. So have junked the Sony unit and need to find a replacement Radio.
1647546892365


Fixed the cigarette lighter issue. Where the illumination bulb would be permanently on, and switch it self off when the lights get switched on. The cause of the fault was the two wires going to the cigarette lighter were the incorrect way around, so the body of the lighter was +12 rather than ground so swapped them over. Now the bulb only comes on with the headlights.
thumb.gif
 
  • Like
Reactions: tr7 and bobby singh
Few further jobs of the list today.

Replaced the lower trims
1647767107855

Starting to look better.
1647767115346

Replaced the boot seal.
1647767121237


Easy enough to fit but was a little tight, also takes a little more force to close the boot but there in no more play.
1647767128294


Also got all the wheel arch liners fitted, and fitted the bonnet stops. These are from a Ford MK1 Escort, as the Audi versions are NLA so that means the car will now completely disintegrate due to rust!
1647767229156


Also got the front lower lights on for the first time in 5 months, I'll look to start painting the grill's later today/tomorrow
1647767235686

Finally I see light in what has been a very long rusty and bodged tunnel.
 
  • Like
Reactions: tr7
Took the car out for a small drive this morning, tracking is all over the place as expected, but the car worked and drove without fault thankfully.

The lower trims were painted and put on the car this morning
1647767295639

1647767302077


Found I had some paint that I used on the A4 to restore some of it's trims so used this stuff
1647767308702

1647767315210
 
Painted the sill's yesterday, my absolute pet hate is masking cars, but I know overspray get's absolutely everywhere so it was well covered.
1647944977858

1647944983683

After the spay job I was not that happy with the result, as the paint looked too glossy. Guess I was not giving the paint enough of a chance to cure.
1647944989567


Anyway after being left for 24 hours, it looks far better
1647944999067


Also had another play with the alignment. Steering wheel was way off centre when I took it out for a drive yesterday morning. After another hour or so of playing around this morning it's now near enough after another quick drive. Looking forward to Friday and getting it fully aligned.
 
  • Like
Reactions: bobby singh
Sorted the lower rear bumper this week.

condition after a wash and then washed with thinners to remove years of various back to black products that will have been applied. It was also masked off including the underside as did not want overspray on the exhaust & heat shields.
1648151435071

Applied the plastic primer and the same paint I used on the sills and front plastic trims. Again it's a bit glossy at the moment as it's still wet but should look like the sill's once dried.
1648151445768

1648151452461

Front bumper to sort next but that has a couple of deep scratches so need to fix them and try and get a similar texture to the repair. Will also remove the bumper to fix that.
 
Gave a car a wipe down and clayed it today. It's comes up well, but there is still a fair amount of crap on the paint work. Going to wet sand the car at some point and polish it up. That's the first time it's be cleaned since I got the car.

This is also the first time I have really driven the car where I feel it's all working as it should be. I got the car October 2nd and less than 3 weeks later it was in bits and off the road.

Now that it's cleaner the wing has a better colour match.
1648151537259

1648151543133

1648151552534

1648151560871


So off for alignment tomorrow, and the heat wrap for the manifold should also arrive tomorrow so once both are done I will be happier to drive the car around.
 
  • Like
Reactions: S3quatt, tr7 and bobby singh
Car is looking nice mate
They are great cars and the engine sound is something else - the pain is worth it in the end :)
 
  • Like
Reactions: B5NUT
Had the alignment done on Friday and it's OK! However they only really looked at the toe setting and never touch anything else. So won't be using them again! Anyway the values are not that faraway from the factory settings and I've booked in the Automark to have it done properly in 7 weeks time.

So with the alignment done ish! Lava Heat Wrap was wrapped around the manifold and I fitted the refurbished injectors. With those jobs done I called it an end to the car being off the road and started driving it for the first time in 5 months. So far I've done over 120 miles this weekend and the only fault I have with the car is one of the front ABS sensors is not working correctly, I get an intermittent fault code about speed discrepancy for one of the front wheels and low speed braking I can feel a slight ABS pulse on the brakes (Tyre pressures are 36PSI all wheels). So will look for 2 replacement sensors.

I did also have another issue which I fixed as the bodged Exhaust system was able to touch the prop over rough roads. So that was slightly modified so that no longer happens but it's going to be replaced as I'm not happy with the system.

Today was the longest run. Just over 50 miles. A trip out to the seaside with my daughter who thinks the car is far better than my old last A6 Avant.. She is right about the S2. It is far better
thumb.gif
It puts a smile on my face. However I'm still a little on edge with the car as I keep looking for issues and looking & hearing for any problems, and wondering if I've made any mistakes with all the work I've done on the car. Think it's just a trust thing and I'm sure will improve over time, and once I get to know the car.
1648414489802


The other Issue I still have not been able to fix is getting the low speed fan to run if I press the AC button. My temps are fine it creeps just above 90 while idle in traffic and you can feel the fan kick in, so it's all working as it should. However I would like to fix this fault. Going to buy some replacement relays as I read that could be the issue.

I also need the aircon working in this car, so that's a job for next month as I'll step up my search for AC parts.

A job I have done over the weekend was to fit the new Radio. Found an new Pioneer unit on FB market place. I was looking around for this unit but it was out of stock everywhere. Also the FB seller was £60 cheaper than Halfords. It's a Pioneer DEH-S720DAB DEH-S720DAB - Car Receivers | Pioneer (pioneer-car.eu) Not what you call OEM looking but it's a nice unit which has dual BT, BT music streaming and DAB.

Only issue I had was mounting the DAB aerial, and I'm still not happy with the look of it. I was hoping you could mount the plastic box under the trim panel, but I could not get a good signal, you also need it to be grounded and it does not have a ground cable just a daft foil stick on strip (one that is black) what I had to make a plate as there is a rubber seal that goes all around the side window.
1648414499563

Once the upper B pillar trim is fitted you don't see that plate
1648414505757


Also had to make an extension cable, as the DAB aerial only comes with a 3 meter cable and is kind of designed to be mounted in the front window. That would do my nut in looking that that box every time I got in the car. Thankfully had some fakra parts and cable from my retrofit days so made a small extension up.
1648414523155


Still it's now in and working, just need to push it back in place once I fit the microphone as I ran out of time.
1648414530338


The big one tomorrow is the windscreen replacement, just hope they got the correct screen this time. Have to say I'm a little nervous! I got the lower trim piece but was not able to find the upper one so they are going to fit a generic trim part
irked.gif
I will ask if they can salvage the old one but almost sure they wont.
 
Finally got all the parts sorted to rebuild the sunroof.

Spent the best part of 2-3 hours removing all of the old sealant. Not sure if that is 100% required but would rather have it as clean as possible
1648581027631

1648581036462


Found these blades best to remove the old sealant, used about 5 new blades in total.
1648581040836


Received the adhesive to glue the frame & panel together. I got two tubes of the adhesive just in case I muck things up.
1648581044853


Got the parts back from being blasted and powder coated.
1648581051922


Sunroof glass was bonded to the frame, it's not the nicest stuff to work with and it goes off quickly. Also I wish I have another 4 clamps. but hopefully I won't have to do it again unless the other roof can be repaired but I think it past saving. I'll take that one apart once that panel is back in the car.
1648581096451
 
  • Like
Reactions: tr7
Been a while since I updated my thread and a good few jobs have been sorted.

I finally found a fix to the low speed fan issue not working with the AC button on the ABY. I was looking around on google images for ABY fuse boxes and it came up with lot's of images some were for B3 others for ABY but fuses and relays missing, found one that showed the delay relay & fuse fitted so figured I would give it a go.

Fitted relay for radiator fan delay and fuse number 20 for radiator fan 1st speed, radiator fan delay. Now have working 1st speed fan. No idea why someone removed this in the first place
1651953774159

1651953781563
 
  • Like
Reactions: tr7 and NHN
Another little job ticked off the list. Fix a couple of trim panels that had alloy corrosion.
1651953906942

1651953915204


Parts were shot blasted and the faces were sanded as the corrosion has caused some pitting.
1651953923893


Parts were then sprayed with a primer, black base coat, top coat and finally few coats of 2K clear.
1651953931718

They need a bit of polishing but unless the boot is open you will never see them


Colour match is also very good
1651953946363


Also fixed the bodge job the screen fitters left for me as they are still waiting on rivets, which is strange as I got them next day from TPS. So it appears they snapped the clips on the inner A pillar trim, rivets were missing and other not drilled out and stubs had been left in. Also found Torx head screws holding the black door frame trim in place rather than rivets. Took most a day to sort the mess out. I'm sure the other side in the same but ran out of rivets, so have ordered some more. So will inspect that next week. I really do hate other people working on my cars.
 
  • Like
Reactions: tr7 and NHN
found a very small coolant leak at the back of the engine. It was also clear the rocker cover gasket was starting to go as it there was a fair amount of oil at the back of the engine.

Before I tackled the above jobs I got on with the aircon system as I got some parts to get the system working again. So fitted a replacement compressor with replacement lower pipes that were free from holes.
1651954116085

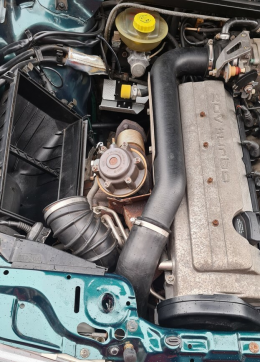
So with that done I went off to get the system gassed. Which did not go well. First there was some confusion about how the system was filled as the low pressure side port is a screw thread rather than the push fit on the R134 systems. So went with just testing the system using the high pressure port. That found another sizable hole behind the protective on the pipe in the image below as you can see some of the green oil that was spat out.
1651954124434


So at this point I got a little fed up with the car so purchased a new toy to fix that sort of BS.
1651954134637

After a long talk with the guy's at r-tech I went with the digital version, as it does appear to be easier to setup.
1651954166558


So on with fixing the pipe. The hole first hole was easy enough to repair. Once done I noticed the nut at the end would turn but not move down so after a bit of a smack it moved and it presented me with this.
1651954225258

There was no way my welding skills could have fixed that so near to that lip, so the pipe was scrap!
banghead.gif


Thankfully I was able to sort a replacement. It did have a small hole but was easy enough to fix even with my poor welding skills
1651954233505


So after cleaning up the area the hole was welded up. Not the best of jobs but OK for someone with about an hours worth of practice
1651954243645

At least now I should be able to fix and make some parts myself. Rather than standing in front of someone with a small job and them, sucking air through their teeth. It's almost like I've just dropped the titanic off for a quick welding job to get it up and running again!
mad.png


Also purchased these adapters, got two types to see which would be the best fit. Turns out the L shape one is better as there not much room near the compressor. I was concerned the push fit connector would not fit with the straight adapter attached.
1651954257353


Next up on the list was the coolant leak. Looking through the old threads most users have talked about the union being damaged due to it being brittle. So I ordered replacement unions as they are cheap enough.

After draining the coolant system which feels like I've done it hundred time now, the union was removed. It looked to be in very good condition, no cracks or damage and had no signs of being brittle.
1651954296228


The o-ring however was in a poor state, that was starting to crack and was no longer round. So I refitted the old union with a new o-ring which I hope will resolve the minor coolant leak.

To give better access to the union I removed the heat shield that protects the brake reservoir. It was covered in rust and looked very scabby.
1651954336533


The rivets were drilled out and all the parts shot blasted.
1651954345831


The heat shield material was then painted with high temp paint and the steal parts with epoxy. While the Mrs was out I put the parts painted with the high temp paint in the over to cure
shhh.gif
Once dry the shield was rebuilt.
1651954357303

1651954362147


Next up was the cam cover gasket. When it was removed it was on the hard/crusty side. However I was pleased with what I found when I removed the cover. It looks nice and clean in there.
1651954368139


Cam lobs also look in good condition, and the chain appeared to be tight enough.
1651954377447


Engine was then put back together and so far no leaks of oil or coolant. Which is nice. :thumbs up:
 

Attachments

  • 1651954390123.png
    1651954390123.png
    910.1 KB · Views: 107
  • Like
Reactions: bobby singh, abmat and NHN
Love the work mate, great and, keep it up.
 
One of the still remaining issues on the car was the exhaust system, on rough roads it was able to touch the prop shaft. I modified one of the hanger brackets a while ago to stop it from happening, however It still happened depending on the road. Another bugbear of the system was the alignment of the tail pipes, and I also hated the U-camp setup. made it very difficult to get the alignment right.

With the exhaust system removed, the drivers side handbrake cable was removed. I used a passenger one from a none quattro model which is about 5cm longer and it gets a little to close for the exhaust for my liking. Thankfully they are still available from tradition.
1654029442096

1654029446261


For the exhaust I chopped of the expanded end, these were both from the middle section also had to cut the one from the back section as well.
1654029453873


Ordered 3 stainless sleeves. The middle sections is 2" and the rear section is made from 2.25" stainless
1654029462892

Unfortunately only 2 of the 3 clamp I ordered turned up so had to improvise with PVC pipe and hose clips. Told It won't last 5 minutes, but I think they are wrong should last at least 7 minutes
lmao.gif

1654029469637


So the middle box would not hit the prop shaft the hanger welded to the box had to be modified. Tried the using the MAP torch to get the hanger hot enough so I could bend it but not a chance, so got creative with the TIG. After 30 minutes or so I finally got the hanger correct so the alignment was correct. Not the nicest looking but at some point I will replace the entire system.

1654029478943


Missing sleeve also turned up. Not too keen on the look of the plastic one
rolleyes.png

1654029491624


With the centre section fixed I started on the back box. The tail pipes were sitting far too low, so had to bend the pipe slightly. However I had no idea how to bend 57mm stainless steel pipe with the tools I had at home. Only option that I came up with was to cut a 2mm slit across most of the dimeter of the pipe then bend it in the correct direction. Tacked it first then refitted to the car once happy with the fit I welded it back up. My welding is not the best but it's the first time I've welded steel using the tig. Ground back the weld a little then fitted the sleeve.

1654029499262


This was the original alignment
1654029510093


New alignment. It also sits more flush with the bumper.
1654029518185


Another job done. Removed the oil splash guard. These are known to break up with age and send plastic bit all over the engine, It had already cracked in two places so I'm glad it's been removed.
1654029571361
 
  • Like
Reactions: NHN
Replace the brake switch. Don't think there is anything wrong with the switch just the plastic thread has been damaged so think it's slipping over time in the housing. Once it moves too far it no longer activates the brake lights.
1654029824651


Had the door cards off the other day as I was looking into a central locking issue, where the pump would continue to run on for another 10 seconds after the car was unlocked. While the passenger side door card was removed I found an old Motorola tracker fitted to the car, with a heavy little battery attached to it which was dead as it was only reading 0.6V . So it's all been removed and the harness fixed where they had tapped into it for power.
1654030066625

1654030071558
 
  • Like
Reactions: NHN
Had the car through it's MOT at the weekend. It passed with no advisories. However, the emissions where on the high side and the exhaust gasses do smell a little rich. So I've ordered a new Lambda sensor. I've recently had the injectors cleaned and also replaced the coolant temperature sensor that the ECU uses. Just in case it's reporting the wrong temperature to the ECU and keeping the mixture too rich.

Also had a quick look at the history of the car and there has been nothing there about emissions, But I guess a pass is a pass regardless of how close it is to the limit line. So I have no idea how long it's been running rich.
1654030382475


Received the Bosch Lambda sensor this morning, so cracked on removing the old one. It put up a hell of a fight. My lambda removal tool would not touch it. It just started spreading apart at the bottom of the socket and slipping on the nut. Thankfully found a more heavy duty removal tool at Machine Mart that did the trick.

Does not look in the best of condition and 2 out of the 3 holes were almost blocked.
1654030462127


If I'm reading this right it was manufactured week 51 1994 so the original sensor for the car.
1654030470723


Went back to the garage that tested the car and now the emissions are excellent and well below the limit. He was surprised by how much the car has improved, and how low they were for a car of it's age.
 
  • Like
Reactions: Sandra, tr7 and NHN
That feeling of fitting the new lambda & it fixes it, lol, it's almost addictive.
 
  • Like
Reactions: B5NUT
Yes, have to agree the result has been impressive. Went over the Scarborough VIA Thornton-le-Dale. and got an impressive 29.1 MPG
1654339371232


On a side note If anyone is thinking about a trip to the old Mathewsons place to have a look around I would not bother. They have removed all of the memorabilia from the showroom and it's now full of branded Bangers and Cash tat like T-shirts, and other branded junk :wtf: :rage: .
 
29.1 ftw damn that's better than modern day lol
 
  • Like
Reactions: tr7, bobby singh and B5NUT
Replaced some of the vacuum hoses as they were not in the best of condition around the clips.
1654454817695


Had a trip out to Whitby same roads as the one to Scarborough. Also same sort of driving condition, but the roads were wet on the drive back. Anyway with the vacuum pipes change the MPG is now up again this time 33.2MPG. More than happy with that.
1654454714952


Will be performing a boost leak check this week, so will see if that brings any issues up.
 
  • Like
Reactions: tr7
That's a considerable change tbh, only gets better :)
 
  • Like
Reactions: B5NUT
Replaced the brake reservoir. For some reason someone had removed the filter on the old tank and there was a fair amount of dirt in there.
1655031928070


Fitted new seals as they are still used in a lot of VAG group cars PN# 357611817 about £4 each
1655031937088

New tank fitted and you will need to cut the end bit off where I assume the rubber pipe connected to the reservoir is for the clutch system. Tanks are still available from Tradition PN#8A0611301B.
1655031949543
 
  • Like
Reactions: NHN and tr7
Monday morning waking upto that is kinda nice, lol, clean, new, OCD on fire.
 
About time I did some updates on my S2 as I've done a fair amount of work on the car.

First off was the front wings again! At some point in this car's life it's been blown over and they either did a **** poor job at mixing the paint correctly to get the factory colour or the last customer asked for a slight modification to the colour to give a more pearlescent effect on the paint. Either way the factory colour is now way off. So after 6 attempts at getting the colour correct I finally have a good colour match to the car that I'm happy with that I won't notice every time I look at the car.
1663357345814


So this is now the paint code for my car. It's better than nothing but would rather have it the factory colour code, and not some slightly bastardised version of emerald green!
1663357390138


With the passenger side wing done I moved on to sort the drives side wing, While using the wire brush on the drill to get into all the edges to remove the surface rust, the wire brush when straight through the panel at the bottom of the wing.

It's clear the wing has seen work before, as it was covered in filler and sealant (all now removed) and masses of black schutz that had just been painted over the rust.
1663357608389

No before image of the hole but this was the amount of welding required. I used my old gasless MIG on this as there would be no way I could have done this on the TIG. Which reminds me I need to get my MIG welder converted to gas.

Not the best of looking but better and stronger than filler (I hope). I'll just now need to use a small amount of filler to get the panel perfect.
1663357659718

1663357668892


Also had to repair the upper mounting point for the front bumper as it had been almost snapped off and the hole had been damaged.
1663357687467

Back of the wing after being having all the rust removed and a rust converter applied as I'm never going to get rid of all the pitting.
1663357710252


For the rear side of the wing I've used a Lechler Two-pack epoxy primer-sealer/filler which has an anticorrosion zinc-phosphate in the paint. I used to sear buy the epoxy from rust.co.uk but they changed the formal of their latest stuff and really don't rate it anymore. Nice things about the Lechler is it can be matched to any solid colour you what.
1663357746832


Once the back was done I moved on to the front, the poor welding was covered by a little bit of filler and then painted. Took a while to paint the wing as I kept getting fry up from some of the old paint where I had gone down to the metal. So had to sand them back and build up very light coats to stop any further fry up from happening. I've given it a good 4 coats of 2K clear so I have plenty of clear to flatten back and polish up.
1663357838157

The wings are 95% OK, there is a slight difference in very bright sunlight from certain angles.
1663358111247
 
  • Like
Reactions: bobby singh and NHN
One of things on my car that bugged me was the radiator. With the old one full of rust & gunk I had to replace it with a 34mm core rather then the 44mm core the S2 had as standard. So I was able to source a 44mm radiator, however when I removed the 34MM rad I noticed the cowling was rubbing against the chassis leg. Now I know the get is straight as it's clear the car has never been in an accident and the front end aligns perfectly. So it must be the the lower rad mount has been welded slightly out at the factory. Below shows the inner of the chassis leg where the paint has rubbed down to the metal.
1663358768601

The replacement radiator has brass end tanks so I had a radiator place remove and move the lower mount by 5mm to give the clearance I needed.
1663358869434


Once I got the radiator back, it was repainted with Epoxy.
1663358914836


So while I'm in there I decided to do something about the ticking time bomb that is the metal water pipe, that appears to rot away and there is no solution for replacements at the moment. I also removed the rubber pipe as I purchased a spare one last year. I was also told these do fail as well.
1663358972012

So after being blasted it was sprayed in with a large amount of epoxy to try and keep the rust at bay. Think It now should last a good 10 + years. if I'd have left it would be be holed in the next couple of years so it's was now or never. It was also a complete pain in the backside to remove the pipe. Cannot believe it secured with one of the gearbox mount bolts and then the 2 wiring harness clips were also a complete pain to open and release the harness.
1663359019738


So far the new radiator is handling the heat better than the 34mm core. I think is down to the larger core and the fact that I used at least 1 and 1/2 liters of extra coolant over the 34mm rad. Also flushed the coolant system again and refilled with fresh coolant. As I'm trying to get rid of the rust in the system. This is the downside of leaving cars to stand for years and not changing the coolant!
1663359100223
 
  • Like
Reactions: NHN
Had a couple of error codes on the car.

First one is this
00561 - Mixture Adaptation
13-00 - Adaptation Limit (Mul) Not Reached

Second code is
00544 - Maximum Boost Pressure Exceeded.

This happened a few weeks back when I was on my way back from meeting a friend over in wales. I was doing an over take and very soon afterwards it started to cut the boost no matter what gear I was in! I pulled in a little further down restarted the car and it was back to normal power. I've tried to replicate this again but with no luck. I wonder if I got a little to close to the red line.

I've cleared the codes and only the 00561 came back. After talking with a few people about the fault they all said the same issue which was a boost leak.

So I've started to make my own boost pressure kit. Got one of these for £9. It's a cheap 79mm hole saw.
1663359541958


It was chopped down and welded all the holes up except the centre hole, as it was a perfect fit for a tyre valve.
1663359554662

It still needs a coat of paint but it should do the job.

To plug the boost pressure control valve, I've cut off the top of one of the old S2 front shock absorbers. It's was a perfect fit.
1663359581070

Was also told to check the crank ventilation system. I'm glad I did as it was in a bit of a state.

Valve was caked with thick oily crud inside.
1663359717522

Then I found this.
1663359731924

Which I found it inside this pipe
1663359762781

I cleaned it up and it now looks like this.
1663359786742


VW/Audi call it a "Flame Deflector Plate" and has part number 035103477A They are obsolete but can be purchased from VW Classic and Tradition. Will just be cleaning my one up and putting it back in.

It should look like this. I flatted my plate out and gave it another clean so it does look at little better (Not that you will ever see it).
1663359905246


Got new valves sorted.
1663360118868


Also cleaned up more metal pipe work in the engine bay.
1663360172085


Quick blast and it's come up Ok. Then spray coated in epoxy.
1663360188653
1663360193526


Once the breather system was refitted. I started the pressure test. I used a Makita 18v tyre inflator to pressurise the system, as I could not be bothered to get the compressor running and get all the hoses out.
1663360257776


Started with a low pressure of 8 PSI which instantly got results. was getting a bubbles from the idling speed control valve.
1663360277216


I also had a very loud hissing coming from around the turbo. I ended up removing the bumper which did not make much difference to be able examine the hoses while fitted to the car. However it allowed me to remove the lower hose and test it off the car using some more modified hole saws. Tested all the pipes individually going to the turbo but found no leaks.

I'm guessing the lower hose attached to the turbo was not secure enough or it was not on correctly. Either way after putting the hoses back on and making sure they were all secure, the hissing noise went away. So I can only think that was the source of all my problems. It's nice and dry at the moment so will take the car out for a spin and see if the fault codes return.

I also don't believe any of valves that I have replaced were the cause of the fault code. However I think changing them was the right thing to do. They have seen 110K miles and are 27 years old, they were also cheap enough and not too much damage to the wallet was done by changing them. It was also good to find and clean the flame deflector plate as that must have been creating a blockage in the system.

Took the car out for a nice long run and it's now pulling very well all the way to 7K RPM. and I no longer have any fault codes.
 
  • Like
Reactions: NHN
Love the updates, keep them coming.

The state of that copper wirey thing probably didn't help.
 
  • Like
Reactions: B5NUT
Also did a few smaller jobs on the car that needed looking at.

Replaced the upper cowling around the steering wheel. Mine had been damaged by some ham fisted idiot at some point in it's life.
1663360907688


It also has had a hole drilled into it at some point, and then filled in.
1663360948087


Got a new one from Tradition
1663360964370


Fixed a bracket on the washer tank. When I removed the bumper a piece of plastic dropped off the car, and no idea where it came from! Anyway I found out a few days afterwards

Bracket holding the washer pumps on the washer tank had failed
1663361051042


Drilled 3 holes for some screws on the snapped bracket and heated the end of the screws up so they melted into the plastic on the tank.
1663361093751


Then used milliput epoxy putty to strengthen the area.
1663361109500


It's a bit of a bodge but I will order a replacement tank from tradition when I place the next order. However it's holding the pump just fine until a replacement arrives.
1663361124656


Next job was caused by a driver who was given their license from Kellogg's. They pulled out on me and I had to slam my brakes on! After that the blower motor started making a rattling sound. After spending a while getting the motor out, which I have to say was a complete pain in the backside. I checked the housing and the fan which was cleaned out and the rattle was still there. So stripped the motor out and this came out! No idea what it is or how it got inside the motor housing.
1663361177426


Next up was to service the wiper linkage. To be fair it was in excellent condition, I was expecting the shafts to have started to rust but the only issue I found was the grease had dried out, on everything except the inside the gearbox cover. So a bit of regressing and it's running smoothly again. At least the wiper mechanism was easier to remove than the blower motor!
1663361246336


Final job was the aerial seal around the base was starting to split, which I figured at some point will let water in.

Got a replacement aerial.
1663361269647


Looks to be a perfect fit, the square fitment locator was the same and the connectors are the same so it was plug and play.
1663361285605


With all that done. The car gave me a new job to at some point the very small soldered bulbs that illuminate the outside temperature gauge have failed so another job to add to the list.
1663361411319
 
  • Like
Reactions: NHN
Love the updates, keep them coming.

The state of that copper wirey thing probably didn't help.

I'm glad I found it. I've never even heard of a flame deflector plate, or that the car had one and it could be in that condition.
 
  • Like
Reactions: NHN and Sandra

Similar threads

M
Replies
30
Views
32K
Replies
0
Views
5K
Replies
6
Views
11K
Replies
0
Views
3K