I’ve spent the last few months upgrading the sound system in my A3 convertible S-Line 1.4 TFSI CoD. I've been significantly helped by threads on this forum (serious respect to the definitive guide to B&O retrofit by airbus319), and thought I’d try and help others by setting out a guide to how I achieved it.
Just to say at the outset that I’m an obsessive perfectionist and audiophile so I wanted to get to a system which wasn’t just loud and boomy but achieved what I consider to be as real a Hifi sound that is possible in the A3 8v convertible without spending really ridiculous amounts of money. It still cost quite a bit… (See the spreadsheet attached).
So – what I started with was:
Next was to get the sound improved, and for that I wanted something better than the B&O which as we all know harks back to the old BL ‘badge engineering’ days (i.e. it’s not actually made by B&O but under some kind of licensing type deal).
1st step was the following:
So, deep breath, I decided to go the whole hog and go for a 2 amp and subwoofer set up, but given that I wanted it to be a completely stealth install and for the subwoofer to not intrude into the boot space I decided on purchasing and adapting the B&O spare wheel well mounted sub. And also purchasing and adapting the amp enclosure and mounting bracket for the B&O amp so that the 4 channel amp for the main speakers could be hidden under the passenger seat.
Sub Install/modifications
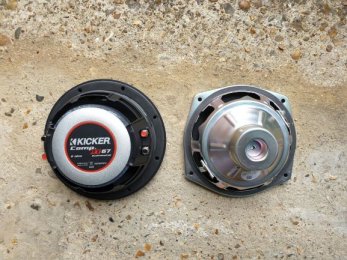
I purchased the B&O sub spare wheel mounted sub from EBay for less than £100. It comes with a 100w dual voice coil driver. However, once I pulled this driver out it was very apparent that it wasn’t up to much. So I set about finding a replacement driver. See pictures of the magnet assembly of the B&O driver (right speaker in photo) compared with the replacement unit I used:

I went for a Kicker Competition 6.75” driver, dual voice coil, this is it: Kicker Comp RT672. There are very few that are this size and I also needed a narrow mounting depth to fit into the B&O enclosure. I should say at this point that if you are going to go down this route and not using the B&O driver then you can save yourself some money by buying the A** sub as you only need the enclosure. However even with this Kicker driver the sub enclosure needs modifying for the driver to fit properly, as follows:
Starting point was to get an amp to fit in the spare wheel well as I wanted all the (limited!) boot space available. Also to get an amp which could be fed a signal from the main amp (more on this later) and was appropriate for the power input of the Kicker unit.
I went for a JL Audio JX 250, which worked on all accounts. If I did it again I’d probably go for the next model up, the JD250 (which is physically roughly the same size), though the JX is available for a good price given (I think) it is being discontinued and replaced by the JD.
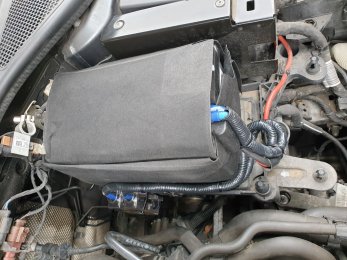
This amp needs to be mounted on a solid base so I fabricated one from wood, contoured to fit the wheel well (this is tricky as you need to get it to fit a 3D depression with bumps and dips) and sprayed with many many coats of paint to make it smooth and resistant to any moisture. I fixed it to the car using a construction glue (Sticks like sh*t ultimate). When finished and with amp mounted it looked like this:

 I
I
Note - I neatly drilled a hole in the plastic trim (see immediately above), so that the screw to fix the amp to mounting can be turned easily.
I also fabricated a mounting plate for the sub wiring connector and there are some pins which stick out horizontally from the rear vertical face of the wheel well to glue it to. Again, fabricated from wood and sprayed many many times. I glued it to the car with Araldite rapid. This needs to be fixed to the car very securely as the connector needs a significant pull to break apart. Finished article before the sub connector fitted:
 The earth for the sub amp was bolted to a flange in the wheel well (needed drilling and a substantial connector), the power and signal wires are fed through from the main cabin and there are some holes in the chassis which allow this without drilling. Make sure you use rubber grommets at these entry points, though.
Photos of this work and the finished install below:


Note in the picture above that I have run the power and ground cables for the amp on the RHS and the signal cables on the LHS (this is good practice to reduce interference).
Main Amp install
This was the hardest bit and required a lot of modifications to the B&O amp bracket , B&O amp cover, carpet, sound deadening and flooring under the passenger seat.
The process is as set out below, though note this was for the install of the JL audio JD400/4 amp that I used and if you go for a different amp then the cutting of the amp bracket and carpet/underlay will need to be different.
Big thanks to Phil at Road Radio (Redhill) for his patience and work on this. We used 2x Stinger amp wiring kits, and Audison Line output connector and Audison interconnects – these are very high quality and shielded which is important. I’m not going to go into huge detail here as I assume you either know what you’re doing or will get a professional to do this. Suffice to say what needs to happen roughly is:


As I mentioned before - you need to remove the passenger seat to do this easily. Be careful re airbag, make sure ignition off and key out before undoing any of the connectors, and ideally undo main battery.
Speaker install and sound deadening to doors
Again, thanks to Phil at Road Radio Redhill for his work on this.
Now that you’ve got substantial power (560w RMS) (the B&O system has 720 'marketing watts'...hmmm I expect this is PMPO) you need to make sure that the speakers are secured properly, damped and that the doors don’t rattle. Essentially what we did was:
At some point in the future I'm going to wrap the line output convertor in lead to remove the small amount of residual interference (hopefully). Seen Chernobyl anyone?
Parts list and costs
A full parts list, what they’re used for, where from is attached. It comes in at just over a grand, but this is less than what some places charge for the B&O retrofit. Remember the size of that magnet assembly, just saying! You can adapt this as necessary.
Hope this helps if any of you are keen to give it a go. I am hugely pleased with the result and now have friends asking me to take them out in the ‘mobile Hifi’ to listen to their favourite tunes.
Just to say at the outset that I’m an obsessive perfectionist and audiophile so I wanted to get to a system which wasn’t just loud and boomy but achieved what I consider to be as real a Hifi sound that is possible in the A3 8v convertible without spending really ridiculous amounts of money. It still cost quite a bit… (See the spreadsheet attached).
So – what I started with was:
- Standard 5.8 inch screen, PFL Nav and MiB unit
- No sub
- Standard sound system
Next was to get the sound improved, and for that I wanted something better than the B&O which as we all know harks back to the old BL ‘badge engineering’ days (i.e. it’s not actually made by B&O but under some kind of licensing type deal).
1st step was the following:
- 4x Focal PS 165v1 speakers in doors and rear ¼ panel enclosure – these have won numerous awards and are a reasonable price (c£160 a pair).
- Focal impulse 4.320 amp
So, deep breath, I decided to go the whole hog and go for a 2 amp and subwoofer set up, but given that I wanted it to be a completely stealth install and for the subwoofer to not intrude into the boot space I decided on purchasing and adapting the B&O spare wheel well mounted sub. And also purchasing and adapting the amp enclosure and mounting bracket for the B&O amp so that the 4 channel amp for the main speakers could be hidden under the passenger seat.
Sub Install/modifications
I purchased the B&O sub spare wheel mounted sub from EBay for less than £100. It comes with a 100w dual voice coil driver. However, once I pulled this driver out it was very apparent that it wasn’t up to much. So I set about finding a replacement driver. See pictures of the magnet assembly of the B&O driver (right speaker in photo) compared with the replacement unit I used:
I went for a Kicker Competition 6.75” driver, dual voice coil, this is it: Kicker Comp RT672. There are very few that are this size and I also needed a narrow mounting depth to fit into the B&O enclosure. I should say at this point that if you are going to go down this route and not using the B&O driver then you can save yourself some money by buying the A** sub as you only need the enclosure. However even with this Kicker driver the sub enclosure needs modifying for the driver to fit properly, as follows:
- An 8mm 165mm MDF speaker mounting spacer is required. I got a pair from Amazon for £6.89 see here: speaker spacer. Sprayed matt black for visual continuity.
- The Kicker driver requires the plastic trim to be cut away as per the photo above: It can’t be removed entirely (I spoke to Kicker customer support on this) as the plastic moulding supports the speaker connections.
- As the enclosure is a plastic moulding with some resonance, it ideally needs filling with speaker dampening material – here is what I used: speaker wadding
- The knurled nut that holds the sub in place needs trimming as per photo below:
this is so that it can be turned with the bigger drive unit in place. - I also modified the cable routing so that it has a cable clip so that the connections to the sub are not under strain.
- You’ll need a substantial quick release connector for the sub wiring, and I used this: amp quick release connector purchased from eBay.
- You’ll need the longer bolt to hold the sub into the spare wheel well, see parts list attached for details.
Starting point was to get an amp to fit in the spare wheel well as I wanted all the (limited!) boot space available. Also to get an amp which could be fed a signal from the main amp (more on this later) and was appropriate for the power input of the Kicker unit.
I went for a JL Audio JX 250, which worked on all accounts. If I did it again I’d probably go for the next model up, the JD250 (which is physically roughly the same size), though the JX is available for a good price given (I think) it is being discontinued and replaced by the JD.
This amp needs to be mounted on a solid base so I fabricated one from wood, contoured to fit the wheel well (this is tricky as you need to get it to fit a 3D depression with bumps and dips) and sprayed with many many coats of paint to make it smooth and resistant to any moisture. I fixed it to the car using a construction glue (Sticks like sh*t ultimate). When finished and with amp mounted it looked like this:
Note - I neatly drilled a hole in the plastic trim (see immediately above), so that the screw to fix the amp to mounting can be turned easily.
I also fabricated a mounting plate for the sub wiring connector and there are some pins which stick out horizontally from the rear vertical face of the wheel well to glue it to. Again, fabricated from wood and sprayed many many times. I glued it to the car with Araldite rapid. This needs to be fixed to the car very securely as the connector needs a significant pull to break apart. Finished article before the sub connector fitted:
Photos of this work and the finished install below:
Note in the picture above that I have run the power and ground cables for the amp on the RHS and the signal cables on the LHS (this is good practice to reduce interference).
Main Amp install
This was the hardest bit and required a lot of modifications to the B&O amp bracket , B&O amp cover, carpet, sound deadening and flooring under the passenger seat.
The process is as set out below, though note this was for the install of the JL audio JD400/4 amp that I used and if you go for a different amp then the cutting of the amp bracket and carpet/underlay will need to be different.
- Fully push back the passenger seat. And remove make sure ignition is off first (or else you may activate an airbag!)
- Use the amp cover as a template for cutting the carpet. Measure twice, cut once as they say
- Remove the carpet to the extent shown in the picture:
You can see in the right side of the picture above the fabricated bracket for the amp to fix to. You'll need to make your own one of these to fit what ever amp you are using. You guessed it, from wood, sprayed may times. - Trim away the sound deadening to the extent shown in the photo above – do this carefully - the plastic conduit for the air to the rear foot wells is under here and you don’t want to inadvertently cut through it
- You then end up with a hole in the carpet and sound deadening that looks like this (this picture shows the trimmed amp bracket - see below - in position, too):
This enables the JD400/4 amp to sit lower in the car so that it has room above it underneath the amp cover for air to circulate. - You then need to set about modifying the B&O amp bracket to fit the new amp to it. I did this with a junior hacksaw. The idea is to allow the amp to be fixed by the front 2 screws to the bracket and allow it to tip backwards to your new mounting points (see photo above). See photos below to give you a clearer picture of how to trim this (though note this will be amp specific)
- Once this is done you need to fabricate mounting points for the rear part of the amp to fix to, and again I used wood, glued to the car metal work with Araldite and sprayed black (again see mounting for amp photo above)
- You also need to get a captive nut installed in the car (a friendly Audi dealer might do this for you – in my case thanks to Phil at 5 Oaks Audi) to bolt the bracket to and the mounting bolts as per the details in the parts list at the end of this thread.
- Once you’ve done all this, have a cup of tea and it should all now look like this:
Big thanks to Phil at Road Radio (Redhill) for his patience and work on this. We used 2x Stinger amp wiring kits, and Audison Line output connector and Audison interconnects – these are very high quality and shielded which is important. I’m not going to go into huge detail here as I assume you either know what you’re doing or will get a professional to do this. Suffice to say what needs to happen roughly is:
- Engine bay – battery removed and power cables run off +ve terminal off battery and run through the bulkhead (there are holes for this). The kits I used were 4AWG gauge wire and with 2x40amp fuses (!!)
- Line out convertor fitted – this sits inside the dash and you need to remove the glovebox and MiB unit to fit, there are other guides on here on how to remove glove box so I won’t repeat that here. Make sure you use a high quality shielded one. I used this: Audison Connection SLI4 line output convertor
- Wiring run from LoC to amp along the transmission tunnel (under carpet)
- Earth cable run from amp to main vehicle earth
- Output from main amp to sub amp via RCA cables. You’ll need 5 metre ones.
- Make sure all cables are secure and properly wrapped with loom tape to avoid rattles
As I mentioned before - you need to remove the passenger seat to do this easily. Be careful re airbag, make sure ignition off and key out before undoing any of the connectors, and ideally undo main battery.
Speaker install and sound deadening to doors
Again, thanks to Phil at Road Radio Redhill for his work on this.
Now that you’ve got substantial power (560w RMS) (the B&O system has 720 'marketing watts'...hmmm I expect this is PMPO) you need to make sure that the speakers are secured properly, damped and that the doors don’t rattle. Essentially what we did was:
- Use Connects2 speaker adaptor rings to fit the speakers into from doors. I wrapped these with sound deadening material and we used hot glue gun glue to avoid rattles.
- The front doors were fitted with Noico 2mm material (fully), and the access panel also covered, see pictures below:
- Standing wave rings added behind the drive units
- [Not done yet but will be!] speaker flare cones to direct sound into cabin and seal against the inner side of the door speaker grill on the door card. I used these speaker flare cones and standing wave rings
- Tweeters go in the A panel trim as per factory fit items. The A panel trims come off with trim removal tool. Crossovers installed in dash. Tweeters fixed in place with hot glue.
- Front speakers wires using the Audi wiring pre crossovers which are fixed to inner door panel behind door card (see photo above)
- The speakers in the rear ¼ panel needed mounting brackets fabricating and in the end we didn’t use the stock Audi wiring, running wiring to these directly from the main amp.
- The rear ¼ panels can be removed with trim tool (start from back and top and they pull down)
- Crossovers for rear speakers installed under ¼ panel trim – they can be pushed under from where the rear seat squab would be and fixed with foam pads so they don’t move/rattle.
At some point in the future I'm going to wrap the line output convertor in lead to remove the small amount of residual interference (hopefully). Seen Chernobyl anyone?
Parts list and costs
A full parts list, what they’re used for, where from is attached. It comes in at just over a grand, but this is less than what some places charge for the B&O retrofit. Remember the size of that magnet assembly, just saying! You can adapt this as necessary.
Hope this helps if any of you are keen to give it a go. I am hugely pleased with the result and now have friends asking me to take them out in the ‘mobile Hifi’ to listen to their favourite tunes.