

Facelift Audi A3 8V s-line FRONT BUMPER SENSORS RETROFIT
- Thread starter Rico2020
- Start date
You are using an out of date browser. It may not display this or other websites correctly.
You should upgrade or use an alternative browser.
You should upgrade or use an alternative browser.
@Potterswheel I think we might have the same supplier. No not yet did all your parts come ok? All working?
Sent from my iPhone using Tapatalk
Sent from my iPhone using Tapatalk

I am still waiting for the front sensor brackets, they were promised for yesterday - but hey there's time yet!!!!
Would you believe the brackets arrived Saturday, one of them was broken!!!!!!!!

I have ordered another from Amazon.DE more expensive but I am hoping for German efficiency and a propt and safe delivery!!!!!
How are you doing???
I have ordered another from Amazon.DE more expensive but I am hoping for German efficiency and a propt and safe delivery!!!!!
How are you doing???
Front sensor holders arrived today - let battle commence.
As I thought good old German efficiency!!!! danke
AND I have received a refund for the broken one!!! result
As I thought good old German efficiency!!!! danke
AND I have received a refund for the broken one!!! result


There are many videos of this on the 'tube', but I thought I would add my '2 penneth' here as just someone doing this for the first time with normal home gear and none of the American Sh1t that usually goes with these videos. and on a FL
So started this afternoon, when the sensor brackets arrive they are made from a greasy sort of plastic (polypropylene I think ppt20 ) which I don't feel confident in the results of glueing - it worked on the back....


So the first job was to rough them up a bit with rough emery cloth to give the adhesive something to get its teeth into

When test fitting, I also felt that the sensors were too tight a fit in the brackets so I took a bit off the locating tangs, thinking that the first time that anyone tried to remove a sensor they would just pull the bracket off the bumper, this made them a little easier to remove, I also extended the split in the side of the brackets to also help with this a little further.


Left tang reduced slot extended 2mm in top bracket
With brackets and sensors ready ( the sensors have already been painted) I jacked up and supported the front of the car on my trusty pit boards and dropped the belly pan and undid three Torx screws each side in the wheelarch liner

And then up top removed the 3 Torx screws from in the inner arch liners (red)

Accepted knowledge is to just remove the 3 red screws but I have also removed all the remaining screws from the front half of the liner (Green) to give me more wiggle room rather than risk damaging the liner.

liner dropped
this was done in both front wheel arches


You then have to undo this bolt for which you need this extension even with the inner arch mostly undone
again done on both sides
You then have to undo a bolt which goes up through both the bumper and wing and on into a bracket, again accepted wisdom is that you only undo the one nearest to the wheel arch (green), but I undid both (red) as with the liner almost dropped you have better access.


bolts the bracket

the bumper edge
Armed with the above you stand a better chance of removing the bumper without a fight, you can see which holes in the bumper go on which clips!!
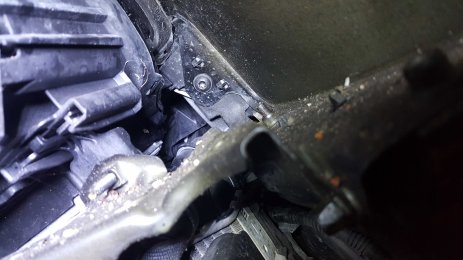
All that remains is the cable for the headlamp washer system on the nearside and this can be undone before you remove the bumper, and the headlamp washer system supply pipe on the offside, there is no temperature sensor on my FL bumper!!

This is really tight but can be persuaded to part with care.
At this point I enlisted the help of my very patient wife to help me carefully lift the bumper forwards and it came off easily and with no force.

here is the cable for the headlamp washer system which can now be seen

Time for a bath

If you are thinking of taking the 4 rings off a standard grill this is the back!!! you would need to undo these 2 Torx screws from the front!!

Here are the markings for the sensor positions on the front of the bumper


center outside
As you can see my center brackets are nothing like and are going to need some fettling, as I have heard others have needed too, there are so many different grills and number plate mountings that there are loads of brackets.
So all in all a successful afternoon, nothing broken, nothing lost, mission achieved and ready for the next phase
watch this space!!!
So started this afternoon, when the sensor brackets arrive they are made from a greasy sort of plastic (polypropylene I think ppt20 ) which I don't feel confident in the results of glueing - it worked on the back....
So the first job was to rough them up a bit with rough emery cloth to give the adhesive something to get its teeth into
When test fitting, I also felt that the sensors were too tight a fit in the brackets so I took a bit off the locating tangs, thinking that the first time that anyone tried to remove a sensor they would just pull the bracket off the bumper, this made them a little easier to remove, I also extended the split in the side of the brackets to also help with this a little further.
Left tang reduced slot extended 2mm in top bracket
With brackets and sensors ready ( the sensors have already been painted) I jacked up and supported the front of the car on my trusty pit boards and dropped the belly pan and undid three Torx screws each side in the wheelarch liner
And then up top removed the 3 Torx screws from in the inner arch liners (red)
Accepted knowledge is to just remove the 3 red screws but I have also removed all the remaining screws from the front half of the liner (Green) to give me more wiggle room rather than risk damaging the liner.
liner dropped
this was done in both front wheel arches
You then have to undo this bolt for which you need this extension even with the inner arch mostly undone
again done on both sides
You then have to undo a bolt which goes up through both the bumper and wing and on into a bracket, again accepted wisdom is that you only undo the one nearest to the wheel arch (green), but I undid both (red) as with the liner almost dropped you have better access.
bolts the bracket
the bumper edge
Armed with the above you stand a better chance of removing the bumper without a fight, you can see which holes in the bumper go on which clips!!
All that remains is the cable for the headlamp washer system on the nearside and this can be undone before you remove the bumper, and the headlamp washer system supply pipe on the offside, there is no temperature sensor on my FL bumper!!
This is really tight but can be persuaded to part with care.
At this point I enlisted the help of my very patient wife to help me carefully lift the bumper forwards and it came off easily and with no force.
here is the cable for the headlamp washer system which can now be seen
Time for a bath
If you are thinking of taking the 4 rings off a standard grill this is the back!!! you would need to undo these 2 Torx screws from the front!!
Here are the markings for the sensor positions on the front of the bumper
center outside
As you can see my center brackets are nothing like and are going to need some fettling, as I have heard others have needed too, there are so many different grills and number plate mountings that there are loads of brackets.
So all in all a successful afternoon, nothing broken, nothing lost, mission achieved and ready for the next phase
watch this space!!!
Attachments
So u didn't have sensors originally? And where did you connected them to ? So is it easy to enable front sensors in VCDS ?There are many videos of this on the 'tube', but I thought I would add my '2 penneth' here as just someone doing this for the first time with normal home gear and none of the American Sh1t that usually goes with these videos. and on a FL
So started this afternoon, when the sensor brackets arrive they are made from a greasy sort of plastic (polypropylene I think ppt20 ) which I don't feel confident in the results of glueing - it worked on the back....
View attachment 233520View attachment 233521
So the first job was to rough them up a bit with rough emery cloth to give the adhesive something to get its teeth into
View attachment 233525
When test fitting, I also felt that the sensors were too tight a fit in the brackets so I took a bit off the locating tangs, thinking that the first time that anyone tried to remove a sensor they would just pull the bracket off the bumper, this made them a little easier to remove, I also extended the split in the side of the brackets to also help with this a little further.
View attachment 233523 View attachment 233524
Left tang reduced slot extended 2mm in top bracket
With brackets and sensors ready ( the sensors have already been painted) I jacked up and supported the front of the car on my trusty pit boards and dropped the belly pan and undid three Torx screws each side in the wheelarch liner
View attachment 233527
And then up top removed the 3 Torx screws from in the inner arch liners (red)
View attachment 233528
Accepted knowledge is to just remove the 3 red screws but I have also removed all the remaining screws from the front half of the liner (Green) to give me more wiggle room rather than risk damaging the liner.
View attachment 233529
liner dropped
this was done in both front wheel arches
View attachment 233532 View attachment 233531
You then have to undo this bolt for which you need this extension even with the inner arch mostly undone
again done on both sides
You then have to undo a bolt which goes up through both the bumper and wing and on into a bracket, again accepted wisdom is that you only undo the one nearest to the wheel arch (green), but I undid both (red) as with the liner almost dropped you have better access.
View attachment 233534 View attachment 233533
bolts the bracket
View attachment 233535
the bumper edge
Armed with the above you stand a better chance of removing the bumper without a fight, you can see which holes in the bumper go on which clips!!
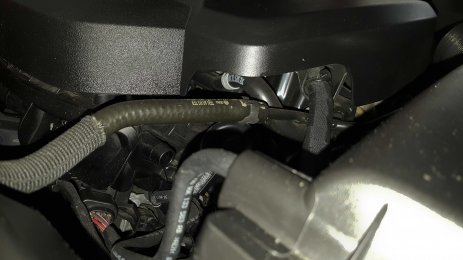
All that remains is the cable for the headlamp washer system on the nearside and this can be undone before you remove the bumper, and the headlamp washer system supply pipe on the offside, there is no temperature sensor on my FL bumper!!
View attachment 233540
This is really tight but can be persuaded to part with care.
At this point I enlisted the help of my very patient wife to help me carefully lift the bumper forwards and it came off easily and with no force.
View attachment 233538
here is the cable for the headlamp washer system which can now be seen
View attachment 233539
Time for a bath
View attachment 233537
If you are thinking of taking the 4 rings off a standard grill this is the back!!! you would need to undo these 2 Torx screws from the front!!
View attachment 233536
Here are the markings for the sensor positions on the front of the bumper
View attachment 233541 View attachment 233542
center outside
As you can see my center brackets are nothing like and are going to need some fettling, as I have heard others have needed too, there are so many different grills and number plate mountings that there are loads of brackets.
So all in all a successful afternoon, nothing broken, nothing lost, mission achieved and ready for the next phase
watch this space!!!
@Potterswheel well done brother, this will come in handy when I get mines done
Sent from my iPhone using Tapatalk
Sent from my iPhone using Tapatalk

Seems ages since I got the bumper off but it seems like I have spent ages cleaning this last couple of days.


Never did find mouse tho
So I then set about cutting the sensor holes using an 18.2mm hole punch

The holes are clearly marked on the inside of the bumper - I drilled a 3mm pilot hole at each mark

I then took this out to 8 mm

and then put the punch through the bumper so that the punch was 'pulling' in from the outside

so that the bolt appeared on the outside

and then attached the 'punch' on the outside


Never did find mouse tho
So I then set about cutting the sensor holes using an 18.2mm hole punch
The holes are clearly marked on the inside of the bumper - I drilled a 3mm pilot hole at each mark
I then took this out to 8 mm
and then put the punch through the bumper so that the punch was 'pulling' in from the outside
so that the bolt appeared on the outside
and then attached the 'punch' on the outside
It is then just a case of taking a deep breath and spannering it up carefully and you end up with a hole
inside .......................................................outside
I did this for both of the holes in the bumper and then turned my attention to the 'center grill' section which was similar but it is made of a harder material and you have to put quite some force on the punch to get it to cut a hole, all in all though it went well.
The centre holders were no where near the fitments on the 'grill' section of the 'grill' so I set to with a trusty file and a drill and modified the holders to fit
I then used some special 'super glue' type adhesive specially made for Polypropylene and stuck the holders to the bumper
center................................................................outside
One interesting thing after leaving the bumper overnight to set, there seemed to be evidence of a whitish deposit on the bumper almost like it had fumed, it soon wiped off though.
The next challenge was a trial fit of the Kufatec bumper loom and after saying previously how good they were it was no where near to my bumper!!! I can only assume that I have a pre face lift bumper loom, just no where, returning it to Germany would have added even more time to the job,
So out with the cutters and again more deep breaths as all the cables are white and only numbered at the ends, undoing all that tape kills your fingers.
left overs - I recon that there was 6 m of cable too much, pity it was in the wrong places!!
final job laid out on the floor so that it can be seen clearly
whilst I was at it I assembled a small loom for fogs should they ever get fitted
So now I am almost ready to start putting the sensors into the bumper and then return the bumper to its rightful place, slight problem though the gaskets I have for the sensors are not all the same, so I have had to order a couple of extra gaskets - worth checking them all before you are standing in front of your bumper as some are 18.5mm and some are 20.5mm.
as usual we are waiting for the postie again so watch this space.....
Just a few quick thoughts which came to me after I wrote last nights installment:-
sensors fitted


I have sealed the inside edges of the holes with a touch up brush in the right colour for the bumper and the grill paying particular attention to the 'raw' edge where the original paint ends , I spent an hour in Halfords running up and down with aerosols until I got a match for the grill would you believe just how many silvers there are? and how different they are to the colour on the tin?? I ended up with would you believe Audi Titan, granite metallic and then a satin lacquer which seems to have done the trick I eventually went with this thinking it must be an Audi or VAG colour. When the colour had dried I gave it a coat of clear lacquer
I bought an aerosol thinking if the worst came to the worst I could always spray the whole of the grey part of the grill, but I am happy it will convince 90% of the people 90% of the time!!! I sprayed the paint into the lid and used it out of there.

It may be prudent to do this sealing before you do the gluing as the primer for the adhesive is quite searching and could, I guess get between the paint and the bumper which thankfully mine didn't
Previously I said I don't have any temperature ?? sensors on my bumper, I do! yesterday when working on the loom I saw that the cables which I had assumed went to the headlamp wash wipe units actually went to 2 sensors, one mounted each side and just under the headlight wash wipe units.


I have finally removed the S3 badge from the grill, I now realise that it is not really practical to remove it completely as there is a hole in the grill behind it, and you cant cut the bracket off, presumably Audi save 1/2 p on plastic on every car! Anyway if you want to get yours off here it is. I may relent and just go for a 'Black stealth' one now


So again today I am banished to another day of cleaning, whilst yet again I wait for the postie!!! thank heaven for lockdown!!!
sensors fitted
I have sealed the inside edges of the holes with a touch up brush in the right colour for the bumper and the grill paying particular attention to the 'raw' edge where the original paint ends , I spent an hour in Halfords running up and down with aerosols until I got a match for the grill would you believe just how many silvers there are? and how different they are to the colour on the tin?? I ended up with would you believe Audi Titan, granite metallic and then a satin lacquer which seems to have done the trick I eventually went with this thinking it must be an Audi or VAG colour. When the colour had dried I gave it a coat of clear lacquer
I bought an aerosol thinking if the worst came to the worst I could always spray the whole of the grey part of the grill, but I am happy it will convince 90% of the people 90% of the time!!! I sprayed the paint into the lid and used it out of there.
It may be prudent to do this sealing before you do the gluing as the primer for the adhesive is quite searching and could, I guess get between the paint and the bumper which thankfully mine didn't
Previously I said I don't have any temperature ?? sensors on my bumper, I do! yesterday when working on the loom I saw that the cables which I had assumed went to the headlamp wash wipe units actually went to 2 sensors, one mounted each side and just under the headlight wash wipe units.
I have finally removed the S3 badge from the grill, I now realise that it is not really practical to remove it completely as there is a hole in the grill behind it, and you cant cut the bracket off, presumably Audi save 1/2 p on plastic on every car! Anyway if you want to get yours off here it is. I may relent and just go for a 'Black stealth' one now
So again today I am banished to another day of cleaning, whilst yet again I wait for the postie!!! thank heaven for lockdown!!!
Attachments

So even though I am waiting for postie my hands have not been idle.
The bumper is finished except for the center sensors, all looms, pipes etc. all neatly clipped (don't know why but this is a bit difficult to look at)

I also had a spare packet of the special adhesive delivered today, ordered from that great auction site

And to tidy up the under bonnet area when I can finally put everything back together I sprayed some bolts with the Audi Titan Graphite metallic paint and the satin lacquer, also shows my sensor mask to get the correct speck for the paint coverage holes cut with the same punch!


Again loads more cleaning of the front end whilst the bumper cover is off and total removal of the wheel arch liners to give them a wash.
Lets hope postie comes early AND carrying gifts tomorrow!!!
The bumper is finished except for the center sensors, all looms, pipes etc. all neatly clipped (don't know why but this is a bit difficult to look at)
I also had a spare packet of the special adhesive delivered today, ordered from that great auction site
And to tidy up the under bonnet area when I can finally put everything back together I sprayed some bolts with the Audi Titan Graphite metallic paint and the satin lacquer, also shows my sensor mask to get the correct speck for the paint coverage holes cut with the same punch!
Again loads more cleaning of the front end whilst the bumper cover is off and total removal of the wheel arch liners to give them a wash.
Lets hope postie comes early AND carrying gifts tomorrow!!!
Well again, waited all day for postie to turn up (seller said he posted the gaskets Monday - 1st class) so continued with the cleaning etc. from yesterday, some images and some thoughts:-
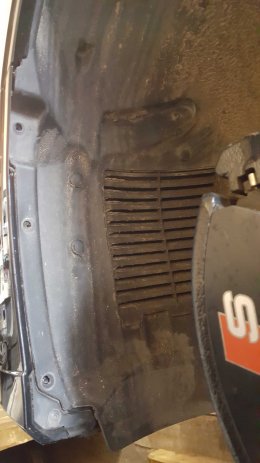
If I had have dropped the liner in the first place then I could have undone the headlamp washer pipe here, I think removing the liners in total is not much more work and gives access to loads of things, there are just 5 of them plastic rivets on each one which you have to push the center through and then they release, and a couple of more screws, more than I had done to undo half anyway.

Here is the liner after a bath

and here is some of the muck from above it

Lets hope for more progress tomorrow
If I had have dropped the liner in the first place then I could have undone the headlamp washer pipe here, I think removing the liners in total is not much more work and gives access to loads of things, there are just 5 of them plastic rivets on each one which you have to push the center through and then they release, and a couple of more screws, more than I had done to undo half anyway.
Here is the liner after a bath
and here is some of the muck from above it
Lets hope for more progress tomorrow
Attachments
So, the postie did turn up today, eventually! and the gaskets were there and this time correct! they were very quickly fitted and I was ready to restart assembly

just a thought at this point these may be of interest


I keep all the pins bolts etc. in some old 'parts bins' each with a note of where they came from, when its been in bits for a few days the old grey matter can start to play tricks on you.
So assembly was the reverse of removal, only now things were easier as I knew where things went -ish!
The bumper was slid into position and the three top center bolts put in, note now Audi Titan grey metallic.

followed by the three across the center bottom which fortunately just fell into position.
the 2 front facing bolts were next,(one each side), again made a lot easier by the arch liner now being out of the way completely.

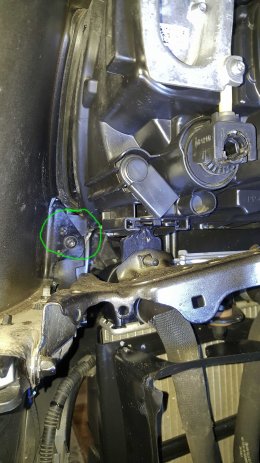
The wing edge bolts came next, because I had taken both bolts out of the wing edge, I put the brackets in place, loosely fitted the front bolt (starred) and then just slid the wing into place and then I fitted the rearmost (not starred) bolt (difficult to write down but you will see is fairly straightforward and worth the effort)


the stared bolt is the one which can stay in and the circled one must come out. I spent a bit of time making sure that the wing and bumper surfaces were flush and then fastened up both bolts.
After that it was just a job of refitting the wheel arch liners which I sort of held along side the car and 'turned' them up into place so that the outer edge 'hooked' over the wing edge, locating the plastic holding nut, then started replacing the screws from the top an gradually working my way down to the front and back edges, the small plastic rivets are a bit fiddley so I fitted them all in place (again from top to bottom) then inserted all the the small dowels and then tapped them all home starting at the top and working downwards. I then replaced all the small screws round the bottom edge of the bumper.


Replacing the front bumper was fairly straightforward and probably took 1 1/2 hours.
Now all I need is my tame coder to turn them on for me!!!
just a thought at this point these may be of interest
I keep all the pins bolts etc. in some old 'parts bins' each with a note of where they came from, when its been in bits for a few days the old grey matter can start to play tricks on you.
So assembly was the reverse of removal, only now things were easier as I knew where things went -ish!
The bumper was slid into position and the three top center bolts put in, note now Audi Titan grey metallic.
followed by the three across the center bottom which fortunately just fell into position.
the 2 front facing bolts were next,(one each side), again made a lot easier by the arch liner now being out of the way completely.
The wing edge bolts came next, because I had taken both bolts out of the wing edge, I put the brackets in place, loosely fitted the front bolt (starred) and then just slid the wing into place and then I fitted the rearmost (not starred) bolt (difficult to write down but you will see is fairly straightforward and worth the effort)
the stared bolt is the one which can stay in and the circled one must come out. I spent a bit of time making sure that the wing and bumper surfaces were flush and then fastened up both bolts.
After that it was just a job of refitting the wheel arch liners which I sort of held along side the car and 'turned' them up into place so that the outer edge 'hooked' over the wing edge, locating the plastic holding nut, then started replacing the screws from the top an gradually working my way down to the front and back edges, the small plastic rivets are a bit fiddley so I fitted them all in place (again from top to bottom) then inserted all the the small dowels and then tapped them all home starting at the top and working downwards. I then replaced all the small screws round the bottom edge of the bumper.
Replacing the front bumper was fairly straightforward and probably took 1 1/2 hours.
Now all I need is my tame coder to turn them on for me!!!
Attachments

Yes, Finally had my PDC, Camera and Folding mirrors coded yesterday, I have had to wait for my tame coder to return home. Coding went easily (for him!) and everything works perfectly - I am more than happy with the results.
Some reflections on the job:-
Do your own research, there are many versions and adaptions in all things Audi, what works for one car may not be the same for yours. i.e. pfl - fl it was not just the bumper that changed!!!
Kufatec were excellent to deal with and very professional but the looms I received did not fit my car, (FL/PFL - Saloon / Hatch??) I had to extend in some places and shorten in others to make them fit correctly, fortunately for me this was not an issue as I had access to all the kit/connectors etc., but added time to the job, but when you are dealing with Germany everything takes time and you are standing in front of your car which is in bits, returning the loom is not an option.
Some info that is out there is just wrong!
understand the parts you are trying to change
yes, watch the utube videos, its a good start point, but give yourself plenty of time, its not a race, make as much room for yourself to work and understand what is going on, there is no need to force anything, yes you can undo 3 screws and work like a gynecologist through a crack in the arch liner, but if you undo some more screws you can see and understand what you are doing and maybe do some cleaning whilst you are in there! - you can break the rear diffuser in seconds but it will be poorly fitting on your car for years!!!
buy yourself 2 sets of trim irons and use them carefully and take your time
ask questions, there are loads of people here who have done whatever it is you are doing, and are willing to share their experiences.
just my 2 penneth!
beep................
Last edited:
solarthread
New Member
For anyone that’s done this, what route did you take for the front sensor loom back to the PDC module in the footwell?
There is a gland/grommet which is tucked away behind the battery/battery tray in the bulkhead, (you have to take these out to make a neat job of running your new loom anyway) the best way to find it is when you have your glove box etc. out reach up behind the top edge of the carpet and sound proofing, you will find it behind the fuse box. I used a stiff piece of steel wire and pushed this through the gland/grommet then attached the loom to this and pulled it all through.
Hiya got a set with parking sensors and modules just cant figure out were the module goes and were that gets wired toThere is a gland/grommet which is tucked away behind the battery/battery tray in the bulkhead, (you have to take these out to make a neat job of running your new loom anyway) the best way to find it is when you have your glove box etc. out reach up behind the top edge of the carpet and sound proofing, you will find it behind the fuse box. I used a stiff piece of steel wire and pushed this through the gland/grommet then attached the loom to this and pulled it all through.
Similar threads
- Replies
- 91
- Views
- 32K