Audi A4 B8 Door Warning Light and Puddle Light retro fit

Top notch quality light here too:

View attachment 174582

And I think they had the ones just with the rings too and only £9.99 per box (2 in the box).

they do look good, you can't grumble about that price for the pair either. Bargain! ;) have you seen the sweeping LED door sills/scuff plates as well? something I thought about but haven't seen the right good quality ones to have a go with yet. Not sure if that might be taking it a bit too far as well.
 
I was thinking about it too but I think it will be too much cause I want to install inside foot light but can’t find a good tutorial.


Sent from my iPhone using Tapatalk
 
they do look good, you can't grumble about that price for the pair either. Bargain! ;) have you seen the sweeping LED door sills/scuff plates as well? something I thought about but haven't seen the right good quality ones to have a go with yet. Not sure if that might be taking it a bit too far as well.
I think it will be to much, especially cause I plan to install inside foot lights but can’t seam to find a good tutorial about it.
 
I think it will be to much, especially cause I plan to install inside foot lights but can’t seam to find a good tutorial about it.

I did the footwell lights front and rear, I did mine with the red reflector cover though so as the glow matches the OEM red interior ambient lights. can't think which guide I used now though. didn't take long to do them all and is quite straight forward though.
 
180ef4101206ffd19a767f3ea69e2fc4.jpg


Sent from my iPhone using Tapatalk
 
  • Like
Reactions: Marius_A4
I used the genuine Audi logo puddle lights when I did my retrofit as I wanted as OEM as possible, they cost a fair bit, but the light quality is top notch (in my opinion anyway)

5e31d5ffc8655c2867f604939cb07fc4.jpg


the interior lights were fitted by you or had a light package? I ask you that I'm going to mount myself and I want to know what to expect. :)). Your circular lights are really nice and I think they are bright enough, although I am the follower of the simple ones, I really like them.
 
Hi Andrei,
I'm very new to this forum but would like to grab the opportunity to ask for your help to get these mods done. Would you able to get done the whole job or just the coding ?
I have an Audi A4 SLine Black Edition B8.5 2.0 TDI 2012.
Many thanks in advance.
Attila

Tapatalkkal küldve az én SM-G965F eszközömről
 
Hey all,

First thank you @pns2007 for taking time to do this amaizing DIY tutorial!

Secondo I just did this on my Audi A4 B8 SE 2010 2.0 Remap Stage 1 TDI and I want to add a couple of extra bits for all of you out there that are planing to do this:

- Buy and use some proper trim tools - don’t use a screwdriver to prime the plastic trims.

- The clips from the door face are so damn hard to remove and I broken a couple of them and the plastic bits that holds them on the door face:
View attachment 174085

so try to be as careful as you can when you remove the door face.

- The rear door connector (as @pns2007 explained) is different; it’s black with a red clip and in the next pic you can see (pointed by the red arrow) how to open it by using a very small screwdriver:

View attachment 174083

It has 16 pins in total and the positive/live wire goes into pin 12 and negative wire into pin 13:
View attachment 174084

I am sorry I forgot to take a pic after I inserted the wires.

- I bought and used these lights from eBay:

View attachment 174086

And two of this (they come 2 in a pac) from Amazon:

View attachment 174088

This is the result:

View attachment 174089

If it is really dark they will look even better.

Next will do the gloves box and in car foot lights and will come back with pics and info.

If anyone wants to do this but is afraid to do it himself I can help you with it, including coding and clearing errors after.
I leave in Northampton, drop me e message and will talk about it.
I can fit this and do coding for extra options too for Audi, VW, Skoda and Seat.

Cheers,

Andrei
Hi Andrei,
I'm very new to this forum but would like to grab the opportunity to ask for your help to get these mods done. Would you able to get done the whole job or just the coding ?
I have an Audi A4 SLine Black Edition B8.5 2.0 TDI 2012.
Many thanks in advance.
Attila

Tapatalkkal küldve az én SM-G965F eszközömről

Hi Attila,

I can do the all thing, fit the lights and coding, but you need to buy the lights kit and the logo lights you want (different logos out there) and also depends where you live in case you want me to come over.

Cheers,
Andrei
 
Hi Attila,

I can do the all thing, fit the lights and coding, but you need to buy the lights kit and the logo lights you want (different logos out there) and also depends where you live in case you want me to come over.

Cheers,
Andrei
Hi Andrei,
Thats sound great, I though I will drive down to you as I may not have the tools the job required. Do you think we can talk privately so we can talk about cost and agree where and when the job will be carried out.
Thanks
Attila

Tapatalkkal küldve az én SM-G965F eszközömről
 

The footwell lights and door warning/puddle lights were ordered as a made up loom from @RobinA3. I did the install myself and was able to enable the footwell lights with Carista App, the door warning/puddle lights needed coding with VCDS though. Both installs were pretty straight forward and Robin supplies the required pin terminations for the control modules, so you can’t go wrong.

Be careful removing the door cards as the clips can be a pain and brake easily. With the footwell lights, the control module is tucked right up above the pedals and is a little awkward/uncomfortable to get to, the cutouts for the lights should already all be there so it’s a case of clipping the unit in and feeding the wiring loom under the floor lining and behind the dashboards.


Sent from my iPhone using Tapatalk
 
  • Like
Reactions: RobinA3
Hi Andrei,
Thats sound great, I though I will drive down to you as I may not have the tools the job required. Do you think we can talk privately so we can talk about cost and agree where and when the job will be carried out.
Thanks
Attila

Tapatalkkal küldve az én SM-G965F eszközömről

Did you got my message?
 
Just swapped mine for the red (LED) ones...
They actually look way better!
73c18cd119b4751eba739cab3f0763e5.jpg


Sent from my SM-G965F using Tapatalk
 
  • Like
Reactions: Marius_A4 and cbeadle2508
Looks great man nice work,can reduce intensity from mmi i think is too brightness.Anyway i like it.
 
Looks great man nice work,can reduce intensity from mmi i think is too brightness.Anyway i like it.
The intensity increases when you open the door then dims to about half of what you see on the pic.
But yes, these are very bright indeed (10 LEDs if I remember correctly)...
Sent from my SM-G965F using Tapatalk
 
  • Like
Reactions: Marius_A4
Hi guys. I'm after a bit of help if possible.

I got a warning and puddle light kit from Ali Express however, somehow over the weekend I've managed to lose 1 of the wiring looms. No idea how or where it is.

Does anyone know anyone who supplies them? I've msgs a guy on here t8ups I think, found his Facebook page and ring him with the number on the, no answer. I've also msgs him on Facebook and so far it's only showing as sent and not delivered.

Is anyone able to help with a wiring loom please? My other option is to order another kit from Ali Express but if I can get away without doing that then all well and good.

Thanks
Rick

@RobinA3 should be able to help you out. He did my full set of wiring looms for me. Really helpful guy and good quality workmanship.


Sent from my iPhone using Tapatalk
 
Thanks for your reply mate. I've managed to get sorted and I've got a new loom on its way.

Just another snag to overcome now tho and I'll be sorted
 
  • Like
Reactions: cbeadle2508
Hi first post forgive me im getting some puddle lights and door warning lights but he live a few miles away 170 miles so coding is going to be a bit of a problem garage down the road does vag coding but he needs the correct codes for my car i have a audi a4 sline 2010 b8 if someone could help ie put some pics up or details where i can get the coding to enable them to work thanks in advance new to all this please help
 
Hi first post forgive me im getting some puddle lights and door warning lights but he live a few miles away 170 miles so coding is going to be a bit of a problem garage down the road does vag coding but he needs the correct codes for my car i have a audi a4 sline 2010 b8 if someone could help ie put some pics up or details where i can get the coding to enable them to work thanks in advance new to all this please help

3bb386f9a25d11863b1db61a02e159db.jpg


Get to this page go into chassis and it brings up all doors in right hand side 42/52/62/72
 
759eb9851fb4f9d46d162b652cfc9da5.jpg


Go into the door you want to code press 07 coding


Sent from my iPhone using Tapatalk

0c74065d5f9db0f4c2a512c48996c619.jpg


This will get you to screen on left go to long coding helper this will bring up the screen on the right use cursor arrows to get to second box that will then give you a list and just turn on what you want use arrows to get back to start press escape that puts code into box then hit apply code and ok that should be 1 door coded that’s how I’ve just done mine all work a treat
Good luck


Sent from my iPhone using Tapatalk

ca3f3a31d8ec40cb899cdf15339ede99.jpg


And voila you should have them on


Sent from my iPhone using Tapatalk
 
Hi first post forgive me im getting some puddle lights and door warning lights but he live a few miles away 170 miles so coding is going to be a bit of a problem garage down the road does vag coding but he needs the correct codes for my car i have a audi a4 sline 2010 b8 if someone could help ie put some pics up or details where i can get the coding to enable them to work thanks in advance new to all this please help

Just a quick note I had doors open a while and voltage dropped it wouldn’t let me install the codes make sure battery is well charged I did mine running to make sure it had plenty in the battery


Sent from my iPhone using Tapatalk
 
  • Like
Reactions: micky981
Hello. I just finished doing the door puddle/warning lights + illuminated door handles on my 2012 a4 b8 facelift avant. I could not do the ambiante door pocket lighting as my door modules only have the half shaded box and no pin 3 (rear door 16 pin) or pin 8 (front door 32 pin) in the modules.

D J Robo, did you connect your rear light into the right pins?

Mines are as stated:

-front modules 32 pin:
Pin 3, door illuminated handles +12v
Pin 16, puddle/warning lights +12v
Pin 8, ambiante lighting +12v (N/A)
Pin 5, earth, just solder lights earth together on this brown wire.

-rear modules 16 pin:
Pin 1, illuminated door handles +12v
Pin 3, ambiante lighting +12v (N/A)
Pin 12, warning/puddle light +12v
Pin 13, earth, just solder together lights earth on this brown wire.

Then just go into each door controler with VCDS and check the tick box for whatever lights you added to your car.

For the door handles i used 1 bright red 12v 5mm LED for each door handles. I drilled on the top of the handles where the original oem would be. Just sandpaper the led to diffuse the light. It looks great at night. I hope this will help you.
Hello I know this is an old thread, I'm only reading 8v on pin 16, 3, 8 I want door lights so when I open the door they light up can you help
 
Hi guys
Where about I have to connect the wires
For the foot lights front and rear ???
Thanks you in advance.
 
This is a guide I have prepared after successfully fitting the red door warning lights and white puddle lights to my 2010 Audi A4 B8. It is intended as a guide only and if followed I would like to absolve myself from any responsibility should you damage your own car !

You will need the following parts per door:-

1 red door warning light part no - 6YO 947 411 £8.28 EACH
1 white door warning light part no - 4BO 947 415 A £6.95 EACH
2 connectors for the door warning lights part no - 893 971 632 £1.69 EACH

repair wires - U000 979 133 E (J30601 wires) £1.90 EACH x2
U000 979 009 (J30601 wire) £1.40 EACH

(For info, the repair wires are about 30cm long and have a soldered terminal at each end. Cut them in half to get two! The end terminals are specially designed to fit into the electrical connectors and come in different sizes)

repair.jpg


You will also need some additional cable. I bought some thin wall cable from these guys - http://www.vehicle-wiring-products.eu/VWP-onlinestore/cable/thinwall.php and some cloth tape from the same company.

First things first, the door card needs to be removed (I'm working on the drivers door - the other doors are similar)

P1000728.jpg


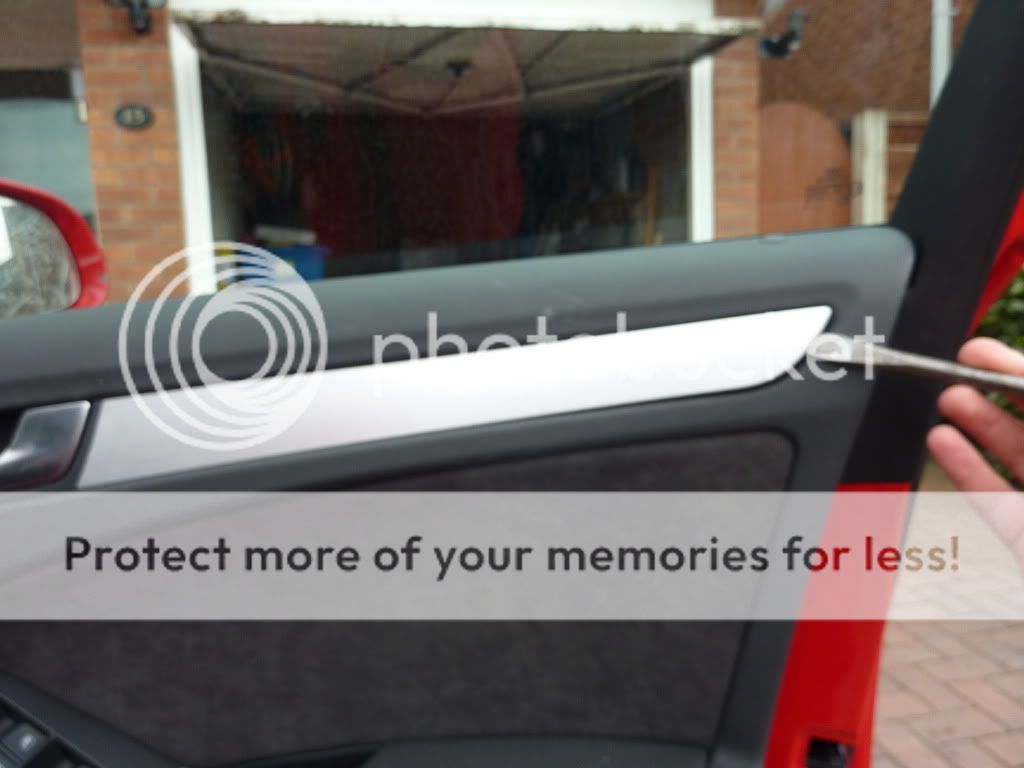
Insert a screwdriver behind the aluminium trim and gently prise away until it clicks. Then more towards the door handle and gently prise the trim away further. You will need to slide the trim to the right to remove.

In all instances of removing trim (now and further in the guide) ensure that you protect it with cloth tape and wrap some around the screwdriver/s. Also ensure any paint work is also protected. (You have been warned!)

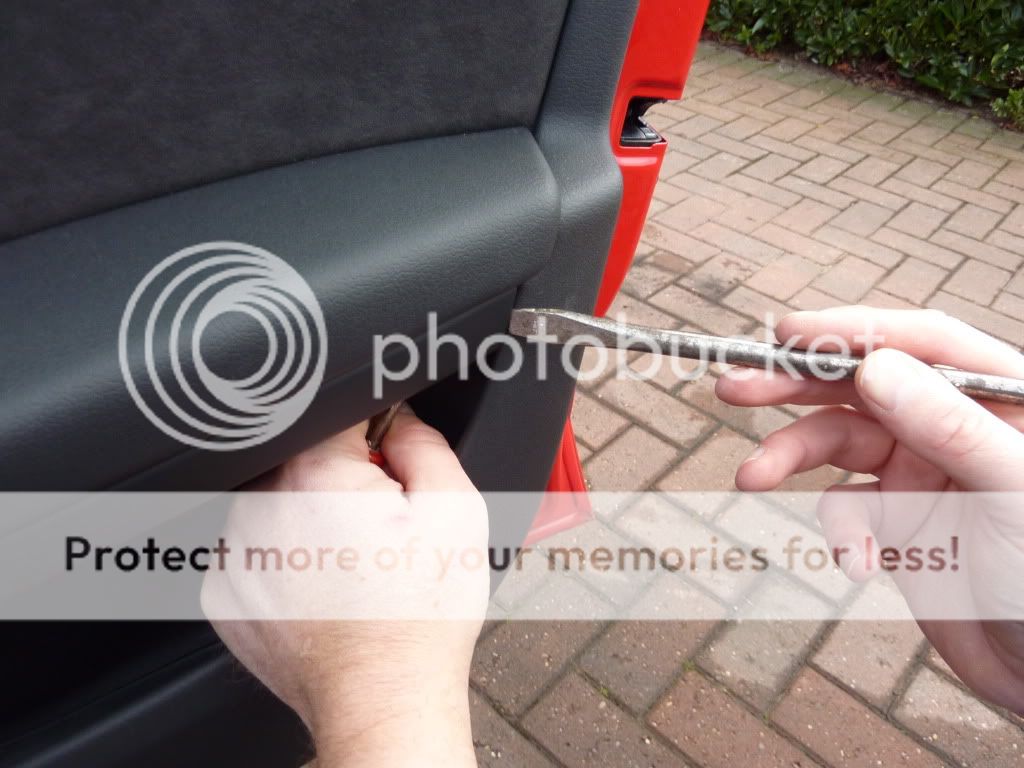
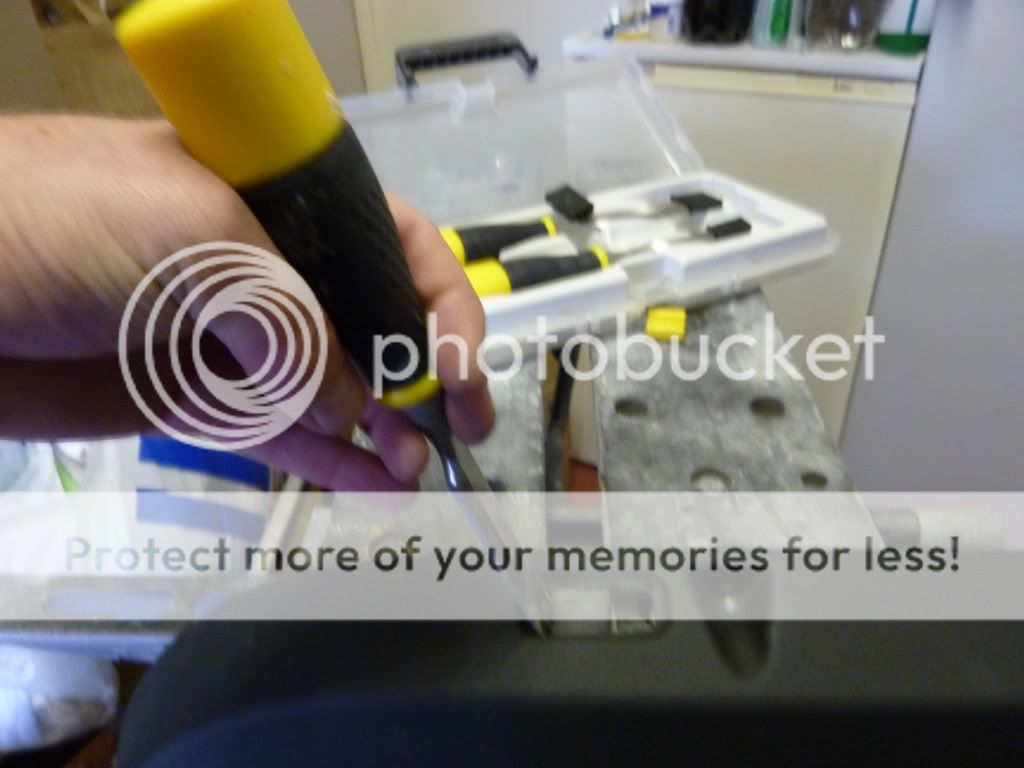
Next is to remove the lower door handle trim. Insert a small (ish) screwdriver into the whole underneath the lower door handle trim and pull towards you. This is the screwdriver in my left hand in the picture below

P1000748.jpg


I also used another screwdriver (in my right hand) and gently prised the trim out. Move left along the trim but be careful as the trim is quite delicate and could easily snap, the lower trim should just come away when you reach the end.

P1000747-1.jpg


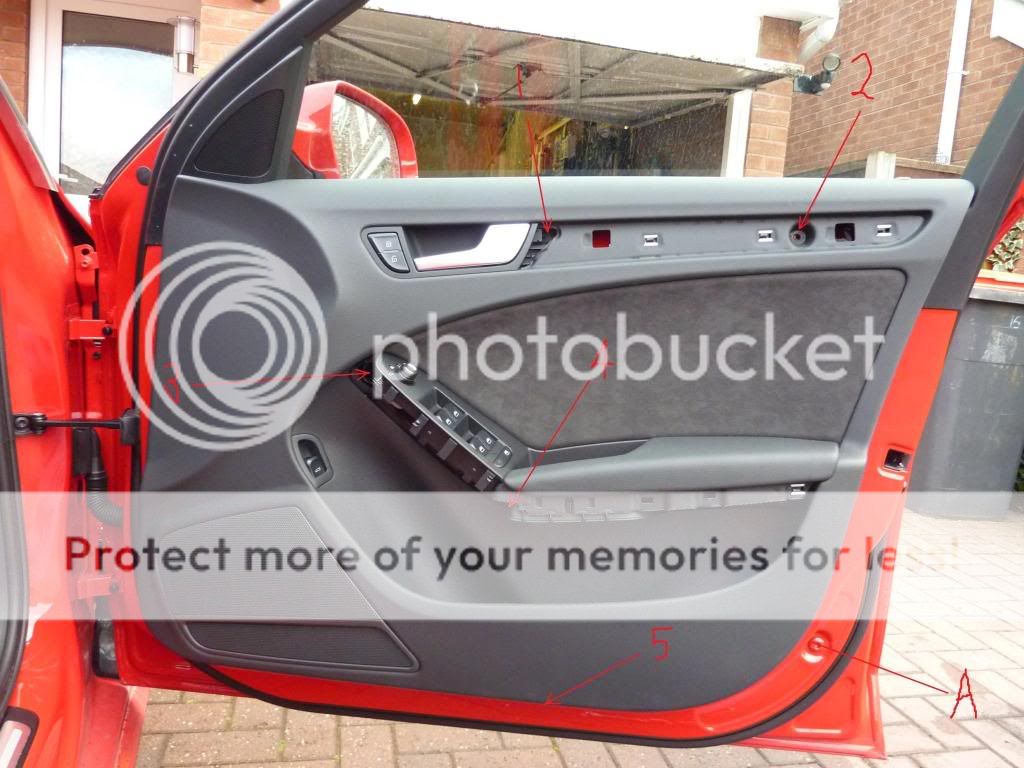
Undo the 5 torx screws numbered 1-5 in the above photo. Next insert a large (ish) screwdriver in between the door and the door card at the point lettered A in the photo and lever the door card away. When this clip has come away use your hands to go along the bottom and left/right hand side of the door card and un clip all 7 clips. (You will see a picture of these later on in the guide)

Pull the bottom of the door away at an angle and then lift the door card away from the door. It will pivot along the window edge. The door card will then be attached to the door by the wiring loom and the door handle cable.

First unclip the door handle cable

P1000729.jpg


Prise the white clip out and push towards the chrome hook. Remember how this white clip came away for when you put it back together! Disconnect the chrome hook by rotating the door card and manipulating it away.

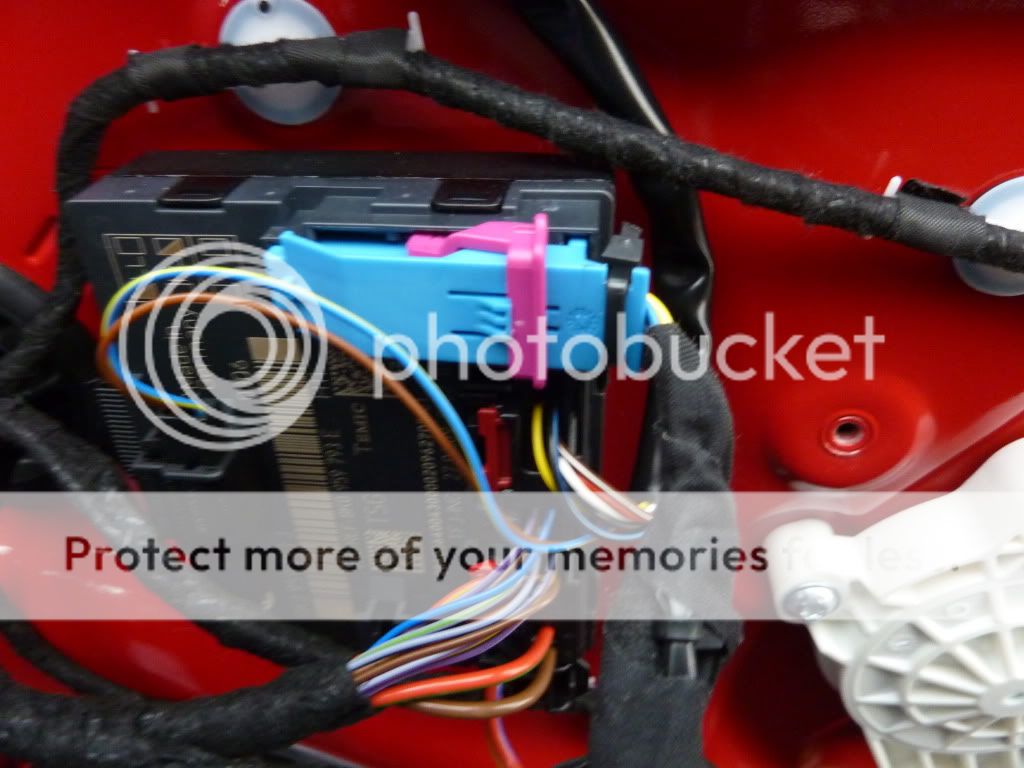
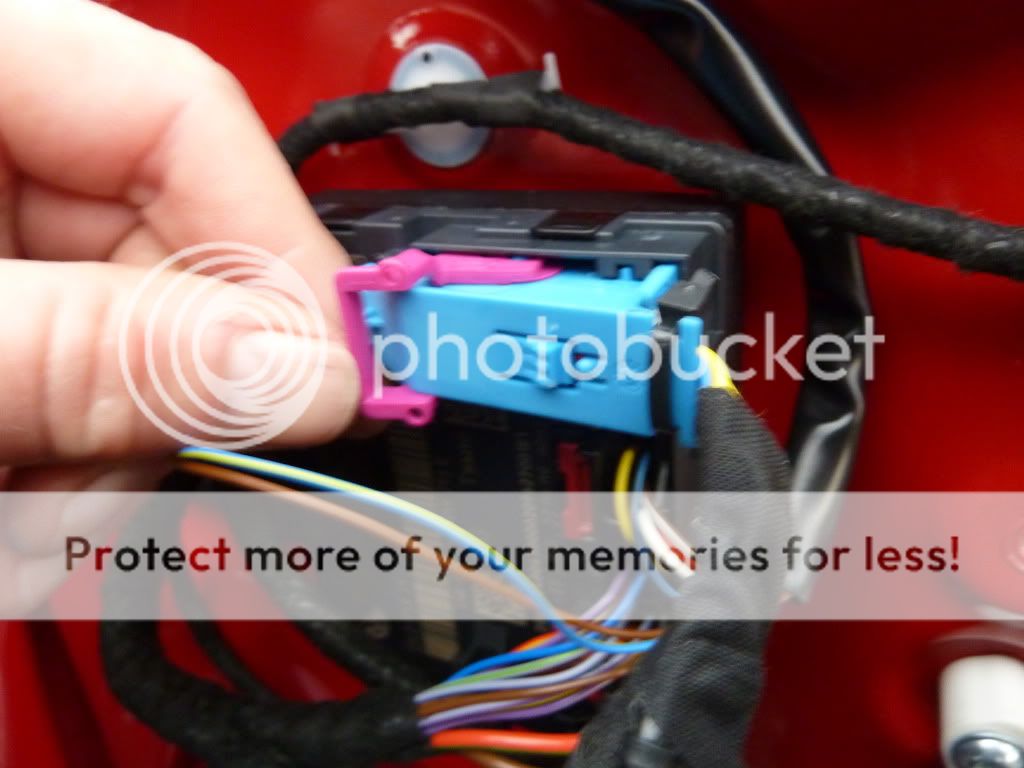
Next is the blue connector for the wiring loom

P1000730.jpg


Lift the purple clip away from its housing and the connector will come away

P1000731.jpg


The door card is then separated.

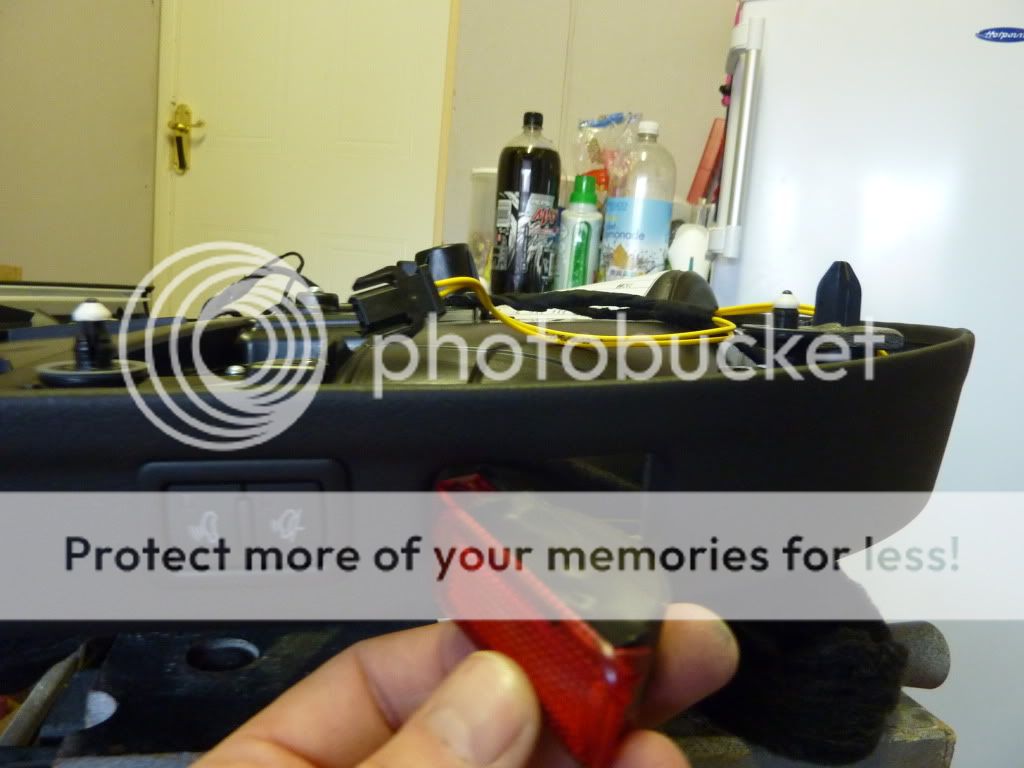
Place the door card upside down onto a work mate of other bench. Remove the red door reflector. The will be an indentation on the bottom of the door card which will need cutting to insert the white puddle light. I did this with a wood chisel
P1000732.jpg


Use the hole from the red reflector as a template. Better to make it too small (and then file) than too big so be careful.

You then need to prepare the wiring loom.

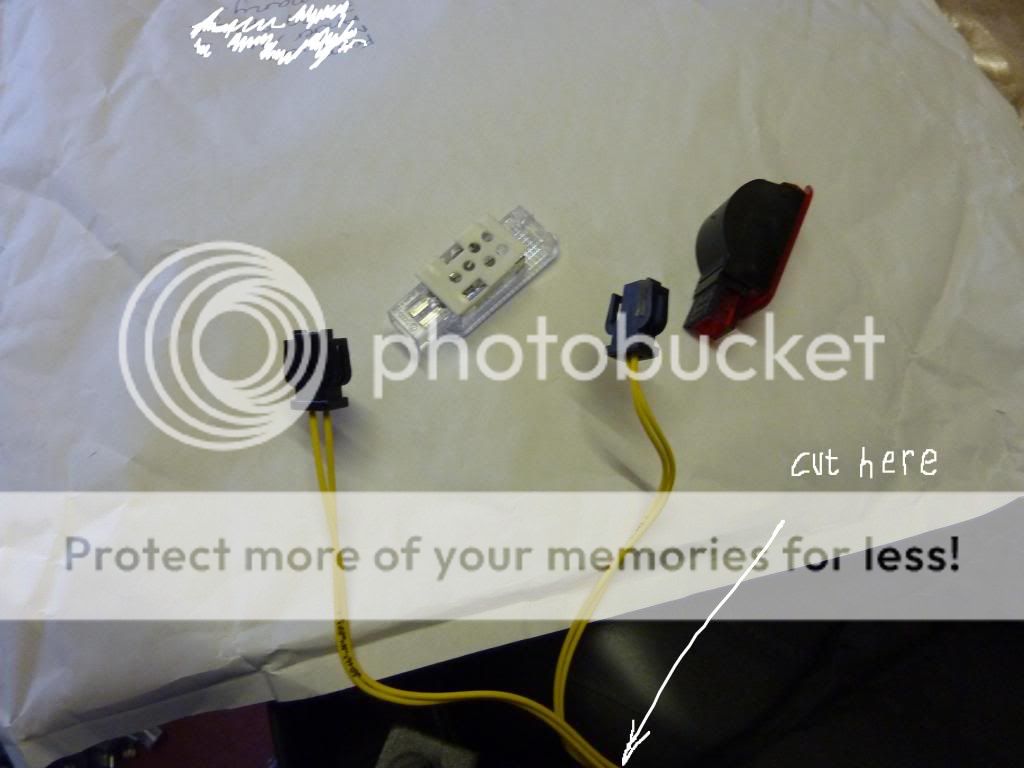
Insert the two larger yellow repair wires into the black connectors. When assembled cut the wires in half. There will be two wires coming from each light. One will be positive and one negative. Tape the two positive wires together and tape the two negative wires together as per the picture below

P1000733.jpg


Next take the smaller yellow repair wire and cut it in half. You will need to bridge the gap between the larger yellow repair wires with the smaller yellow repair wire with about 30 - 40 cm of the thinwall cable. Solder the wires together and insulate. Wrap the wires in cloth tape to give it that oem look. This needs to be done twice, one for the positive side and one for the negative side.

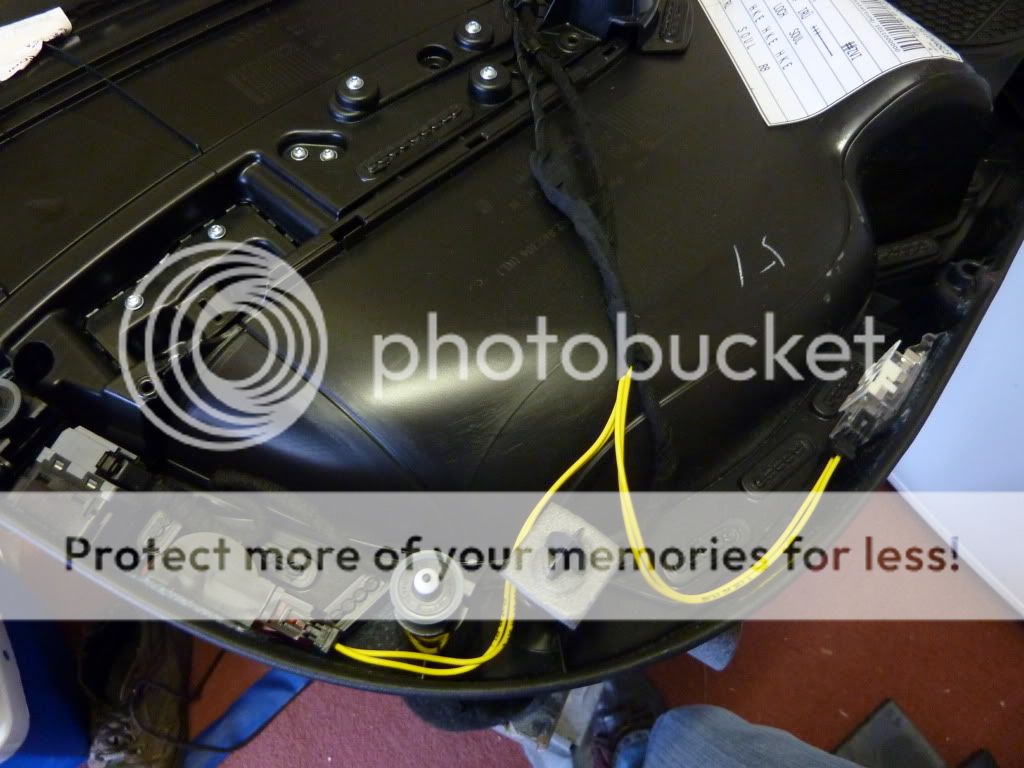
Insert the red light and white light into the door card and plug the black connectors into the lights (doesn't matter which)

P1000734.jpg


It will then look like this viewing it from the back of the door card

P1000736.jpg


We next need to look at connecting the wires into the blue plug referred to earlier

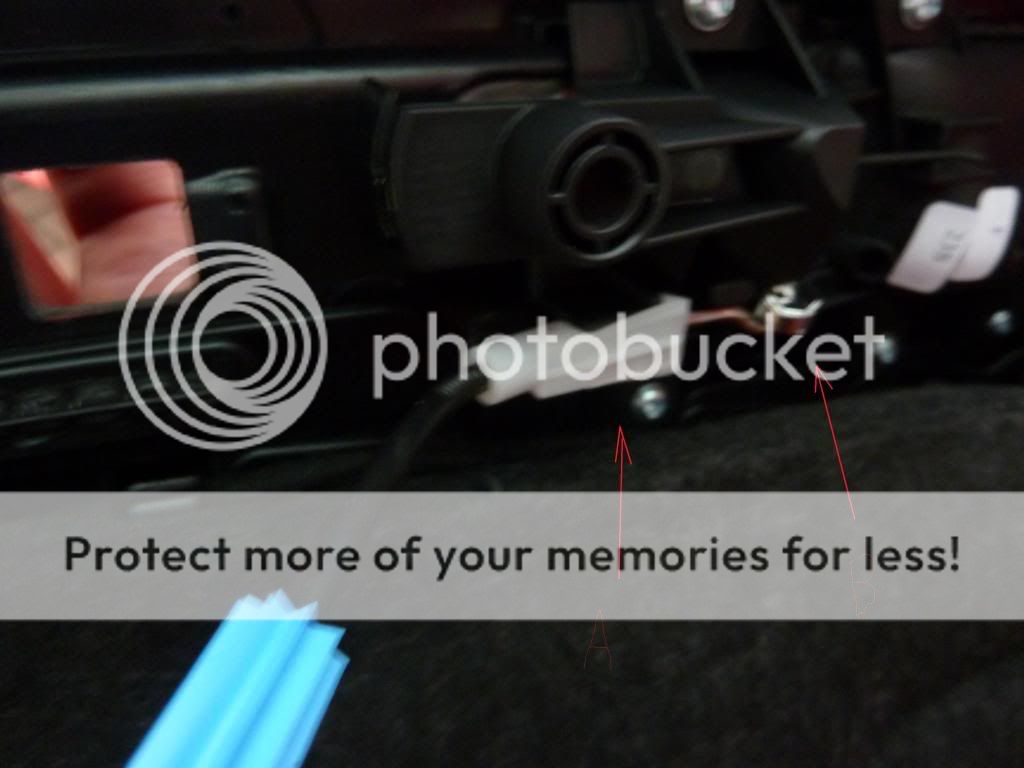
Insert a small screwdriver into the clip as shown below and the white block will slide out

P1000738.jpg


P1000739.jpg


The white block contains 32 pins. Insert one of the clips from the smaller yellow repair wires into the hole for pin 16 (this is the positive connection). The above photo shows this inserted as the far left wire in the white block. There are tiny numbers shown on the block for the location.

Pin 5 is a common negative terminal and will already contain a wire. Either splice into this wire or remove it like I did as there is more wire to play with and insert the other smaller yellow repair wire into this pin 5. You will then need to connect the wire you have just taken out and splice it into the yellow repair wire. (Hope that makes sense).

Insert the white block back into the blue connector and use a small nylon cable tie to secure all the wires to the connector and tape the wires together with the cloth tape

P1000745.jpg


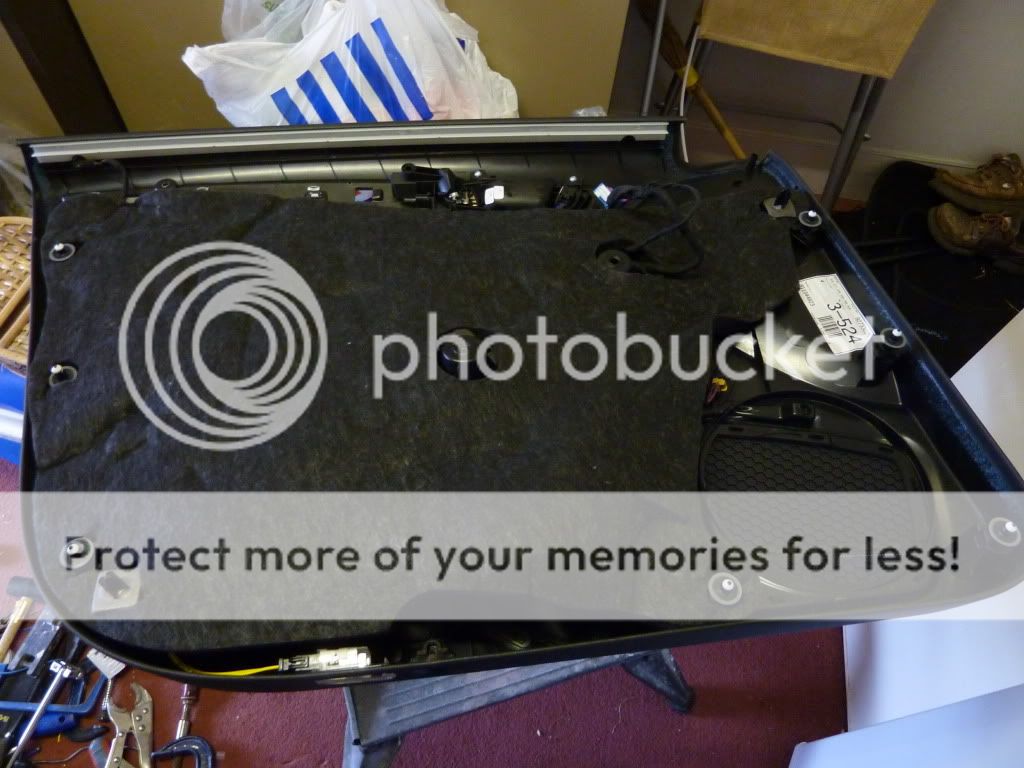
Place the felt padding back onto the door
P1000746.jpg


In the above photo you will see the 7 door clips. The are the small white sphere type things with a black dot in them.(technical term!)

Refit the door card in the opposite way it came off. Start with the wiring loom first, then the door handle cable and then offer the top of door card up to the top ot the door along the window edge and lower it and align the 7 door clips with their respective holes. Push home and then screw in the 5 torx screws.

You will then need VDS to code the lights to the car. I can't at this stage remember the modules but go into the modules for front left and front right doors and its there. Any questions on this and i'll dig out my cable and do some screen shots.

The front passenger door is exactly the same as this.

The rear doors are different in that instead of a 32 pin blue plug, its a 16 pin black plug. The positive connection is pin 12 and the negative connection is pin 13.

At the time of doing this there was no coding in VDS to code in the rear door lights. By a process of elimination the coding was worked out in this thread - http://www.audi-sport.net/vb/showth...-light-retro-fit-and-puddle-light-information

Any questions or comments please let me know.

I have also successfully fitted the front and rear footwell lights and have just ordered the door handle illumination lights. I'll do a write up for the door handle lights as I do it. The footwell lights are done and were quite fiddly to do especially plugging into the central electronic module. I'm happy to answer any questions regarding it though.

Cheers

Neil

hiya mate. I’ve begun my research wanting to run some 12V LED’s into my door card for the door handles and door pockets… do you have a wiring diagram for this? I would like to know which wire supplies the lights on the door switches and if they’re 12v fed.

kind regards

rich
 
mich habe versucht die Türwahnleute hinten nachzurüsten. Ich habe habe das wie vorne mit pin 16 und Masse pin 5 gemacht, das klappte nicht und an pin12 und 13 versucht, das auch nicht funktionierte. Was soll ich jetzt machen? Gruß Martin M.
With a little help from Google Translate: :)

"I tried to retrofit the door madmen* at the back. I did the same as before with pin 16 and ground pin 5, that didn't work and tried on pins 12 and 13, which didn't work either. What should I do now? Greetings Martin M"
*Not sure about that; it might be a quirk of the translation.