SeanTFSI
Sticking with Audi
So I recently came to notice a lot of threads about leaky boot lids on a B8. Just like all parts on my year of car, there was a recall. My boot fell foul last year but dried up so I thought it fine until it happened again recently.
I checked the upper brake light, sealed it and put it back together. Job done, or so I thought. The issue with the current mass of posts is they don't resolve it, just send it to the garage. The fix cost me £5, I know it has worked because I dumped two buckets of water on the joint with no leaks!!
It's a very simple process, and something that'll take an hour if you do it right.
First, remove your lights. Simply unscrew the nut which will free the light. disconnect the bulbs and unclip them. Carefully lower the boot and lift the side of the light next to license plate toward the side of the car. As if you're spinning it and off. Image below shows nut on left and bulbs with connection to remove.

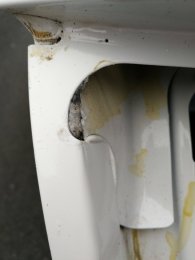
If you have found the leak, the below images will show you how obvious it will be. One shows mud and a diet stain, other is spotless.


Clean off all the mud, make the area spotless. Odds are you won't get th light spotless. The black piece in the picture came off my and I cleaned as best I could, then just super glued it back in.


What you need is none setting silicone. This means you can replace your lights or clean them off with no damage, it's very much waterproof.

I don't have pictures from here on, but should be understandable. Where you can see the metal parts welded together is a hole. As you can see on mime, this is where the water enters. There is also another tiny hole just above. First time i did this i missed the small one so the water got blocked by silicone in the bigger hole and went into the smaller hole instead.
Fill both of the holes with silicone. Best thing to do is use a small nozzle and build into the bigger hole. Once that's done, create a bead of silicone all the way around where the black foam on the light meets the metal frame. I also put a bead along the metal where the top of the light sits as a fail safe. It can't hurt, and can't be seen.
Job done! Stuff takes about 15 minutes to set, hook the outerside of the light where it sits and turn the light back into place. Slot the nut back into place and tighten slightly. Check light is sitting right and tighten.
Give it 20 minutes, then pour a bucket over the shut boot, let it drain then lift up and down listening for a trickle of water. Hopefully, there isn't one!
I checked the upper brake light, sealed it and put it back together. Job done, or so I thought. The issue with the current mass of posts is they don't resolve it, just send it to the garage. The fix cost me £5, I know it has worked because I dumped two buckets of water on the joint with no leaks!!
It's a very simple process, and something that'll take an hour if you do it right.
First, remove your lights. Simply unscrew the nut which will free the light. disconnect the bulbs and unclip them. Carefully lower the boot and lift the side of the light next to license plate toward the side of the car. As if you're spinning it and off. Image below shows nut on left and bulbs with connection to remove.
If you have found the leak, the below images will show you how obvious it will be. One shows mud and a diet stain, other is spotless.
Clean off all the mud, make the area spotless. Odds are you won't get th light spotless. The black piece in the picture came off my and I cleaned as best I could, then just super glued it back in.
What you need is none setting silicone. This means you can replace your lights or clean them off with no damage, it's very much waterproof.
I don't have pictures from here on, but should be understandable. Where you can see the metal parts welded together is a hole. As you can see on mime, this is where the water enters. There is also another tiny hole just above. First time i did this i missed the small one so the water got blocked by silicone in the bigger hole and went into the smaller hole instead.
Fill both of the holes with silicone. Best thing to do is use a small nozzle and build into the bigger hole. Once that's done, create a bead of silicone all the way around where the black foam on the light meets the metal frame. I also put a bead along the metal where the top of the light sits as a fail safe. It can't hurt, and can't be seen.
Job done! Stuff takes about 15 minutes to set, hook the outerside of the light where it sits and turn the light back into place. Slot the nut back into place and tighten slightly. Check light is sitting right and tighten.
Give it 20 minutes, then pour a bucket over the shut boot, let it drain then lift up and down listening for a trickle of water. Hopefully, there isn't one!