headlight washer install without holes in bumper work in progress

Troubs12

Well-Known Member
VCDS Map User
Joined
Oct 24, 2009
Messages
549
Reaction score
283
Points
63
Location
Plymouth, Devon
hello everyone as the post says i'm going to attemp to install headlight washers to my a3 without basically the story is this:

i bought an 04 a3 1.9 tdi and have since upgraded to the following in order:

Cruise control
Front and Rear S-Line suspension
2.0L front hubs and brakes as the hubs were too small for the S-Line shocks
Double din conversion as i wanted to go up to rns-e when i could afford it concert fitted until
Bose sound system fitted (two day rewire bledy nightmare but worth it)
rns-e & Bluetooth
Black headlining

Double grill to single S-Line front end with shiney black grill (bonnet, brand new bumper, fogs and grills)

Before
3079-img-0455
3079-img-0455

3079-img-0455.jpg


And After


3078-img-0456.jpg


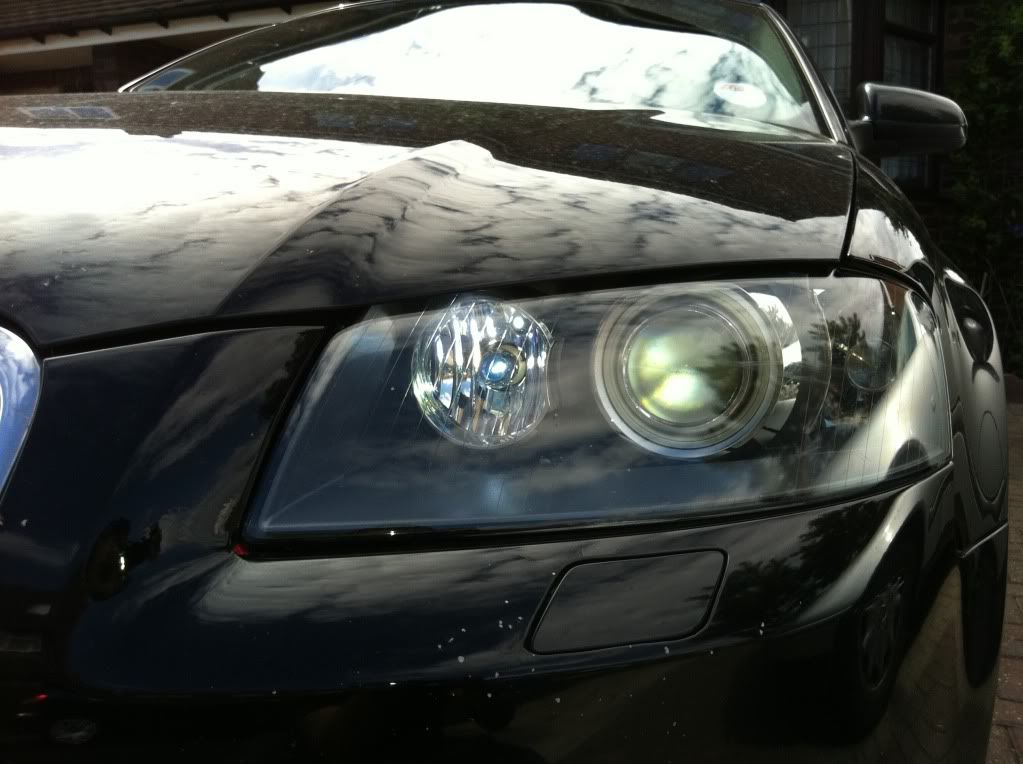
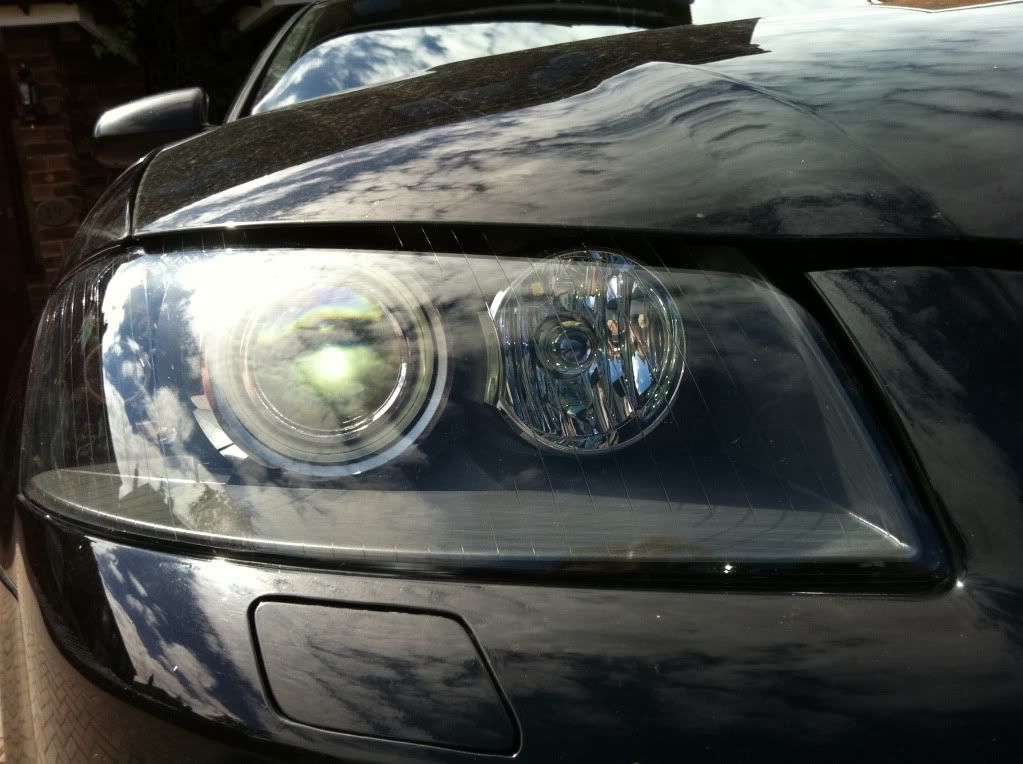
xenon headlights as i found them cheap cheap on ebay

and so far thats it however as i've gone up to xenons i need to add the washer and auto level which is just my luck i had to buy a brand new bumper as it worked out cheaper at the time (£196 inc vat) than the damaged ones on ebay i figured at the time that headlight washers and xexnons would be too expensive and that i'd be better off without. Of course then i found a guy breaking an a3 that he'd crashed so i got both xenons, washers, auto level sensors and ecu for under £500

so i've pulled the bumper off this weekend which the intention of fitting the washers after spraying up some 8p3 caps to fit when i managed the get the brackets off i found the template lines didn't match up does anyone know if the s-line bumper uses the s3 caps or another type (there are 3) i hae an s3 one to check but as the bumpers back on now it seems abit pointless to rip it off again as knowing my luck it'll be the third type haha i've ordered the third type in and check then if anyone has done this and can offer any help or advice other than don't do it and you cant fit them without the holes would greatly appreciated i'm trting to add some pics but i'm having an issue ploading them they are in my album if anyoone wants to check them out
 
Last edited:
If you have a 04 car then you need a 8P2 caps, not 8P3 as this was the facelift model for 2009MY with completely different front end. I assume you bought a 8P2 S-Line bumper?
 
ah that might be why they didn't fit then yes thats the bumper i bought the choices of caps are 8p0 (S3) 8p3 and 8p4 now i have 2 8p3 caps (no good) an 8p0 cap not checked yet and i got tps to order me in the other just so i could check it i was thinking that the s-line bumpers would share the same caps if you follow me
 
yeah as scott said mate you need 8p2 caps not the 8p3 ones they are totally different good work so far tho mate on your front end conv want to do this to mine but havent got the funds spare at the mo hope to have this done by the end of year maybe
 
I agree with you however I can't seem to find an 8p2 part number anywhere all I can find are 8p0 8p3 and 8p4 I've a feeling that the 8p0 ones are going to be the ones I need I'll find out during the week
 
As I said mate, I'm skeptical about you trying to cut holes & plastic weld fixings for the jets on a bumper that wasnt made for them, fixings will need to be robust tbh to handle the water pressure excerted through the jets & also any stress from the jets/piping themselves, but I'm always 1 for pushing the barrel as such, so good luck :)
 
I have headlight washers from factory on my sport model A3, when i upgraded to the Sline front i couldnt find one with the holes cut so the body shop said they could cut it for me...
cannot even notice that it wasnt there from factory now.

5c3fb303.jpg

9e02a7f3.jpg
 
well success i found the right ones they are part numbers

8P4 955 275 GRU Left
8P4 955 276 GRU Right

i ordered one in from TPS durring the week and matched it up so thats one herdle done when i took the bumper off last week and removed the washer jer holder i found thats its held on with double sided tape the same i'm pretty sure its the same stuff that you use on the rear spoiler D438 515 A1 which as luck would have it i happen to have a roll of in my toolbox also i found a fresh tube of a bonder that we had to use on the Touarag rear spoiler recall i reckon if it can hold one of them on it'll hold the bracket fine however onward and upwards i'll probably post results next week as i wont be able to get the car in till im not working and i reckon its better doing it inside
 
Well it took a while due to a double hernia from lifting a 6 speed box into a golf but success i finished the retro fit step by step with pics if anyone is interested

Step 1
remove bumper

4323-img-0680.jpg


Step 2

Remove the mount for the jet (stuck down with double sided tape by audi)

4322-img-0681.jpg


at the top right you can see the template that has to cut out carefully however as you'll see from the next pic it is too small

4321-img-0684.jpg


Step 3

mask off around the cover and draw around it leaving a few mm for safe working clearance early pic i hadn't finished the lines but thought i'd better snap a pic now

4320-img-0685.jpg


Step 5

remove the bumper again and the washer jet, cover and mount and using a small file set very carefully file down to the line that is on the tape (this took me about 1-2 hours each side lucky everyone had left work so i had peace and quiet)

after that refit the mounting bracket either using a bonder or like audi double sided tape i used both, tape in the middle and bounder on the outside then cut the hole in the bottle fit the pump run the wires to the relay and j519 code and pressto your done

4319-img-0689.jpg


its a bad pic i know but it actually looks or i should say looked the part as these pictures were taken about two weeks ago then this happened......


4318-p1040571.jpg


A nice encounter with a lorrys rear end has done my wheel, wing, bumper, painted grill and lock/radiator carrier
needless to say when the repairs done i'll be getting the bumper with holes precut now but just wanted people to know it is possible
 
about two weeks ago then this happened......


4318-p1040571.jpg


A nice encounter with a lorrys rear end has done my wheel, wing, bumper, painted grill and lock/radiator carrier
needless to say when the repairs done i'll be getting the bumper with holes precut now but just wanted people to know it is possible

good effort dude, but ouch!
maybe its time to do a facelift front end??
 
It is already a facelift front end (see the first post it's the same car lol) 04 is the double grill bumper and I decided that I liked the 07 s line bumper so I changed the bonnet bumper and fogs also had the grills sprayed shiney black like the golf gt grill personally I think it looks better well after a polish that is
 
Ah I'm with you now to be honest it's gonna be too much effort and personally I prefer the a3 before they changed the front end to the 8p3 I did consider it even bought the bumper but changed my mind when I saw it besides haven't you got to change the wings, mirrors, lights and bonnet?
 
i might however do the mirrors at some point as i like the repeaters in the mirrors and just get the wings filled and sprayed to be honest if i had time and the money i'd do it now while its going in to get sorted but concentrating on the rear now. Got the my11 rear lights in and hopefully the 2011 rear bumper trying to find a genuine rear parking sensor kit for it at the mo if anyone knows of anyone selling?
 
just a new pump in the washer bottle there is a template hole on the bottle for it you just have to be careful and get a new seal then wire it to the relay give the relay a live from the proper fuse 23 and then wire relay to the on-board power supply (ops) then after coding its works like it would from factory if anyone wants to do this mod i can provide the correct wiring diagram from elsa or any other help/advise
 
Just make sure you wire these up properly & to the correct fuse/ground points as it uses a 2.5 feed, you dont just whack this onto any fuse point, also check you have the correct fuse points in the fuse box as not all are wired fully, normally its fuse point 32 & I've found low line cars wont have the fusepoints fitted for this usually, hence why I run a new fuse bar in from the fuse/power board under the bonnet so its all safe & per oem, which provides 6 more fuse points from fuse 32 onwards.
 
thats strange mine says 23 the powers there it all checks out via current flow and after test worked fine maybe they changed the location later?
 
Engine/box codes, years differentiate, but all cars I've done have been fuse 32, but if yours shows 23 in elsa then its all good.
 
sorry but it was annoying me it looks like they changed it to 32 after 2006-current god bless VAG for making our lives easy huh
 

Similar threads