

[HOW-TO] Install heated seats (incl. Kufatec retrofit cable)
- Thread starter henkkeumus
- Start date
You are using an out of date browser. It may not display this or other websites correctly.
You should upgrade or use an alternative browser.
You should upgrade or use an alternative browser.
Not that I can remember. Last modification I did was adding the MFSW buttons and the Q3/RSQ3 facelift climate control unit install.
The car did get a service at a 3rd party shop (and I'm not too happy with them either. They changed the interior filter, probably with some paper for 25 euro! I had the best MANN filter in it for a couple of months, which costed me 20 euro), but I don't think they touched anything regarding this. Oddly enough, I noticed error 01309 today, which I didn't see last time I scanned the car multiple times (usually driving around fixes it, but not this time. The error usually pops up if you disconnect modules and reconnect them).
The car did get a service at a 3rd party shop (and I'm not too happy with them either. They changed the interior filter, probably with some paper for 25 euro! I had the best MANN filter in it for a couple of months, which costed me 20 euro), but I don't think they touched anything regarding this. Oddly enough, I noticed error 01309 today, which I didn't see last time I scanned the car multiple times (usually driving around fixes it, but not this time. The error usually pops up if you disconnect modules and reconnect them).
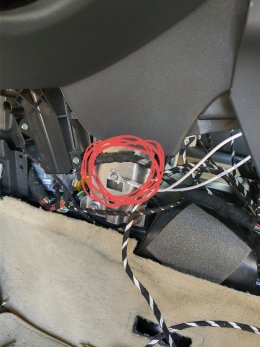
The connector does fit the fuse box. I have it wired this way in slot 37. I thought it didn't fit at first too but here's a pink plastic tab that you need to slide back before you can pin any wires in.The Kufatec guide says that you have to connect the D13/D14 to a live Kl.30. Oddly enough, the connector doesn't fit the fuse box. I wanted to connect it to Fuse 37, which is for the heated seats (and add a 20A fuse), but instead, I now have it directly connected to the 12V rail from that fuse. It's a bummer, no security, unless I apply a new connector that fits in the fuse box.
Try this in VCDS.Okay, disabled it and the error in Central Electronics is gone. The J519 is still there. Any idea?
Address 08 Auto HVAC > basic settings > group 01 > go
Clear faults and check for errors.
Unfortunately it didn't clear the error. The basic setting seems to work fine, when I press the on/off/next button I can hear the flaps actuating.Try this in VCDS.
Address 08 Auto HVAC > basic settings > group 01 > go
Clear faults and check for errors.


I'll try the 12v connector later, but from the looks of it, the connector seemed differently from the other connectors in the fuse box. Unfortunately I deleted the pictures I took, so I can't recheck at the moment. There was no pink plastic tab when I checked, are we talking about the same fuse box? (the one at the left/driver side door).
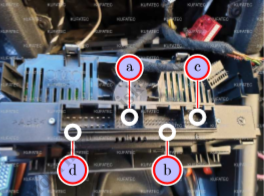
Yeah, that's the correct fuse box. Pink tab was a poor choice of words, it's more like a pink housing. I don't have a clear picture, so I've borrowed the one from post #13 and illustrated it for you and others that come across this thread. If you have the Kufatec loom which I assume you do, then the connector is correct and these images should help you wire it in into the fuse box.I'll try the 12v connector later, but from the looks of it, the connector seemed differently from the other connectors in the fuse box. Unfortunately I deleted the pictures I took, so I can't recheck at the moment. There was no pink plastic tab when I checked, are we talking about the same fuse box? (the one at the left/driver side door).
The release clip is located in the circled area from what I remember but if I am wrong then it will just be near one of the edges.
As I don't have a clear image of the release clip on the A3 fuse box I've attached this image to show what it looks like on a A4 fuse box (it's the same on the A3).
Pry the black clip up and slide the entire pink housing into the unlock position.
I did it yesterday. The first pic you shared is somewhat incorrect, but I got it. The release clip is at the left side and the purple block moves to the right instead of downwards. Then I could insert the pin.
Unfortunately I don't have a spare 20A fuse (will have to get one), but for the time being I use the spare 30A fuse (I know, it's unsafe, but it's better than not having it fused in the first place!)
Regarding my thoughts about it not fitting, the connector on the Kufatekc loom is different than the ones found on the rest of the fused cables, but it fits just fine.
Fun to see my topics are still being used. Sorry I don't check them that often since I drive a 8V nowadays.
I see you fitted the Q3 panel right? Maybe @Troubs12 can help you out, he got the heated seats fitted too and has a Q3 HVAC unit.
I got a 'normal' A3 unit so not to sure why it's prompting you that it hasen't communication if everything works well.
Just like MT-V6 told, no coding is required for this fit as it's controlled by the HVAC unit.

Hmm yes, I retrofitted the facelift (RS)Q3 climate control unit. The only thing I changed was the level 3 heat adaptation level (set to 55) and disabled the level 3 to 2 and level 2 to 1 timers (I can instantly feel that it drops a level and it takes a while for it to heat up again).
I plan on pulling the forked end of cables 13/14 over to the fuse box (slot 37) to mirror the factory location. My vehicle has power seats so I ordered the lordosis loom. Now obviously, the current cabling in the vehicle already provides power which appear to be mapped to pins 8&9. My loom as two K1.30 additional wires that presumably are for powering the seats, not the heat. Can you confirm that the 13/14 forked cable is indeed the exclusive source for heat power?Will post a photo of the location this weekend.
You can also open your fusebox and connect it to a live feed in there (thats what I did later). The Kufatec loom comes with a cable for the constant plus that can be fitted in an empty slot on the fusebox.
The white loom is the constant plus loom. On the other half there is a constant live feed from Audi originally and they are connected with a 20A fuse. Nice and tidy.

Verstuurd vanaf mijn ONEPLUS A5010 met Tapatalk

Kufatec seems to indicate this with the following instructions:
Plug D: Pin 13 and Pin 14
Note: For the cable set variation with Lordosis, another additional cable is layed to the fuse box and pinned into a steady plus K1.30 leading slot.
The cable that should be connected to the fuse box on slot 37 is the power source line for the heated seats. On the plastic cover from the dash it's instructed to use a 20A fuse, which pretty much confirms it.
I guess I should clarify that my question was with the existing power lines to the seats in place, I either trace them back and run the K1.30s in the loom to their position or just strip out the K1.30s in the loom and leave the existing wires in place. Then for power for the seat elements, just run the 13/14 line over to the fuse box, correct?The cable that should be connected to the fuse box on slot 37 is the power source line for the heated seats. On the plastic cover from the dash it's instructed to use a 20A fuse, which pretty much confirms it.
Since you already have powered seats, you have the black connector, so the easiest thing you can do is remove the black connector from the Kufatec loom and put the wires in the connector from your car's harness. Otherwise you'd have to remove the current harness (and God knows how it's all connected in the front) and replace it with the Kufatec loom that has both connections for the heat elements and powered seats mechanics.
If there are double wires, check the instructions manual, which states which wire is what in the black connector.
You could've bought the seat heating only variant and use the wires from that loom, no need for the extra wires from the powered seats, since you already have them.
Sorry if I still didn't completely understood your question, did you buy this set or the electric seat adjustment / lordosis set?
I bought the electric seat adjustment / lordosis set thinking I needed that since I already had power seats. As you said, it may be worth removing the power seat wires and then overlay the existing cabling the heating wires using the existing black connectors. Price for either was the same so just the effort to pull out.Since you already have powered seats, you have the black connector, so the easiest thing you can do is remove the black connector from the Kufatec loom and put the wires in the connector from your car's harness. Otherwise you'd have to remove the current harness (and God knows how it's all connected in the front) and replace it with the Kufatec loom that has both connections for the heat elements and powered seats mechanics.
If there are double wires, check the instructions manual, which states which wire is what in the black connector.
You could've bought the seat heating only variant and use the wires from that loom, no need for the extra wires from the powered seats, since you already have them.
Sorry if I still didn't completely understood your question, did you buy this set or the electric seat adjustment / lordosis set?
You bought the "incorrect" cable. That cable is meant to retrofit both heated and powered seats. You need the heated seats only variant. In the end it doesn't really matter, you'll now have extra wires. Just plug in the wires meant for the heat elements and leave the power seats as is to save yourself the work (otherwise you'd have to connect the other end of the powered seats section of your Kufatec loom).I bought the electric seat adjustment / lordosis set thinking I needed that since I already had power seats. As you said, it may be worth removing the power seat wires and then overlay the existing cabling the heating wires using the existing black connectors. Price for either was the same so just the effort to pull out.
Makes sense. So the heated seats draw their power from the "Y" cable (pins 13/14) that goes from the back of the climate control to - in my case - the switched 12V fuse, correct? The 2 ground wires are to ground each individual seat, not one for the heated elements and one for the power seats.You bought the "incorrect" cable. That cable is meant to retrofit both heated and powered seats. You need the heated seats only variant. In the end it doesn't really matter, you'll now have extra wires. Just plug in the wires meant for the heat elements and leave the power seats as is to save yourself the work (otherwise you'd have to connect the other end of the powered seats section of your Kufatec loom).
I don't exactly remember how it's wired in the loom, but I think that the main power is drawn directly from the fusebox location towards the heat elements and regulated in the climatronic unit through pins 5/6 (or 13/14) for each seat. This makes the most sense to me. Unfortunately there's no complete wiring diagram of the whole system available from Kufatec, but I bet you can find it in a workshop repair manual.Makes sense. So the heated seats draw their power from the "Y" cable (pins 13/14) that goes from the back of the climate control to - in my case - the switched 12V fuse, correct? The 2 ground wires are to ground each individual seat, not one for the heated elements and one for the power seats.
The two ground wires are for each individual seat and can be connected on the right side of the transmission tunnel (even though the manual mentions the driver's side on LHD, but it's correct on the RHD instructions).

I can't figure out what the issue here is. I get the Z45 and Z46 errors. I removed the passenger seat (Z46) and measured everything.
The elements are connected in series. The brown wire (pin 4 on the male big black connector) is connected to the top element. The return of the top element is connected to the bottom element's "input". The return from the bottom element is connected to the black/green wire of the big black connector next to the temperature probe pins.
Resistance with both elements ~1.2-1.8 ohm.
Bottom element has a resistance of ~1.1 ohm and the top element has a resistance of ~0.6 ohm.
Could it be that the grounding isn't well in the car?
I grounded the kufatec loom on the passenger side behind the plastic cap at the transmission tunnel.
I did a continuity test and the 12V from the fusebox arrives well to the ends of the kufatec loom where the seats plug in
Last edited:
Did some more testing and I found
fuse box (12v rail) to ground = 12v

Orange is the temperature probe
Yellow is the 12V line (or rather, should be)
Blue is the return (I assume to the climate control unit which regulates the current flow and then to ground).
With running engine I checked the voltage at the yellow pin and it's around 5V (instead of what I assume 12V).
I also tried enabling the heated seats (button on the climate control unit), but it didn't change the voltage as I expected since the unit is stuck with the error for Z45 and Z46, thus it would just ignore trying to set the system).
Any idea what the issue might be?
Both chairs seem to be fine and a ~1.8 ohm resistance between the yellow and the blue pin has been measured (on the male connector of the seat).
fuse box (12v rail) to ground = 12v
Orange is the temperature probe
Yellow is the 12V line (or rather, should be)
Blue is the return (I assume to the climate control unit which regulates the current flow and then to ground).
With running engine I checked the voltage at the yellow pin and it's around 5V (instead of what I assume 12V).
I also tried enabling the heated seats (button on the climate control unit), but it didn't change the voltage as I expected since the unit is stuck with the error for Z45 and Z46, thus it would just ignore trying to set the system).
Any idea what the issue might be?
Both chairs seem to be fine and a ~1.8 ohm resistance between the yellow and the blue pin has been measured (on the male connector of the seat).
Eventually it was a bad grounding spot. I connected the ground wires to the passenger side (right side) behind one of the two plastic covers.
A better spot is directly behind the cover of the center console, close to the climate control unit.
It's a bit tricky to put the center console back, as you can't bolt the wires before putting the console back. I put the bolt through the console and the two ground wires and slowly put the center console back and tightened the bolt.
Attachments

georgebm8PA
New Member
Hi mate, great tutorial on how to install the Kufatec wiring for the heated seats. I managed to get the drivers side seat to work (RHD), however, not the passenger side. I followed your troubleshooting instructions and I noticed I only had a voltage of 3 not 12 on pin 2 under the seat. The voltage shown was when the switch was turned up to 6. Do you have any idea where I could have gone wrong. I did a continuity test along the wires and they were all fine. Any help would be greatly appreciated. ThanksBackstory:
Well, after seeing much information (dating 2014) but no discrete information in how to connect the retrofit cable from Kufatec I took a leap of faith and bought myself a clima-unit with heated seats option and the Kufatec loom.
After 2 days of measuring, fitting and sweating I managed to get it working. This manual will unclude the pinout for a LHD aswell as a RHD.
The loom will come without a manual to lay the cable so the way I describe it in this tutorial isn't necessarily the 'best' one.
Tools needed:
- Clima-unit with heated seat options: 8P0820043BH XHA
- Kufatec retrofit cable (I have the 'only heated seat' variant): https://www.kufatec.com/en/audi/a3/...heating-harness-for-audi-a3-8p-8p-sport-34045
- Torx: TX25
- Inbus: M6
- Socket wrench: Size 8 and 10
Note before starting:
Since I disconnected the seats in my how-to I also disconnected the airbag connector. Just to be sure, disconnect your battery before working on this retrofit.
This how-to is done on a LHD car (I'm Dutch). It doesn't really matter, the how-to for a RHD is the same except for the pins behind the clima which I will address later in the tutorial.
What is in the Kufatec package?
- Retrofit loom
- Additional steady plus cable.

HOW-TO:
Step 1.
Get your radio out the dash.

Step 2.
Pull the hazard light switch trim out. It's in very firmly so a little pressure needs to be applied. I scratched my hand like a dozen of times disconnecting this trim. A true evil piece.

Step 3.
Place something protecting over your ashtray as the clima-unit is also an evil piece that is very stuck in the dash. You need to pull it towards you and it will get loose.


Step 4.
Disconnect and disassemble the seats. Won't go too deep into this since it's pretty straight forward. 4 bolts on the corners of the rails and the connectors in the floor.

Step 5.
This step is kinda optional but I wanted to lay the cable in a neat and invinsible manner. So I got the midconsole out to lay the cable under the carpet.
5.1: On both sides of the midconsole there are 2 size 8 bolts. They are hiding under plastic clips who can be easily removed.

5.2: Get your ashtray and geartrim out. Open your ashtray and get your fingers under the geartrim. It should be an easy go since they only get hold by 4 plastic pins. When the trim is out it will show you 4 TX25 bolts. Unscrew those. Since you are here also unscrew the 2 size 8 bolts on both sides.

5.3: Now get on the ground and get your M6 inbus. On the bottom of the trims on the side there is a inbus screw hiding in place. Get that thing out on both sides.

5.4: Last but not least there are 2 very very difficult to reach bolts hiding in the back of the dash. Please use a towel of some sort to catch the bolts as they will fall out into nowhere.

5.5: Now on to the backside of the midconsole. Remove the ashtray by opening it and pulling it towards you. After the ashtray is out you can also remove the box under it. It will reveal the last 2 size 8 bolts. When you got those bolts out remove the armrest by bolting out the big size 18 bolt in the middle.
My A3 came with telephone preparation so there are cables on the picture. It's not certain your A3 has those, so don't bother looking for them if you don't see them


And now the midconsole can be pullet out (gently). Some cables are clipped into the midconsole so gently pull it up and check the cables (cigarette lighter, AUX, telephone etc..)

Step 6.
Get your Kufatec loom. You will see the 2 big black plugs who obviously connect to the black ones underneath your seat. But you do I know which one should go on what side? Well, on the cable you will find imprints. Look for the biggest cable on the connector (PIN 1). It will say one of these two things: BFS or FS
FS = Fahrersitz = Driverseat
BFS = Beifahrersitz = Passengerseat
I wanted the cables tucked away in a neat way, I forced my arm under the carpet and pulled the cable from the midconsole to the connectorbox under the seat for both seats.


Step 7.
The fun part, the connectors behind the clima unit. They are hold in place by a tie-wrap and a clip. Disconnect the housing from the actual connector to reveal the pins.
NOTE: THE KUFATEC LOOM ONLY USES CONNECTOR C AND D.
C = Bown/Goldish connector.
D = Black connector (biggest).
You can check the back of your clima-unit, the letters are stamped on the slots.

Press the black pin DOWN.

Step 8.
When you got the housings of pull the Kufatec loom from the midconsole towards the clima unit. Now the pinning can begin. How do you know what hole belongs to what pin number? On the actual connector itself you can find the numbers corresponding to the hole (where the pin goes into).


Just as on the cable under the seats these cables also have imprints on them. They correspond to the pins they should go. Since Kufatec is a German company and in Germany they produce LHD cars the imprints won't correspond for UK. Check the table underneath for the correct pinout.

Step 9.
Connector D, pin 2 is already occupied. This is right, splice the T16d/2++ loom into the existing loom. I used a T-connector for this. If you pin 2 is not occupied you can use the factory connection from Kufatec.

Step 10.
Wire things up and put the housing back on the connectors. Use a tie-wrap to get them tight since the connector will be loose in it without!

Step 11.
I used the right side of the midconsole to put my ground cables. The manual states under the A-column but that would require me to pull the cable all over to the other side. So I just unscrewed the plastic trim on the side and brushed some of the paint of the chassis.
Put the trim back and mounted the ground to it. Checked it with a multimeter and works like a charm.


Step 12.
The only thing that is not connected now is T16d/13 and 14. These cables will run to a single connector which need to be connected to a 'dauerplus' (Constant 12v current). I pulled a cable from my + pole on the battery through the firewall and spliced the cables together.

Result and testing:
Before getting everything back test your seats. Plug in the seats and connect the wires under your seat. Connect the battery again and turn your key to ignition.
It can take up some minutes before your seats will get hot the first time, but when they do it's fire

Troubleshooting:
If your seat doesn't work;
- Check voltage on PIN2 under your seat. When you wired it correctly there should be a 12v voltage on this pin.
- Check the connection of T16d/2++ this is a spliced loom and can cause errors.
- Check your ground, make sure it is grounded properly!
Still having issues? Please respond in this topic and maybe I can help you out.
Best of luck!
Try another ground point. The one I showed in a previous post seems to work better.Hi mate, great tutorial on how to install the Kufatec wiring for the heated seats. I managed to get the drivers side seat to work (RHD), however, not the passenger side. I followed your troubleshooting instructions and I noticed I only had a voltage of 3 not 12 on pin 2 under the seat. The voltage shown was when the switch was turned up to 6. Do you have any idea where I could have gone wrong. I did a continuity test along the wires and they were all fine. Any help would be greatly appreciated. Thanks
After doing the heated seats on the A3 8V, I think that the cable layout shown here is incorrect (however, it works).
The 8V has the loom running differently, despite the loom being nearly similar to the 8P loom in terms of length.
You're probably supposed to wire it behind the glovebox compartiment and under the steering rack (above the pedals), then through the side pillars down the sides towards the seats. This way the cable isn't under the carpet and won't ever have issues with potential moisture. It also makes sense because the length of the left and right seat connection till the Y split is quite long.
Ground points should be under the side/door trim as on the 8V.
See the preview manual of the 8V here. The 8P routing layout should be similar.
georgebm8PA
New Member
Will give that a go. I did ground the wires to the A-pillar next to the bonnet release handle as kufatec suggested.Try another ground point. The one I showed in a previous post seems to work better.
After doing the heated seats on the A3 8V, I think that the cable layout shown here is incorrect (however, it works).
The 8V has the loom running differently, despite the loom being nearly similar to the 8P loom in terms of length.
You're probably supposed to wire it behind the glovebox compartiment and under the steering rack (above the pedals), then through the side pillars down the sides towards the seats. This way the cable isn't under the carpet and won't ever have issues with potential moisture. It also makes sense because the length of the left and right seat connection till the Y split is quite long.
Ground points should be under the side/door trim as on the 8V.
See the preview manual of the 8V here. The 8P routing layout should be similar.
CryptoCaddy
New Member
Hi there i too live in the Netherlands, and i came across this topic when i was searching for pinout info for the set of 2014 TFSI 16v Audi TT manual heated seats I'm trying to retrofit into my VW caddy, the caddy has the, Black and Yellow plugs and so does the Audi but they are both female so not quite plug and play, if anyone knows of any adapter cables or could tell me what each of the cables are/do, id be grateful if you could share a link to buy these or the pinout info.
Seat heating is not al must but id really like to get airbags connected for safety reasons.
Thanks in advance.
Seat heating is not al must but id really like to get airbags connected for safety reasons.
Thanks in advance.
Mike93
Registered User
I've finally gotten all the parts and tools I need to do this
Wish me luck my friends holy ****.
With the fuse box part I just shove it in where the fuse goes and plug the fuse over it? 37?
Honestly seems a bit over whelming looking it it. Hoping it will not be as bad once I get going.
I've already got my climate bit out and stuff so the hardest part I think will be doing the pinning. I've read about it enough now though for over a week so I've got an ok idea of what I need to do.
Just praying I don't blow my car up lol
Mike93
Registered User
I've finally gotten all the parts and tools I need to do this
Wish me luck my friends holy ****.
With the fuse box part I just shove it in where the fuse goes and plug the fuse over it? 37?
Honestly seems a bit over whelming looking it it. Hoping it will not be as bad once I get going.
I've already got my climate bit out and stuff so the hardest part I think will be doing the pinning. I've read about it enough now though for over a week so I've got an ok idea of what I need to do.
Just praying I don't blow my car up lol
She's out
gonna get my seats back out in the morning when it's light and I can concentrate and do the pinningMike93
Registered User
What a mission.
Forgot to plug my cig lighter and aux in. Atleast I'm a master at removing it all now. Omg.
Just cut the end off a fuse and soldered a wire to one side.
Does anyone know which side is "live" is that how it works?
Mike93
Registered User
Passenger side works but drivers isn't getting hot even when I switch the sides on the control passenger still gets hot but drivers isn't?
Passenger side of the loom is getting 12v but drivers isn't? Any ideas?
even when I switch the sides on the control passenger still gets hot but drivers isn't?Passenger side of the loom is getting 12v but drivers isn't? Any ideas?
You did the wiring incorrectly (just like OP, but for OP it happened to work out). Read the last posts I made in this thread.Passenger side works but drivers isn't getting hot
Passenger side of the loom is getting 12v but drivers isn't? Any ideas?
First of all, the fusebox looks like a mess. The slot should be not populated, so you can just plug in the wire from behind!
Secondly (as my posts), you don't have to remove the center console. You need to wire through the dashboard, behind the glovebox, down the A pillar, under the door sills, under the carpet to the seats. At the door sills you'll find proper earth spots. (Hint)
It took me a while to get a better understanding of automotive electronics, but it all makes sense to me now. Always do it the proper way, or you'll get headaches later on.
Mike93
Registered User
I ended up ripping it all out again and changing connector to the other seat and still same problem so guessing my seat is broken? I swapped my original ones for full leather heated and a bit of cash but wasnt tested. Still looks better.You did the wiring incorrectly (just like OP, but for OP it happened to work out). Read the last posts I made in this thread.
First of all, the fusebox looks like a mess. The slot should be not populated, so you can just plug in the wire from behind!
Secondly (as my posts), you don't have to remove the center console. You need to wire through the dashboard, behind the glovebox, down the A pillar, under the door sills, under the carpet to the seats. At the door sills you'll find proper earth spots.
It took me a while to get a better understanding of automotive electronics, but it all makes sense to me now. Always do it the proper way, or you'll get headaches later on.
I'm keeping my eye out for a drivers side one.
I ended up using the bolt in the side like another user here.
Where the bolts go in though, there is like a bracket that doesn't conduct electricity? So the connectors don't really sit right on the metal behind it. You have to strip some of the cables cover away and wrap it around something bare metal. Just attaching the connector to most of the screws won't work properly.
I've tested it with a multimeter now with the metal bit of the door lock so I 100% know it's grounded through the cars body.
Gutted aswell weather is freezing here would've been just in time
atleast my girlfriend gets a toasty ***Can you do a resistance test on both heat elements separated and connected with the wiring harness (from the seat)?
It should be under 10Ω and the temperature sensor around 10kΩ depending on the current temperature.
What error do you get with a scan tool (preferably VCDS or ODIS)
Ps: the bolt near the door sill is what you should use. I believe it's also a bit hidden under the carpet. Unfortunately I didn't took pictures of the 8P install.
Mike93
Registered User
I will have to try it over just ordered a cable. There is no errors from standard odb2 scan.Can you do a resistance test on both heat elements separated and connected with the wiring harness (from the seat)?
It should be under 10Ω and the temperature sensor around 10kΩ depending on the current temperature.
What error do you get with a scan tool (preferably VCDS or ODIS)
Ps: the bolt near the door sill is what you should use. I believe it's also a bit hidden under the carpet. Unfortunately I didn't took pictures of the 8P install.
Will test the seats with multimeter again but it's going to be my heating element or the thermistor? Will try it tomorrow
Hi can someone help me please just done this step by stem check and re checked the wiring done everything like the instructions but the seats don't get hot i have checkeck the number two seat pin and it only giving me 2.8 volts is this down to poor earth hope someone can help many thanksBackstory:
Well, after seeing much information (dating 2014) but no discrete information in how to connect the retrofit cable from Kufatec I took a leap of faith and bought myself a clima-unit with heated seats option and the Kufatec loom.
After 2 days of measuring, fitting and sweating I managed to get it working. This manual will unclude the pinout for a LHD aswell as a RHD
The loom will come without a manual to lay the cable so the way I describe it in this tutorial isn't necessarily the 'best' one.
Tools needed:
- Clima-unit with heated seat options: 8P0820043BH XHA
- Kufatec retrofit cable (I have the 'only heated seat' variant): https://www.kufatec.com/en/audi/a3/...heating-harness-for-audi-a3-8p-8p-sport-34045
- Torx: TX25
- Inbus: M6
- Socket wrench: Size 8 and 10
Note before starting:
Since I disconnected the seats in my how-to I also disconnected the airbag connector. Just to be sure, disconnect your battery before working on this retrofit.
This how-to is done on a LHD car (I'm Dutch). It doesn't really matter, the how-to for a RHD is the same except for the pins behind the clima which I will address later in the tutorial.
What is in the Kufatec package?
- Retrofit loom
- Additional steady plus cable.
HOW-TO:
Step 1.
Get your radio out the dash.
Step 2.
Pull the hazard light switch trim out. It's in very firmly so a little pressure needs to be applied. I scratched my hand like a dozen of times disconnecting this trim. A true evil piece.
Step 3.
Place something protecting over your ashtray as the clima-unit is also an evil piece that is very stuck in the dash. You need to pull it towards you and it will get loose.
Step 4.
Disconnect and disassemble the seats. Won't go too deep into this since it's pretty straight forward. 4 bolts on the corners of the rails and the connectors in the floor.
Step 5.
This step is kinda optional but I wanted to lay the cable in a neat and invinsible manner. So I got the midconsole out to lay the cable under the carpet.
5.1: On both sides of the midconsole there are 2 size 8 bolts. They are hiding under plastic clips who can be easily removed.
5.2: Get your ashtray and geartrim out. Open your ashtray and get your fingers under the geartrim. It should be an easy go since they only get hold by 4 plastic pins. When the trim is out it will show you 4 TX25 bolts. Unscrew those. Since you are here also unscrew the 2 size 8 bolts on both sides.
5.3: Now get on the ground and get your M6 inbus. On the bottom of the trims on the side there is a inbus screw hiding in place. Get that thing out on both sides.
5.4: Last but not least there are 2 very very difficult to reach bolts hiding in the back of the dash. Please use a towel of some sort to catch the bolts as they will fall out into nowhere.
5.5: Now on to the backside of the midconsole. Remove the ashtray by opening it and pulling it towards you. After the ashtray is out you can also remove the box under it. It will reveal the last 2 size 8 bolts. When you got those bolts out remove the armrest by bolting out the big size 18 bolt in the middle.
My A3 came with telephone preparation so there are cables on the picture. It's not certain your A3 has those, so don't bother looking for them if you don't see them
And now the midconsole can be pullet out (gently). Some cables are clipped into the midconsole so gently pull it up and check the cables (cigarette lighter, AUX, telephone etc..)
Step 6.
Get your Kufatec loom. You will see the 2 big black plugs who obviously connect to the black ones underneath your seat. But you do I know which one should go on what side? Well, on the cable you will find imprints. Look for the biggest cable on the connector (PIN 1). It will say one of these two things: BFS or FS
FS = Fahrersitz = Driverseat
BFS = Beifahrersitz = Passengerseat
I wanted the cables tucked away in a neat way, I forced my arm under the carpet and pulled the cable from the midconsole to the connectorbox under the seat for both seats.
Step 7.
The fun part, the connectors behind the clima unit. They are hold in place by a tie-wrap and a clip. Disconnect the housing from the actual connector to reveal the pins.
NOTE: THE KUFATEC LOOM ONLY USES CONNECTOR C AND D.
C = Bown/Goldish connector.
D = Black connector (biggest).
You can check the back of your clima-unit, the letters are stamped on the slots.
Press the black pin DOWN.
Step 8.
When you got the housings of pull the Kufatec loom from the midconsole towards the clima unit. Now the pinning can begin. How do you know what hole belongs to what pin number? On the actual connector itself you can find the numbers corresponding to the hole (where the pin goes into).
Just as on the cable under the seats these cables also have imprints on them. They correspond to the pins they should go. Since Kufatec is a German company and in Germany they produce LHD cars the imprints won't correspond for UK. Check the table underneath for the correct pinout.
Step 9.
Connector D, pin 2 is already occupied. This is right, splice the T16d/2++ loom into the existing loom. I used a T-connector for this. If you pin 2 is not occupied you can use the factory connection from Kufatec.
Step 10.
Wire things up and put the housing back on the connectors. Use a tie-wrap to get them tight since the connector will be loose in it without!
Step 11.
I used the right side of the midconsole to put my ground cables. The manual states under the A-column but that would require me to pull the cable all over to the other side. So I just unscrewed the plastic trim on the side and brushed some of the paint of the chassis.
Put the trim back and mounted the ground to it. Checked it with a multimeter and works like a charm.
Step 12.
The only thing that is not connected now is T16d/13 and 14. These cables will run to a single connector which need to be connected to a 'dauerplus' (Constant 12v current). I pulled a cable from my + pole on the battery through the firewall and spliced the cables together.
Result and testing:
Before getting everything back test your seats. Plug in the seats and connect the wires under your seat. Connect the battery again and turn your key to ignition.
It can take up some minutes before your seats will get hot the first time, but when they do it's fire
Troubleshooting:
If your seat doesn't work;
- Check voltage on PIN2 under your seat. When you wired it correctly there should be a 12v voltage on this pin.
- Check the connection of T16d/2++ this is a spliced loom and can cause errors.
- Check your ground, make sure it is grounded properly!
Still having issues? Please respond in this topic and maybe I can help you out.
Best of luck!
Poor grounding. Use the ground points at the door sills like you should according to the proper instructions. Do not route the loom through the center console, but through the door sills.Hi can someone help me please just done this step by stem check and re checked the wiring done everything like the instructions but the seats don't get hot i have checkeck the number two seat pin and it only giving me 2.8 volts is this down to poor earth hope someone can help many thanks
thanks you are a star m8Poor grounding. Use the ground points at the door sills like you should according to the proper instructions. Do not route the loom through the center console, but through the door sills.
Hmm, I'm half way through this and have just seen your post. I've run in the cable to the passenger side via the mid console. However, I was going to run the remaining cable via the sil on the driver side up through the dashboardYou did the wiring incorrectly (just like OP, but for OP it happened to work out). Read the last posts I made in this thread.
First of all, the fusebox looks like a mess. The slot should be not populated, so you can just plug in the wire from behind!
Secondly (as my posts), you don't have to remove the center console. You need to wire through the dashboard, behind the glovebox, down the A pillar, under the door sills, under the carpet to the seats. At the door sills you'll find proper earth spots. (Hint)
It took me a while to get a better understanding of automotive electronics, but it all makes sense to me now. Always do it the proper way, or you'll get headaches later on.
Also my cables are labelled differently:
T20 / 11 or 13
T20 / 15 or 12
T20 / 16 or 15
T12 / 01
SC 37
SC 4
2 ground
2 x K1. 30
Hmm, I think I've realised my own mistake. I've ordered the 'climatic' version of this cable as opposed to the 'climatronic'
Hi, i have the same problem did you solve it ?I will have to try it over just ordered a cable. There is no errors from standard odb2 scan.
Will test the seats with multimeter again but it's going to be my heating element or the thermistor? Will try it tomorrow