'How To's' For The B9 A4/S4

Any ideas anyone?
84228c153899e878325d77fefedf9cd3.jpg


Sent from my iPhone using Tapatalk
 
Looks like cable or connector problem.
 
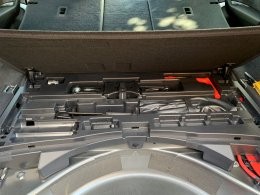
How to replace the inflation kit supplied with some B9 cars with the correct Audi parts for a space saver wheel.

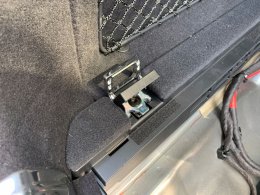
Firstly remove the 4 load fixing points from the side rail
IMG 1586

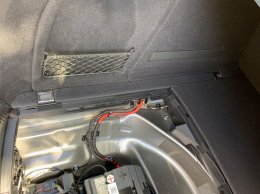
Next remove the side trim.
IMG 1591

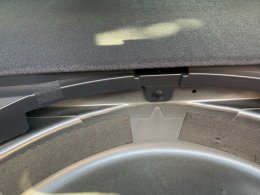
Then remove the locating trim clip
IMG 1588

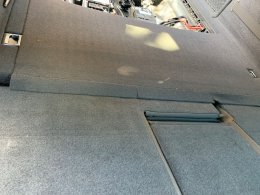
Lower the rear seats so you have access to the back of the storage box, lift the carpet flap and pull the plastic box/tray upwards, repeat for the opposite side as there are two clips you need to pull out. Ensure that these clips remain attached to the box and not remain in the fixings.
IMG 1590

Refitting is the reverse of the above steps, when complete you will have the tool tray with proper storage for the jack and other tools.
IMG 1589

The part no.s for the tray and Jack are as follows

Tray - 8W9 861 486 FG W8
Jack - 8W0 011 031
Crank - 4H0 011 221

I will add the wheel part no. shortly, if you have any questions then PM me.
 
  • Like
Reactions: mister.c., Tonyc59, Steve335 and 2 others
On a slightly different topic, has anyone managed to get/fit a second rear fog light to an B9 A4 Avant 2019. Audi being cheap have built one of the units with the LED panel missing just fitting it on the drivers side of the car as that is all the UK mot requires.

Looking at the wiring it looks as if you could just swap out the rear inner lamp unit with a LHD one as all the connections look to be there. This if it is possible would give you the second rear fog light.

Anyone offer any advice?


Sent from my iPad using Tapatalk
 
Reading through the link it seams to be aimed at American cars as they talk about using the Euro spec lights, I need to some more research into this.

I might try and get to talk to my local parts guy and one of the master techs at my local dealer to see if they know anything.

My car has go to go in for them to replace the boot mounted rear seat release as the first time I went to use it and it broke, now the seat won’t latch back into place. Car is less than 6 months old so they can sort that under warranty.


Sent from my iPad using Tapatalk
 
Yes it's a American audi forum, seems like you might be making a effort for something you would rarely use and can't actually see...
 
How to replace the inflation kit supplied with some B9 cars with the correct Audi parts for a space saver wheel.

Firstly remove the 4 load fixing points from the side rail

Next remove the side trim.
View attachment 189731

Then remove the locating trim clip
View attachment 189732

Lower the rear seats so you have access to the back of the storage box, lift the carpet flap and pull the plastic box/tray upwards, repeat for the opposite side as there are two clips you need to pull out. Ensure that these clips remain attached to the box and not remain in the fixings.
View attachment 189733

Refitting is the reverse of the above steps, when complete you will have the tool tray with proper storage for the jack and other tools.
View attachment 189734

The part no.s for the tray and Jack are as follows

Tray - 8W9 861 486 FG W8
Jack - 8W0 011 031
Crank - 4H0 011 221

I will add the wheel part no. shortly, if you have any questions then PM me.

Hi DP24v. Yours is an interesting and informative post.
May i ask where you were able to come by the relevant tray. Only I keep coming up with nothing when i search for one!
Only I have the space saver and jack ect. Which i have fitted in the boot, but its stashed rather than stored properly like you kindly display.
Thanks in advance for your Help.
Steve.
 
I got the information from another A4 B9 that the dealer had in there show room, I then used the details from the sticker in the boot to get the part no.s
IMG 1536

IMG 1535

Use the info above and find a good parts guy to look them up. Hope it helps.


Sent from my iPhone using Tapatalk
 
Thanks for your kind help and advise dp24v.
Once I am allowed out and about again I will follow your lead up!
Steve.
 
How to replace the inflation kit supplied with some B9 cars with the correct Audi parts for a space saver wheel.

Firstly remove the 4 load fixing points from the side rail

Next remove the side trim.
View attachment 189731

Then remove the locating trim clip
View attachment 189732

Lower the rear seats so you have access to the back of the storage box, lift the carpet flap and pull the plastic box/tray upwards, repeat for the opposite side as there are two clips you need to pull out. Ensure that these clips remain attached to the box and not remain in the fixings.
View attachment 189733

Refitting is the reverse of the above steps, when complete you will have the tool tray with proper storage for the jack and other tools.
View attachment 189734

The part no.s for the tray and Jack are as follows

Tray - 8W9 861 486 FG W8
Jack - 8W0 011 031
Crank - 4H0 011 221

I will add the wheel part no. shortly, if you have any questions then PM me.

Thanks for this - I used it to get a spare wheel/jack for my car!
 
How to replace the inflation kit supplied with some B9 cars with the correct Audi parts for a space saver wheel.

Firstly remove the 4 load fixing points from the side rail

Next remove the side trim.
View attachment 189731

Then remove the locating trim clip
View attachment 189732

Lower the rear seats so you have access to the back of the storage box, lift the carpet flap and pull the plastic box/tray upwards, repeat for the opposite side as there are two clips you need to pull out. Ensure that these clips remain attached to the box and not remain in the fixings.
View attachment 189733

Refitting is the reverse of the above steps, when complete you will have the tool tray with proper storage for the jack and other tools.
View attachment 189734

The part no.s for the tray and Jack are as follows

Tray - 8W9 861 486 FG W8
Jack - 8W0 011 031
Crank - 4H0 011 221

I will add the wheel part no. shortly, if you have any questions then PM me.

Did you ever get the wheel part number? Would a 19" space saver from an A4 B8 fit?
 
How to "mask" a badly scratched MMI display after using the wrong type of wipe :sweatsmile::flushed:

So, I managed to source the correct size protectors and finally fitted them.

This proved challenging as I wanted to retain the stock/matte finish and this could only be attained with a plastic protector. I bought the Brotect screen protector from Amazon, it took a few days as it came from Germany.

[The forum isn't allowing me to post a direct link to the protector. Paste the part number into the Amazon search: B0756YQTJR]

I had the issue of identifying the correct size of protector as for some reason nobody describes it in the known convention as "MMI Navigation Plus" or give its dimensions. Instead, it is labelled as "A4 F4 2015 MIB-HS". I'm guessing the MIB-H is the standard size display.

I taped off the bezel to be safe as I tried some IPA to no effect.
View attachment 205781

In the end, I used the same wipe which caused the damage to remove the rest of the coating. This took a while and needed a steady pressure to get all of it off.
View attachment 205782

After removing the coating I made sure to get as much dust off the screen as possible and then sat still in the car for a few minutes for any floating dust to settle. I applied the screen protector by peeling off the backing, lining up the top edges and allowing it to adhere by itself. I didn't force it.
View attachment 205783

I got a relatively good adhesion with only one air bubble (thanks phone shop :thumbs up:). I used a cloth around my finger and pushed the bubble to the edge by applying steady pressure.
View attachment 205784

All in all, I got a good finish. I'm pleased with the quality of the protector and it is quite forgiving if you don't get every speck of dust off the display.
I could have peeled it back and used a piece of sticky tape to get every last speck off but I was content with the finish and they're barely noticeable.
View attachment 205785
 
Out of interest what was the wrong type of wipe so i can avoid this disaster
Sorry, only just saw your post.

It was just a permeated wipe that you can buy in most supermarkets in the car section, it's intended use is for glass only I suppose, that's where I went wrong.

The wrong type of wipe is any wipe that has any solvent in it. ONLY use a clean microfibre cloth without any spray or solution!

Cheers.
 
  • Like
Reactions: cuke2u and Sibmets
Hello all,

would like to share the info about auto dimmable rear mirrors. It was mentioned on few spots here, but maybe it can help someone if consolidated.

I have A4 B9 from germany with heated and electrict folded mirrors and with the blind spot detection. I was missing the dimmable function from my previous car (Skoda Superb 3) so I try to do it.
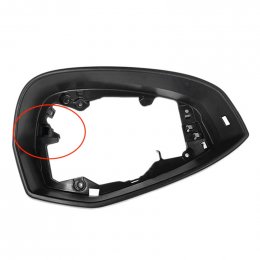
I bought mirrors on the ebay and cable set from Kufatec, mirrors are a little expensive, but nothing terrible. Then you need the highline door unit and auto dimmable interior mirror. After I recieved the shipment, I go through the manual to put down door paneling and to disasemble the mirror but.... long story short... there was a preparation from Audi! I had the connector both on driver side and on the passenger side. There is a slot inside the mirror frame with connector and sufficient cable length.

So, if you would like this retforit, just check if you have a cable parked under the glass on the inside side (as on picture) and it could be fastest retrofit you ever did. Just dont forget that there is a need to code that funcion, I use the OBD prepared app, but the correct one should be:
  • Address 42, Door Control Unit (Driver's side): Set byte 9, bit 0 to 1
  • Address 52, Door Control Unit (Passenger side): Set byte 9, bit 0 to 1

Mirrors - 8W0857535H (heated, aspheric and dimmed)
Higline door unit - 4M0959793H

PS, if you don't have the connector prepared, you can youse this cable and connect in to pin 2 and pin 6 of the door unit, but to be honest, it is nearly impossible to put cable through the door, you have to put down whole mirror and reassemble the cable set inside, really not worth the pain you will get...
 

Attachments

  • frame.jpeg
    frame.jpeg
    124.3 KB · Views: 266
Audi A4 B9.5 – Add wireless phone charge pad & storage tray to armrest area
 

Attachments

  • Charge Pad Mod.pdf
    1.1 MB · Views: 199
  • Like
Reactions: matthew999