My A6 3.0TDi Avant bit of a rebuild and repair thread.

B5NUT

Well-Known Member
VCDS Map User
Joined
Feb 6, 2010
Messages
5,560
Reaction score
1,606
Points
113
Location
Darlington
Picked up my new (to me) A6 3.0TDi S-Line Avant, it belonged to a member of the family so got a very good deal, however it also needs a fair bit of work.

Current Faults are!
  • Drivers side door won't open form the outside
  • Navigation is not working won't recognise the map disc
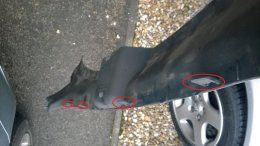
  • One of the front parking sensors is not working so the hole system is disabled (cracking design by Audi)
  • One of the glow plugs is dead
  • Air conditioner pump valve unit is failing causing some of the vents to blow hot air when the other are cold.
  • Battery is not in the best of condition, its the original battery which is now almost 8 years old
  • Small amount of rust on the tailgate (Had it into Audi and have been told 70/30 in cost so just waiting for the quote)
few pictures of the car.

One very dirty engine bay, going to start the cleanup on that tomorrow (If the weather is good)

Will post more of the fixes and mods which hopefully include
  • AMI retrofit (Just got one from the breakers for £100)
  • Dab retrofit (got the part from ebay last week.)
  • Facelift bumper
  • Reversing camera
  • Digital TV (if I can get one cheap enough)
  • Auto dimming rear view mirror
  • Alloy roof rails (Anyone what to buy my black ones or what to swap)
  • Electric front seats
  • Memory module for seats
  • Facelift wing mirrors
  • Replace all the front control arms (Should be coming next week)
  • Replace the shocks and spring (already got them)
  • Replace all the rear end arms, axle guides, track rod, and any other bushes
Will try and post up some write-ups in this thread of all the work when its done, I've just done the Navigation fix so will post that up now.
 
Last edited:
  • Like
Reactions: Graham Brownlee, d0n25, gupsterg and 3 others
First fault fixed today was the navigation. It's been running backup discs for a good few years, but when I got the car it came up with a disc read error, I also got the following error in VCDS

1 Fault Found:
02927 - DVD Read Error
000 - - - Intermittent
Freeze Frame:
Fault Status: 00100000
Fault Priority: 6
Fault Frequency: 48

The main stumbling bock was just getting the nav out, the MOST & Power connect was ok, but the GPS connector was proper sod and in the end has to shift the MMI cage to get better access.

The top of the navigation unit is just clipped in place so you just have to pries the top off it should come away easy.
Next you need to remove the drive it's held in place with 4 T8 torx head screws. You then need to un-clip the 3 ribbon cables.

As you can see from the pictures the ribbon cables are dirty and so was the top of the drive unit.
attachment.php

WP 20140301 011

The laser is difficult to get to, I found it was better accessed from the rear of the drive.

For cleaning I used a cotton wool bud and isopropyl alcohol to clean the laser, it took a few goes but after the 3rd bud it started to clear up, here is a picture of the first 2 buds, the third was clean.
attachment.php

WP 20140301 015
WP 20140301 012

After drying the laser with another cotton wool bud, I cleaned up as much of the inside as possible I reassembled the unit.

With the unit fitted back in the car I tested it and cleared the fault codes, and the navigation is back working again.
 
Last edited:
  • Like
Reactions: grainqey, RoyC, gupsterg and 4 others
Good result for a start. You have plenty to do there so should keep you busy for the next few days :applaus:

Karl.
 
Started on further fixes on the car today, first was replacing one of the front parking sensors, for some reason Audi figured it was a good idea if one sensors fails then the hole system should be disabled. Anyway I had a front sensor failure. With the following error in VCDS.

1 Fault Found:
01628 - Sensor for Parking-Aid; Front Mid-Left (G254)
009 - Open or Short to Ground
Freeze Frame:
Fault Status: 01101001
Fault Priority: 3

Taken a few picture as it may help other users with the same fault, the elsawin instruction say to remove the bumper but you only need to loosen one side..

First is to remove the top bit of trim, this just unclips in 4 locations.
1_zpsc2463450.jpg


You can then access the 3 screws holding the top of the bumper
2_zpsad885549.jpg


You then need to remove the number plate mount, then is done by removing 2 screws, one each side of the plate underneath
3_zpsc386c3d9.jpg


You then need to remove or pull away the inside wheel arch liner, I ended up removing it as it was thick with mud so gave it a good clean.
4_zps70df2b00.jpg


Once it was removed I was then able to access the final screw
5_zps7d40e420.jpg


It was then the case of unclipping the side of the bumper and pulling it forward, this should give you enough room to access the sensors on the side that needs replacing.
6_zps9cb513d5.jpg


After fitting a new sensor I gave it a quick test before refitting the front bumper.
8_zps82fe0870.jpg


Before I refitting the wheel arch liner I gave the inside of the wheel arch a good pressure wash as it was thick with years of mud
9_zpseabd0819.jpg

10_zpsfbb59f2a.jpg

11_zps624f1c37.jpg


It's not come out to bad.
12_zps61150aba.jpg


I have to say, I don't think much of the wheel arch liners, I know they are there to help with reducing road noise but the amount of mud in the liner, I spent at least 10 minutes with the pressure washer but even then there was still mud coming out.

Anyone know if you can buy plastic liners
 

Attachments

  • 1_zpsc2463450.jpg
    1_zpsc2463450.jpg
    71.5 KB · Views: 1,940
Last edited:
  • Like
Reactions: gupsterg, ScottD3 and Tuddie
Next on the list was to replace the Coolant Circulation Pump, as I have having a problem with heating in the car. Some of the vent would blow cooler air, when other vent would blow red hot air. I was getting the following fault code.
1 Fault Found:

00739 - Coolant Circulation Pump (V50)
001 - Upper Limit Exceeded - Intermittent
Freeze Frame:
Fault Status: 00100001
Fault Priority: 3

After a bit of googling I found the faulty device.

Here is the replacement Audi have revised the pump with part number 4F2959617B the old part number was 4F2959617A
c821f983-26e2-4cd8-aeac-3913db602c5f_zps5ae06db2.jpg


I first removed the brace bar as it gives a little bit more room to get the unit out.

The instructions then stated to clamp down the pipe next to the pump, then remove the 3 nuts holding the pump unit in place.
3_zps79527040.jpg


Next is the painful bit getting the clips of the 3 hoses which are circled on blue and remove the 2 electric connectors in red.
3A_zps2b769469.jpg


Once removed it's the case of refitting the new pump in reverse order, I also pored coolant in the hoses (to help reduce any excess air in the system) just before refitting each them starting with the lower hose first.
4_zps57f9715f.jpg


It was then the case of clearing the fault code and giving the car a test, as it mainly happen during town driving and sitting it traffic, and so far the fault has not reoccurred.
 
Last edited:
  • Like
Reactions: gupsterg, r15wne, ScottD3 and 1 other person
Final job today before the rain stopped play was to fit the AMI module. When I was at the scrap yard on Saturday picking up the pump, I found the car also had AMI, and they only want £100 for the unit which was a bargain.
WP_20140301_005_zps91236e92.jpg


First job was to remove the glovebox it's held in place by 5 screws 3 just under the lid of the glove box and two underneath of the glove box, you also need to remove the end panel cover.

Once the glove box was out it was the case of fitting the harness & optic cables. The harness cable was a kufatec cable I got from ebay, the main thing about the cable going into the AMI unit is pin 4 is connect to ground, this makes the AMI unit media player 2 in the MMI loop.
WP_20140302_030_zpsb7aff81a.jpg

WP_20140302_032_zps2970d34e.jpg


Next was to fit add the MOST connector for the AMI unit, so the output of the CD changer, to the input of the AMI and the output of the AMI to the input of the BT module.


Once the wiring was done I then cut the back of the glove box to allow fitment of the AMI unit, you can buy glove boxes that have the correct mounting for the CD & AMI, but it's cheaper just to modify the glove box you have. I did cover the back of the CD-Changer up so not to get the until filled up with plastic dust. I then used a dremel to cut the back of the glove box out.
WP_20140302_033_zps1474a142.jpg


Once fitted I used a few self-tapping screw to hold it in place
WP_20140302_035_zpsac7a34e9.jpg


Next was to code the can-gateway and add media player 2, then clear any fault codes.
 
Last edited:
  • Like
Reactions: Keefo13, gupsterg, r15wne and 2 others
Nice thread, I like things like this. You've had a constructive day!

I guess they isolate the complete parking sensor system for safety, I'm sure plenty of people would drive into something because they forgot one of the sensors didn't work....
 
  • Like
Reactions: Pergan
Cheers.

I know what your saying, but as they have a visual display they could just have grayed out or highlight the faulty sensor, or just disabled the end where the faulty sensor is. The main reason I bet is to get you into the dealer and spend £££ to fix the fault.
 
Last edited:
Excellent thread B5NUT, looks a nice motor too!
 
Another fix today, the passenger door would not open from the outside door handle when the car was unlocked. It would start to work again if it was opened with the inner door handle. There was also a fault code registered on the passenger side door module.


1 Fault Found:
02115 - Locking Unit for Central Locking
008 - Implausible Signal
Freeze Frame:
Fault Status: 01101000
Fault Priority: 3

Replacement door lock
WP_20140301_006_zps450049fd.jpg


Before I started the job I got a hot glue gun as you will need this to put the sound proofing back onto the door.
1_zps5f10df01.jpg


You are also going to need to buy replacement door trim clips as they rarely come off without them being damaged.
Part number for the new clips is 6Q0868243 and cost around 40p each and you need 6 for each door trim.


Here is a picture of the damaged clips left is stuck in position and the right has snapped.

47e76dc8-5a39-45c3-b33f-ba4111efd72f_zps33522515.jpg


To remove the door trim you need to remove the top speaker cover, and unscrew remove the screw behind there.
2_zpsabfaa947.jpg


Remove the trim by pulling it out near the door handle and towards the end of the trim push it away from the door and remove, you then access the 2 screws behind the trim.
3_zps78e22b62.jpg

4_zps23f46440.jpg


Remove the screws under the arm rest and near the puddle light, you can then pull the trim away starting from the bottom first and towards the top push the trim upwards.
5_zps95f1de98.jpg

6_zps42d0763d.jpg


Unplug the 2 electrical connectors going into the door trim and disconnect the cable going into the door leaver.
7_zps4a7c0082.jpg


Next remove the door speaker
8_zps67ea2c3b.jpg


You then need to cut away the glue between the insulation & the door. You only need to cut away the left hand side just to give you enough access to the lock.
9_zpsb519c97c.jpg


Pull the yellow clip to the left slightly side and remove the back clip, you can then remove the connector to the door handle.
10_zps21957778.jpg

11_zpsc9a83304.jpg


At this point remove the two screws holding the lock in place, it will make it easier to disconnect the other connectors.

Next is to remove the cable going to the internal door handle it needs to be rotated and then pulled out. there is a further clip that again need to be rotated and pulled out.
12_zpsa55c77b7.jpg


You can then unplug the electrical connector.
13_zps617504c4.jpg


At this point etka states you must remove the window frame however if you are carefull you can remove the lock, it's a little tight and you need to pull slighty on the window frame guide and the lock will come out.


Put the new lock in and connect the inner door handle cable and the electrical connector, you can the screw the lock in place and reconnect the door handle connector.


You can then use the glue gun to stick back the sound proofing (Audi state you must do this as there is a pressure crash sensor in the door)
14_zpsf89ea5de.jpg


Remove any old clips stuck in the door and refit the door panel.
15_zps2dab71da.jpg


Again use VCDS to check and clear any fault codes.
 
Last edited:
  • Like
Reactions: rallymangtb, RoyC, gupsterg and 2 others
great work! It's good when you can get stuff sorted yourself!
 
B5 this is an awesome write-up...perhaps you and Gups need to make babies!!?? :scared2:
 
  • Like
Reactions: gupsterg and Tuddie
Changed the centre console today as the current console has start to split apart, and I also want to change the selector knob.

Current centre console, not sure why the top plastic cover has come away but it don't look good.
WP_20140309_001_zps40043cd3.jpg


First was to remove the side trims, there is one screw under the drivers & passenger foot well to remove.

WP_20140309_008_zps7012da9b.jpg

WP_20140309_013_zpsf4165127.jpg


Once the screw is removed you can remove the trim by getting your hand behind the trim and pulling away from the centre console, the passenger side is a little tight as there is not much room between the seat & console.


You can then start to remove the rear section of the console, you have to remove the air vent first either by pushing on the back of the vent or using a hook to pull the vent out. Don't hook onto the front vent you will only break them off, the hook point is right at the back of the vent at the bottom.

WP_20140309_004_zps1ceabb13.jpg


Once the vent is removed you can access the screw holding the armrest in, if you have factory fit phone prep you will also need to disconnect the wiring harness

WP_20140309_006_zpseaa6eeed.jpg


Next was to remove all of the rubber mats under the armrest, and remove the screws holding the cup holder and rear console in place.
WP_20140309_007_zpsf290902c.jpg

WP_20140309_014_zpse59e49d3.jpg


The rear section is also held in by clips either side of the console at the back, you don't need to touch the screws
WP_20140309_017_zpse7f6efd4.jpg


Rear console removed.
WP_20140309_019_zpse725567a.jpg


To remove the front section of the console you need to remove the climate control unit, it unclips at the bottom and slides out. On later models you also have to remove the air vents and buttons above the climate control unit.
WP_20140309_002_zps3c87700e.jpg


Remove the lower trim under the climate unit it just pulls forward.
WP_20140309_020_zps52be9752.jpg


Next is to remove the front ash tray, remove the insert and then remove the two screws
WP_20140309_021_zps1ec2cc08.jpg


the ash tray is then remove by unclipping the front and pulling upward.
WP_20140309_022_zps03ebd567.jpg


Pull the selector gator upwards it, does not need to be removed. You can then unclip the selector indicator and unclip the connector.
WP_20140309_024_zps53e34751.jpg


You then need to remove the two screws which are located either side of the console trim you are trying to remove. You can just about see where the screws go into the fixing points on the console.
screws_zpsf7dce6c2.jpg


Once they are removed you can disconnect the power cables going into the electronic handbrake, MMI controls, and the lighter.

You can then remove the screws holding the MMI controller, and the cup holder in place
WP_20140309_027_zps571451b5.jpg


Unclip the alloy trim and that will release the MMI controls
WP_20140309_028_zps7838d7c9.jpg


New console next to the old console.
WP_20140309_029_zpsb58dabb7.jpg


At this point I cleaned every bit of trim I ripped off, and then started to put the car back together

Note you only need to do the next few steps if your changing the gear knob.

Final bit was to change the gear knob, first you have the pull the button out enough to get a tie rap behind the button. WARNING Make sure you tighten the tie rap up, if button drops back into the connector you struggle to get it out without damaging it, and the gear knob can only be fitted/removed with the button pulled out.
WP_20140309_030_zpse35710fc.jpg


Next is to remove the metal clip holding the selector in place, you will not be able to remove this without damaging it, so you will need a new one.
WP_20140309_031_zps6e2489ba.jpg


Once the clip is removed pull the gear knob up, and remove the black plastic ring shown just above the clip.

You then just need to attach the leather boot to the new selector and put the plastic ring back on, then put the new clip on and put back on the selector shaft, then crimp the metal clip to hold the selector in place.

Push the boot down into the console and job is done.
WP_20140309_032_zpsa7b4dbc2.jpg


Without the cleaning process, I would say the job has taken just over an hour.
 
Last edited:
  • Like
Reactions: gupsterg and Tuddie
As i said i have some used glow plugs you can have if you want them, 3 work 3 don't but cant remember which ones.
 
Cheers for the offer, I have some new ones but they are 3mm longer, also purchased a new OEM glow plug which is also 3mm longer. So not to possibly lunch the engine. I'm getting Audi to change the single faulty plug, and once I know that going to work then I will change the rest. So if for some reason the plugs in etka are the wrong ones listed and it damages the engine, Audi will have to foot the bill...... (I hope).
 
There is indeed two types for the 3.0.
One is ceramic and one metal i think.
The replacement ones i got online in a deal where loads of people purchased theirs from do appear longer but when you inspect where they seat im sure its a fraction deeper but via a revised design.
Even gus....... With his lemon A6 which is an early build used the later glow plugs.
Besides depending how burned out a glow plug is depends how long it is, sorry if im repeating what you know.
The difference is found by the different coloured ring on the glow plug. Something like green and red.
 
  • Like
Reactions: wigandill
I have been reading up and I do have the metal beru plugs, most of the threads I have read about this say it will be fine, but for the cost of £50 I cannot be bothered to take the risk, as a replacement engine is around £4K.

The original part number is 059 963 319 E and the new part number is 059 963 319 M
 
Last edited:
Another job done over the weekend was to to replace the battery, if the car is left to long the battery light comes on and the car is sluggish to start in the mornings.

The battery on the car was the original so it's done 8 years and about time to replace it.

The first job was to remove the old battery, the clamp holding the battery was was badly corroded so will need to be replace but I did manage to free it off and reuse it until I get a new one.
WP_20140302_004_zps78c0d451.jpg


Next is to remove the battery clamp.
WP_20140302_003_zps044ba8d6.jpg


You then need to remove the top plastic cover, and disconnect the negative then positive terminals.

Once the battery was removed it was time to clean wheel well area, as at some point the plastic caps have come off allowing all the cr@p to enter the car.
WP_20140302_002_zps497fbd72.jpg


Even after cleaning there is still a fair bit of paint damage so will have to look at it during the summer.
WP_20140302_005_zps770891d7.jpg


With the new battery fitted I check VCDS for any coding changes, there was another coding option but it looked to be for a smaller battery.
WP_20140308_019_zps7a8baab2.jpg


One thing to note is to make sure the battery controller is on the correct firmware as early versions caused a problem with battery draining. More information can be found here. Audi-Resource - 10% Battery Issue
 
Last edited:
  • Like
Reactions: gupsterg, Tuddie and ScottD3
Started the cleanup this week, but first had to buy some new equipment

New VAX washer for the carpet cleaning
WP_20140313_001_zpsb7d4c48f.jpg


New Karcher steam cleaner for the leather and the head lining
P4300015_zps3b451598.jpg


Some of the cleaning products used.
WP_20140312_005_zps08589d97.jpg


Not much of a write-up on this one, too much trim to remove and clean.

Started with the tail gate

WP_20140312_002_zps20c5f315.jpg


Then moved on to the boot, all the trim panels were removed and washed, and the fabric was cleaned using Bold hand wash.

WP_20140312_003_zps94ca98f7.jpg


Front seats were then removed, and the carpet cleaned
WP_20140314_002_zpsd00b99c8.jpg


Have to say the carpet came up very well and the vax got the dirt out, but took about 3 goes before the water was clear
WP_20140314_003_zps66c47022.jpg

WP_20140314_004_zps66516cd2.jpg


Lights in the headling were also remove surprised how dirty they were even the bulbs had dirt on them.
WP_20140314_006_zps43f506af.jpg

WP_20140314_007_zps14ec6eae.jpg


Tomorrow the seats go back in and the car will be put back together, then the door cards are going to be removed and cleaned and the window switches are also being replaced.
 
Last edited:
  • Like
Reactions: gupsterg, Tuddie and ScottD3
Looking good mate.

Want to do my A8 after?

Never used or even thought about using a steam cleaner on leather.
Thought it would have adverse effects on the leather.
 
There was a thread last year were someone stripped and cleaned a C5 A6 and used a steam cleaner on the leather, and his result looked good. So gave it a shot, and it did remove a vast amount of dirt. Will put up some more after shot later today once I rebuild the car!
 
Last edited:
  • Like
Reactions: Tuddie and ScottD3
How easy was it to remove the front overhead lighting unit? Is it just the two screws under the sunglasses holder and the whole lot pulls away?

Excellent thread btw :)

Cheers,
John.
 
Open the sunglasses holder and pull at the chrome strip and the edge that plus the center section will come out, you then remove the outer cover which will expose the 2 screws holding the main light unit in place.
 
  • Like
Reactions: RAF_S7
Started on the tailgate today, it going in for a respay at the end of the month as rust has appeared underneath the rear lights.

First job was the replace the tailgate struts, to fully open you had to give the tailgate a helping hand and bashed my head on it a few times.

First job was to support the tailgate, I purchased this lifting device from B&Q last year when I replace my kitchen ceiling.
WP_20140315_005_zps5bd5b46e.jpg


Next was to remove the upper and lower clips
WP_20140315_003_zps5d69ddac.jpg

WP_20140315_004_zpsc73f713a.jpg


At this point you can just remove the strut, but I would check the strut mount point as a couple of mine were lose. To fit the new strut you just push it into the mount.
WP_20140315_006_zps0146ab55.jpg


Next was to remove the tailgate lights as they were covered in fine scratches.
WP_20140315_007_zpse4ce1448.jpg


Also found fair amount of dirt under the light
WP_20140315_011_zps2338505d.jpg


To clean up the tailgate light I got a meg'a headlight restore kit
WP_20140315_010_zps9db0ddab.jpg


First was to rub the lights down with the wet & dry pads that come with the kit, after that out with the drill for polishing, have to say the results were very good for a basic kit.
WP_20140315_013_zpsf45be829.jpg


Tomorrow will to sort out the door cards..
 
Last edited:
  • Like
Reactions: gupsterg, ScottD3 and Tuddie
Changed the coolant temp sensor today, I already had the coolant drained and will put a post about draining the system soon.

First was to change was the coolant temp sensor, it was not causing a problem but as I'm doing a coolant flush I figured I would change the sensor anyway.

First you have to remove the air inlet pipe going from the air filter to the turbo, at the air filter end there are 2 clips that hold the hose in place, and at the turbo end there is just a hose clip.

You can then see the temp sensor, however it's easier to get to if you remove the plastic hose connector which is held onto the turbo by 2 screws.
WP_20140319_007_zps3997a421.jpg


What I don't like about the design on the V6 is the location to the turbo, as there must be a fair amount of heat generated by the turbo, and this is what the seal looked like when it was removed.
WP_20140319_004_zps9681792e.jpg


To remove the temp sensor, pull the green clip away from the temp sensor, then you can remove the sensor by just pulling the sensor out of the holder and then remove the connector. One thing I had trouble with was refitting the new sensor, as the new o-ring was a dam tight fit and a good smearing of G13 did help a little, just make sure to clean out all the other damaged o-ring first
WP_20140319_008_zps463c88be.jpg


Second job was to change the coolant reservoir as my one is looking a bit tatty to say the least.

First you need to remove the single screw holding the tank in place, then remove the two top hoses and then the bottom hose.
WP_20140319_009_zps0d826293.jpg


At this point you can remove the tank and un-clip the low coolant sensor.
WP_20140319_011_zpse5718037.jpg


You then just refit the connector to the new tank refit the hoses and put the screw back in.
WP_20140319_013_zpscdd660ce.jpg
 
Last edited:
  • Like
Reactions: gupsterg, ScottD3 and Tuddie
So over the last few days I've been ripping my engine apart, and starting the cleanup of the inlet manifolds and EGR system.

I started off using this thread. http://www.audi-sport.net/vb/a6-s6-...old-egr-cleaning-refurbishment-help-info.html

There was a lot of useful information in the thread, but I found a few issues of my own and other ways to clean the parts.

To start with I stripped down the inlet side of the engine and found the same problem as gupsterg

WP_20140316_005_zps014f7b55.jpg

WP_20140316_006_zps07b84d1d.jpg

WP_20140316_007_zps10ca5639.jpg

WP_20140316_008_zps283426ba.jpg

WP_20140316_009_zpsca18fccb.jpg

WP_20140316_010_zpsc3d64891.jpg

WP_20140317_001_zpsef0f6eaf.jpg

WP_20140317_002_zpsabd1224f.jpg


So to clean up the parts I let them soak in a water based parts washer fluid, which I put into a sealed 50 litre storage container.

I did use a little bit of scrubbing, but not much had to be done, these are what I used and yes that is a toilet bush (new from the pound shop) just had to chop the bristles down a bit.

WP_20140320_027_zps23747f77.jpg


In total they were soaking for around 2 days, and I changed the washer fluid twice, but they came up just about spotless.

WP_20140320_010_zpsa72bd4c4.jpg

WP_20140320_025_zpsf63e2a29.jpg

WP_20140320_024_zpsa342779a.jpg

WP_20140320_023_zps078b5f30.jpg

WP_20140320_013_zpscd6ab89f.jpg

WP_20140320_012_zps91994afe.jpg


The EGR system was also cleaned in parts washer fluid but only the cooler was submerged in the fluid
WP_20140320_026_zps14e75ff3.jpg


The EGR parts below were scrubbed with the paint brush & a pan cleaner dipped in the fluid
WP_20140320_021_zpse7460322.jpg

WP_20140320_020_zps30d1aad2.jpg

WP_20140320_019_zps7a980bb2.jpg


The valve below was also not put in the fluid, and again it scrubbed with the paint brush & a pan cleaner dipped in the fluid.
WP_20140320_011_zps1e13abc9.jpg


One of the main problems I had was removing the EGR valve & cooler, as show in the picture below the pipe in red which is connect to the pipe union which would not budge from the engine block and you cannot access the hose clips to remove the pipe, so in the end I had to just just the pipe, a new pipe was only £3 and the part number is 059 121 073 C also the pipe union has been revised last year and the new part number is 059 121 065 DS.

Untitled_zps0bad961e.jpg


If your going to start this job I would get a copy or etka and elaswin and get all new seals and o-rings as some of them were just about shot.

Tomorrow with the help of the weather I should be able to put the engine back together.......
 
Last edited:
  • Like
Reactions: RoyC, gupsterg, Tuddie and 1 other person
Good job that man.
It makes me want to do that to mine.
I bet its just as minging.

Same as the 3.0TDI In the A8?
 
Last edited:
Different engine codes but they all used the same inlet manifolds & pipe work
 
  • Like
Reactions: gupsterg, r15wne and ScottD3
BRILLIANT !!! great admiration for your work......
mostly small niggly jobs but done to perfection...
keep to up....
 
Few jobs done today.

First was the glovebox, the damper was on its way out and you just about had to pull the lid down, and the last thing I wanted was a damaged hinge.

As stated early in the thread the glove box is removed by removing the trim at the end then removing the two screws underneath, and with the glovebox open you can remove the other 3 screws.

On the A6 the damper is on the right unlike the A4 which is on the left.

Disconnect the connector.
WP_20140320_005_zpse53882d6.jpg

Remove the pin
WP_20140320_006_zps3eefb5a6.jpg

You then rotate the piston to remove
WP_20140320_007_zps948822da.jpg


Job takes about 10 minutes, and the only tools required is a 10mm socket and needle nose pliers to remove the pin
 
Last edited:
  • Like
Reactions: RS4B5, RoyC and gupsterg
Started to put my engine back together after cleaning all the air inlet.

WP_20140321_004_zpscb8341c9.jpg


Still have a few bits to put back on but I'm doing more work tomorrow, so if the weather says dry I should be able to get it done.

Next was to remove the front bumper so I could strip down the intercooler system, no writeup on this one as it was getting dark and I'd had enough for the day. Also want to get the intercooler cleaned ad dried ready for tomorrow.

WP_20140321_008_zps7f9e0caf.jpg

WP_20140321_010_zpsdf00237c.jpg


When stripping down the intercooler system I figured it would have oil in it so I was surprised when this came out, think my turbo could need replacing, as I cannot think of any other way that much oil would get into the system. (Found out there was another way, the crank case breather was causing the issue)

WP_20140321_006_zpse4cfc21e.jpg

WP_20140321_007_zpsa1917144.jpg


Tomorrows job will be to replace the water pump, thermostat, tensioner and v-belt, will then flush the system and refill with new G13 coolant, and after that lot I'll put the car back together........
 
Last edited:
  • Like
Reactions: gupsterg
So today's job, replace the thermostat, water pump, tensioner and v-belt

Again it's not much of a write up on this one, as there was a fair bit to do and spent most of the morning drying the intercoolers and pipe work that had been cleaned up. Other problem today was the weather, it was raining on and off for most of the day which started to pi$$ me off.

Got most of the parts below from ebay which was about 50% cheaper than TPS, only part I had to buy from TPS was the thermostat.
WP_20140322_001_zpsed27894e.jpg


First was to put the slam panel into the "lock carrier" position which is a case of removing the air intake duct, then removing 4 bolts on top of the panel, and then removing the 4 bolts and 1 nut on each member, you can then pull the panel forward, I also disconnected all of the rad hoses to give extra room.

WP_20140322_002_zps30d2428a.jpg


First was to remove the old belt, at this point I found the tensioner to be very weak and required very little pressure to remove the old belt.
WP_20140322_003_zpsa00930ad.jpg


Next was to remove the pulley off the water pump so you can access the 7 screws holding the pump in place.
WP_20140322_006_zpsf8793cc4.jpg


The thermostat is only held in place with 3 screws, if you just want to change the stat it can be done without removing the belt.
WP_20140322_004_zps66790608.jpg


New pump, stat and tensioner fitted, I also used new bolts when fitting everything back together
WP_20140322_010_zpscb387340.jpg


New belt fitted, make sure the belt is seated on all the pulleys, its also better to start with the lower pulley there is very little room to get the belt between the front engine mount and pulley.
WP_20140322_011_zps2af10ec9.jpg


When refitting the slam panel try and line up with the old screw marking, as you can see the old rings marked on the panel.
WP_20140322_012_zpsdf78b45d.jpg

RHS lined up just about perfect
WP_20140322_013_zps25d7d734.jpg

LHS was about 1/2 a millimeter out, which is good enough for me
WP_20140322_014_zps3b82e380.jpg


Final jobs was to put the engine inlet parts on
WP_20140322_015_zps08aa8941.jpg


Refit all the cleaned up intercooler parts and hoses.
WP_20140322_016_zps9111ea02.jpg


Unfortunately I damaged the lower coolant hose so cannot refill the system unit I get the new hose, which I hope will be Monday but I bet they won't have one in stock, so will more likely be Tuesday..........
 
Last edited:
  • Like
Reactions: RoyC, gupsterg, Tuddie and 1 other person
Excellent work and write up. You and gup could team up and start a workshop together !!
 
  • Like
Reactions: gupsterg and Tuddie
One of the final engine jobs was to drop the sump and check out the oil pickup. On the 2.7 & 3.0 TDi engines there is nothing in the way of removing the lower part of the sump.

First start by draining the oil and removing the connector going to the oil sensor.

You then need to remove the 33 bolts that hold the plate in place.

The next difficult part is to break the sealant holding the low sump in place, you start off by putting pressure downwards on a corner of the sump, then trying to get a Stanley blade in to break the seal, once the corner started to free I then used a scraper to cut into the rest
WP_20140324_001_zpsed9686f8.jpg


One of the other reasons I wanted to remove the sump was to fix the rust problem. The bad part is in the pictures below, but there were plenty of other spots

WP_20140324_015_zpsfd355986.jpg

sump_zpsad8ced89.jpg


Once removed the old sealant had to be removed I found it did not stick to the top of the sump, just the lower part. To remove the sealant I used WD40 to get the thick off and then the cheap screwfix sealant remover. No Nonsense Sealant Remover 100ml | Screwfix.com

WP_20140326_003_zps94ccb4e8.jpg


I then resprayed base of the sump with hammerite black spray paint and left for 24 hours to dry. One thing I would say to to make sure it's dried in a warm place it just won't dry if left in the cold.

WP_20140326_001_zps9e80320d.jpg


Next was to clean the pickup pipe, no before pics but it was not that bad, but it cleaned up very well

WP_20140324_007_zps00aacd0a.jpg


There is no gasket on the TDi block so you have to use a silicone sealant which you can get from you local dealer. But it is just Loctite 5970, so you may be able to get it cheaper.

WP_20140326_004_zps19e6d585.jpg


You have to be quick when putting the sealant on, as the sump should be put back on within 15 minutes of applying the sealant.

For the screws it's 5nm and the 1/4 turn.
 
Last edited:
  • Like
Reactions: gupsterg, Tuddie and ScottD3
Well its been a week since I took the car off the road and started to do all the work on the engine, so today I finally got the last gasket for the oil level sensor and the car was filled up with fresh oil. Started the engine and was very revealed when it fired into life.

Only problem I had was the amount of steam coming from the engine bay, this was due to the amount of cleaning the engine had, to remove the cr@p from in-between the V where the oil filter & egr system is fitted. So after a good 30 mile trip the water has gone and it no longer looks like the cars on fire when I pull up at a junction.

My MPG has also improved by 4-5 according to the DIS, but will see how that goes over the next few weeks. It's made a massive difference to the amount of smoke when you put your foot down its now almost gone gone, where as before there was just a massive cloud of smoke when you floored it.
 
Last edited:
  • Like
Reactions: RoyC, gupsterg and Tuddie
B5NUT, I'm thinking of doing the massive inlet and EGR clean that you and gupsterg did.
Do you have a list of all the needed gaskets, washer any other consumable parts needed?
 
The only gasket I replaced where the EGR ones, but I did need get new washers for some of the coolant pipes. Will try and get a list together of what I used.
 
  • Like
Reactions: ScottD3
Here is the list of parts I changed

EGR Cooler related parts

Hose X1 (059 121 073C) Could not remove the EGR as this pipe was stuck fast and had to cut the pipe
Pipe Union X1 (059 121 065 DS) Revised Audi Part
O-ring X1 (N 904 520 02) for pipe Union
O-ring X1 (N 908 091 02) other water pipe for EGR
Seal X1 (059 131 120) These are the seals for EGR inlet and outlet for exhaust gases.
Seal X1 (059 131 547 C) seal between the EGR & EGR Cooler
Bolt X4 (N 910 215 01) Bolts holding the EGR pipe off the turbo to the EGR my were a little rusty so replaced.

Water pipe o-rings
O-ring X6 (N 013 807 6) These are the water pipes that go into the side of the engine near the inlet manifold get a few of these about 6 give you a couple of spares

Turbo oil pipe
Banjo Bolt X1 (059 103 728) My bolt was very rusty so chucked it and got new
o-ring X2 (N 013 811 5) These are the seals for the oil pipe and the bolt above, did not want an oil leak to replaced.

Few things to note when doing this.

You will lose a far bit of coolant, so make sure you have spare and bleed the system when done.
Get yourself a extending magnet device this saved me a fair few times doing this job.
Try and clean as much as you can between the inlet manifold & glowplug area before removing the inlet manifolds
Double check the head before refitting the inlet manifold just in case some dropped down onto the valves.


Finally get yourself a swear jar you will be a millionaire by the time your done!
 
  • Like
Reactions: RoyC, A4_MaJiK, gupsterg and 1 other person