

I read that tick option keeps the footwells on while drivingSilky
I also have another option which is Byte 12. This gives the option to tick a box which says " footwell lights with terminal 58D active"
Any ideas? Leave well alone ?
My DIY Guide for Retro Fitting Foot well lights
- Thread starter RobinA3
- Start date
You are using an out of date browser. It may not display this or other websites correctly.
You should upgrade or use an alternative browser.
You should upgrade or use an alternative browser.
D
Deleted member 96254
Guest
That option also enables the dis menu on the dash for interior lights so that you can alter the brightnessI read that tick option keeps the footwells on while driving
liam1711spear
Registered User
- Joined
- Oct 5, 2016
- Messages
- 17
- Reaction score
- 2
- Points
- 3
Where can I buy the lights and wiring? Want to fit them to my 2012 8p will they work in it?
Sent from my iPhone using Tapatalk
Sent from my iPhone using Tapatalk

- Joined
- Jun 24, 2010
- Messages
- 1,417
- Reaction score
- 241
- Points
- 63
- Location
- East Manchester In the Hills !
That option also enables the dis menu on the dash for interior lights so that you can alter the brightness
Yes they will. Done all of mine with the kits I bought from Robin (great quality) and then ripped the bulbs out and replaced them with red leds from t8ups
Sent from my iPhone using Tapatalk
liam1711spear
Registered User
- Joined
- Oct 5, 2016
- Messages
- 17
- Reaction score
- 2
- Points
- 3
- Joined
- Jun 24, 2010
- Messages
- 1,417
- Reaction score
- 241
- Points
- 63
- Location
- East Manchester In the Hills !

Have the front footwell lights and would like to fit rears as well. Any reason why I can't just parallel wire the new rears to the fronts?
Thanks to forum members who have contributed to retrofits, It was made easier with @TimWills28 glovebox removal video and the knowledge shared by members.
the seat wiring on my 2014 car was different from other pics I have seen, there wasn't a multi plug under a plastic cover, just a cut out in the carpet.
Sorry to revive and older thread but I need some help.
I purchased a set of LED footwell lights from eBay (I should have gone straight to Robin...) - they are all fitted however the wire that connects into the white CECM block, pin 50 (MY61) doesn’t have the right connector. I need to buy the applicable repair wire for this.
I’ve read several threads but I still can’t work out what the part number/correct size should be.
I’ve narrowed it down to:
000979131E
Is anyone able to confirm and as always your help is appreciated
Thanks
Sam
Having made the mistake of purchasing a set of footwell lights from China, where the pin wouldn’t fit my MY control model, I’ve purchased a full set of looms from @RobinA3.
They arrived today (Special Delivery) and have now been successfully fitted - amazing.
Echoing the many posts above, the quality of Robin’s looms is excellent, the connectors, the crimping and how the rear loom plugs into the front, so no soldering.
They arrived today (Special Delivery) and have now been successfully fitted - amazing.
Echoing the many posts above, the quality of Robin’s looms is excellent, the connectors, the crimping and how the rear loom plugs into the front, so no soldering.
Antony Dixon
Registered User
Hello
I have just got Audi A3 2011 2.0l 3 door and have all parts just need to confirm the pin connections for footwell lights and puddle lights before I blow all the electrics
Many thanks
I have just got Audi A3 2011 2.0l 3 door and have all parts just need to confirm the pin connections for footwell lights and puddle lights before I blow all the electrics
Many thanks
Hello
I have just got Audi A3 2011 2.0l 3 door and have all parts just need to confirm the pin connections for footwell lights and puddle lights before I blow all the electrics
Many thanks
Hi Anthony, there is 2 different posts - one for Footwell lights and another for Puddle lights.
Re Footwell lights - Page 2 of this thread will give you the info you need (post 2010 models)
Re Puddle Lights -http://www.audi-sport.net/xf/threads/my-diy-guide-for-retro-fitting-puddle-lights.58244/. Worth reading end to end.
Antony Dixon
Registered User
Ive just fitted the footwell lights for ny a3. Ive fitted the OEM facelift LEDs amd they only work when the doors are open(when all the interior lights are on). Ive seen them flicker when headlights are on so it looks like the car does a light check on these too. Is there any way to prevent this on a prefacelift 8P through VCDS? Thanks
- Joined
- Jun 22, 2011
- Messages
- 2,175
- Reaction score
- 945
- Points
- 113
- Location
- Wellingborough
- Website
- www.emtuning.co.uk
Ive just fitted the footwell lights for ny a3. Ive fitted the OEM facelift LEDs amd they only work when the doors are open(when all the interior lights are on). Ive seen them flicker when headlights are on so it looks like the car does a light check on these too. Is there any way to prevent this on a prefacelift 8P through VCDS? Thanks
Nope
I get quite a few enquires regarding the kits I offer so I have recently created website showing the kits I can offer.
https://rocketwires.co.uk
https://rocketwires.co.uk
All sorted Pin 17 is on the end next to the purple wire. Also guide the wiring through the centre console directly on top of the air duct.
Are you still making these kits?This afternoon i decided to retro fit some foot well lights, there are a few guides on the internet knocking around but i thought i'd do my own as i see there are many posts - including one from me - on how to do this retro fit.
From start to finish it took me about an hour to do, longest part was soldering the connectors onto the wiring.
First of all before i start the guide i would just like to mention that it was a bit of a mission getting hold of the correct electrical connectors but i have now got a number of them all therefore i am able to make wiring 'looms' for this retro fit to make it basically plug and play (apart from needing VAG-COM to turn the function on).
If anyone is interested then i am able to supply all the wiring, electrical connectors, plastic connectors and the actual lights as a 'kit'. The connectors have been soldered on and all you need to do is to connect everything up once its all in place, the length of the wires are all correct as well so no messing around for yourself.

If you are interested please pm me.
Right now for the guide.
First off you will NEED vag-com program the controller so that it knows there are footwell lights fitted.
To do this go to Group 09 and change Byte 00 Bit 2 to Position 1.
Now for the monkey work bit of the process.
Remove the 2 screws underneath the steering wheel trim, you'll need to get down and get your head underneath to see them.
Next remove the fuse box cover on the side of the dash, i used a screwdriver to lever it off.
Undo the screw at the top which holds on the steering wheel trim.

Now pull the trim away from the dash, it is clipped in at the top where it meets the dash, this needs a bit of force but make sure you pull it away from the dash towards the back of the car rather than levering it upwards as the clips may break.
Now unclip the electrical connectors from the headlight switch and remove the OBD plug at the bottom of the trim.
The trim panel can now be removed.
Now poke your head up in the foot well and look up for the bunch of electrical connectors, you'll see a red tab, push that and that will release the connectors.
Now use a torch and look for connector 'B'. It will be a black connector with only 4 or 5 wires going to it. Push the clip in on the connector and remove it from the main wiring block.
On the back of that black connector there are some numbers which indicates which pin is which, look for the hole number 7, it should be empty, this is the positive feed for the lights, on the side of the plug there is a bit of pink plastic, use a screwdriver to lever it away from the connector, this holds the pins in place, plug the connector of the loom into this hole, make sure it goes into No.7 hole because its virtually impossible to remove the wire from the plug once its in without the correct depinning tool.
Once you are happy with the connector, push the pink clip back into the connector and plug the connector back in to the main wiring block, remember to push the red tab back so it locks the connectors in place.
This is the feed sorted now, now you need to earth the wiring, i used a bolt behind the steering wheel, i undid the bolt and then tightened it back up with the earth wire trapped between the head of the bolt and the car.
Now its time for the passenger side.
Remove the side panel on the side of the dash as on the drivers side.
Undo all the screws holding on the glovebox, there are 2 underneath in the footwell, 4or 5 underneath the inside of the glovebox, one inside of the glove box at the back and one at the side of the glove box.
Let the glovebox drop down, you can remove the glovebox by disconnecting the connector one the glovebox but you will get a airbag fault warning on the dash afterwards as the connector feeds the airbag switch in the glovebox, this fault can be cleared using VAG COM. I removed the glove box completely for better access but it can kept on the floor to do the job but its more fiddly if you don't want to have to clear faults on the car.
Now you'll need to get the wiring to the passenger side footwell, i used a coat hanger and from the passenger side pushed it through to the drivers side just behind the stereo and taped the wire to the hanger and then pulled it through.
Once its pulled through you now need to push the connectors at the end of the wires into the plastic plug for the light.
Now connect the plug to the light.
Hopefully the light will now work assuming the vag com setting has been completed, if it doesn't work then you may need to put the ignition on and then turn it off again. If it still does not work then check the connections and earth points.
Once everything is working disconnect the lights and put back all the trim and glovebox etc.
Once its all done (making sure you haven't got any bolts left over) pull the connectors through the hole where the lights sit into the bottom of the trim, connect them up to the lights and push the lights into their location.
And there you have it, foot well lights.


I'll be doing the puddle lights and warning lights tomorrow so i will post a guide up on how to do that and if anyone is interested i could create a 'kit' up so it will be plug and play assuming its an easy job but looking at the wiring diagram it looks pretty easy.
Are you still making these kits?

Hi All
I made the retrofit in my Audi A3 8V 2018, its installed and I performed the coding but still got this message and the lights are not working , any idea of what could happens?
Please

Sent from my iPhone using Tapatalk
I made the retrofit in my Audi A3 8V 2018, its installed and I performed the coding but still got this message and the lights are not working
 , any idea of what could happens?
Please

Sent from my iPhone using Tapatalk
Right so here goes, finally!
Firstly, big thanks to Stokeballoon and Robin, as Stokeballoon provided the wiring pin locations on the new 2010+ module and the part numbers for the LED TTRS Footwell lights and repairs wires needed, and Robin made the looms and ordered the parts for me. Top guys both of them!
So, as some of you may the know the central electric module changed in 2010 and as such the modules location, type and wiring all changed from earlier A/S3's. Also the TTRS came out with LED footwell lights as standard and these are the same size fitment as the A/S3 ones. So this is how to fit OEM LED foot well lights to a 2010+ A/S3.
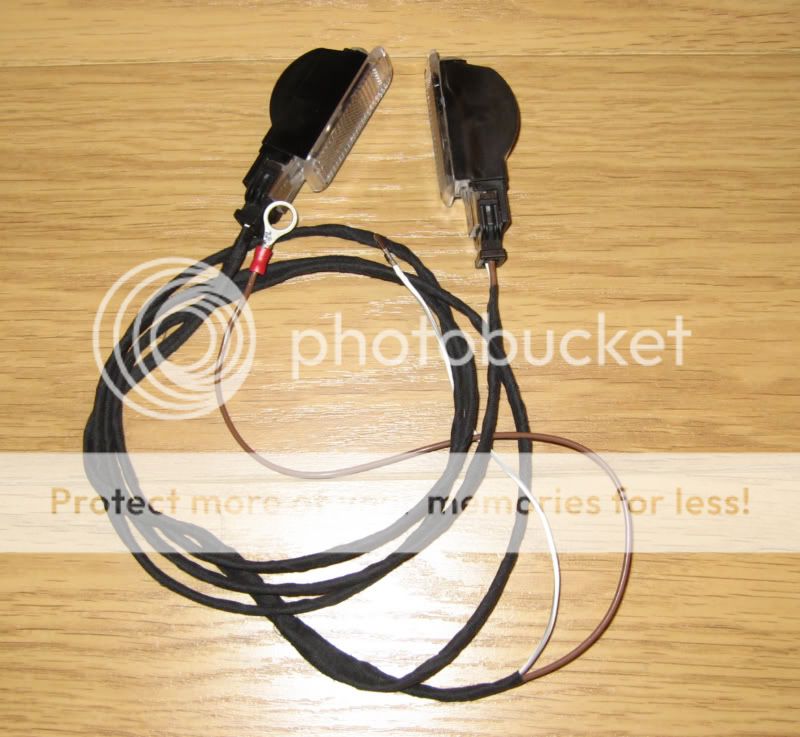
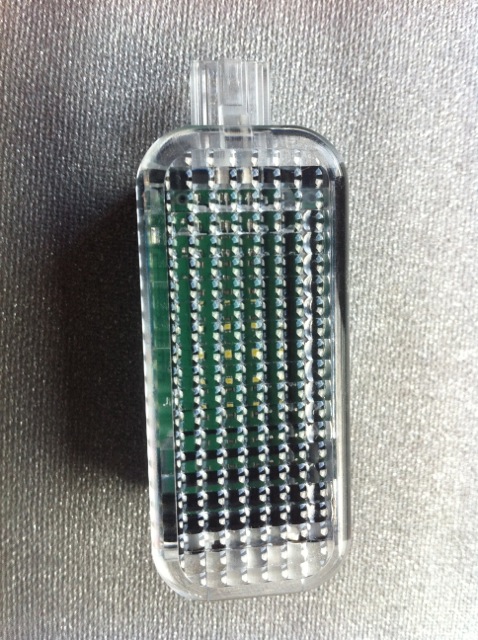
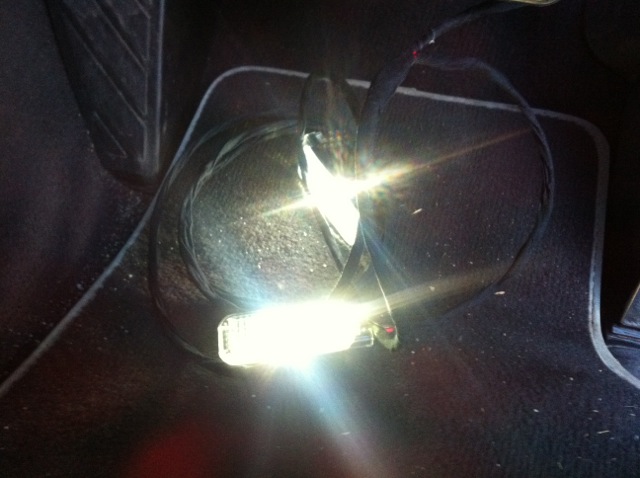
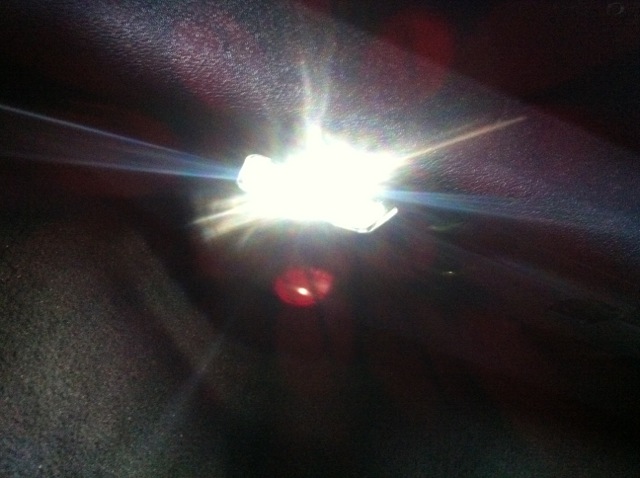
This is a close up of the OEM LED footwell lights (standard on TTRS):

Loom and parts as supplied by Robin:

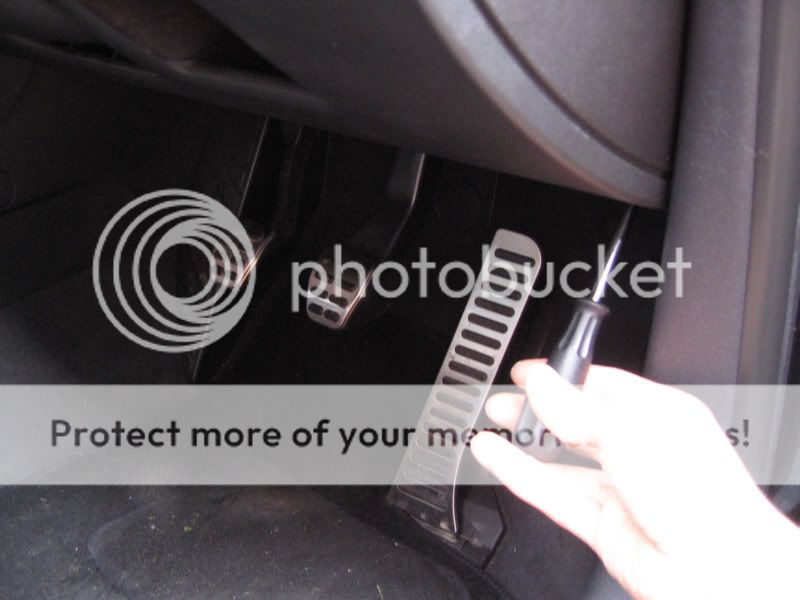
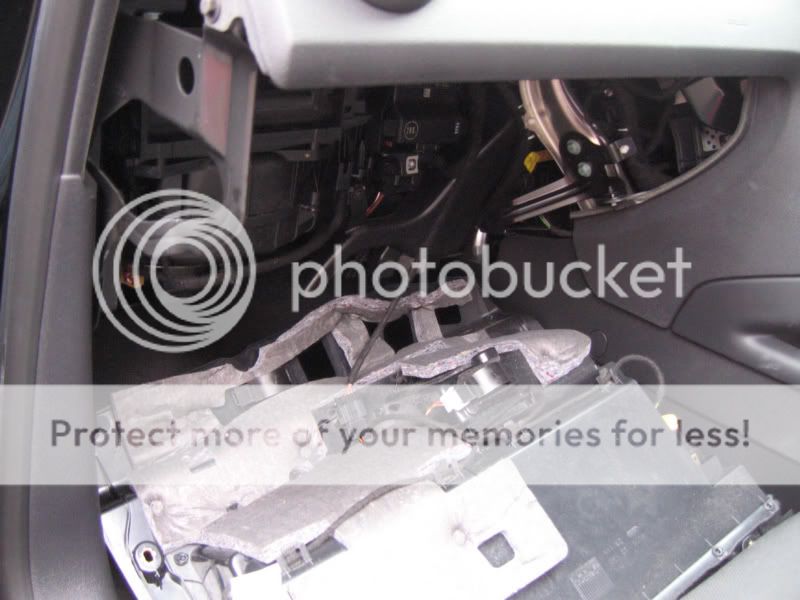
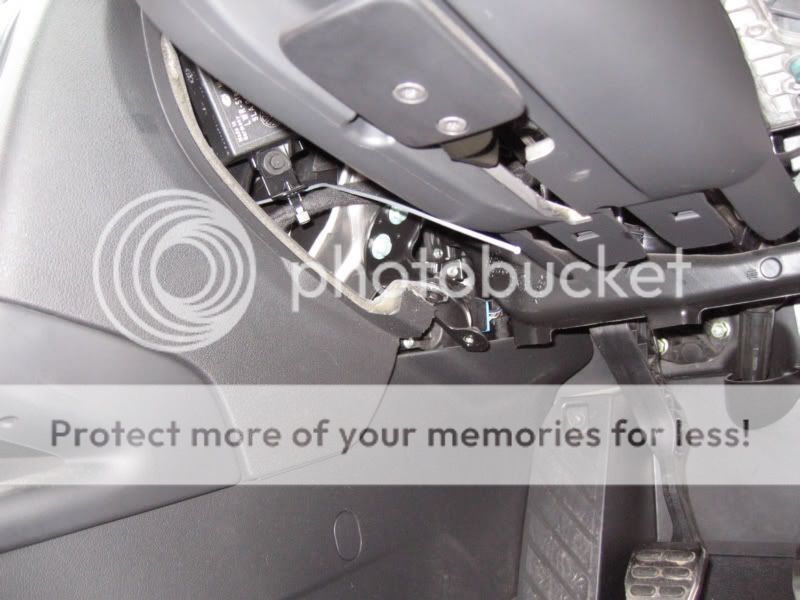
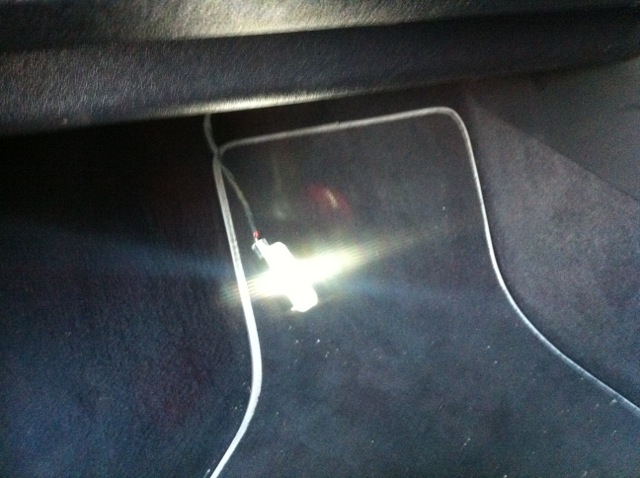
Firstly follow Robins instructions above to remove the drivers side knee panel which gets you to this point:

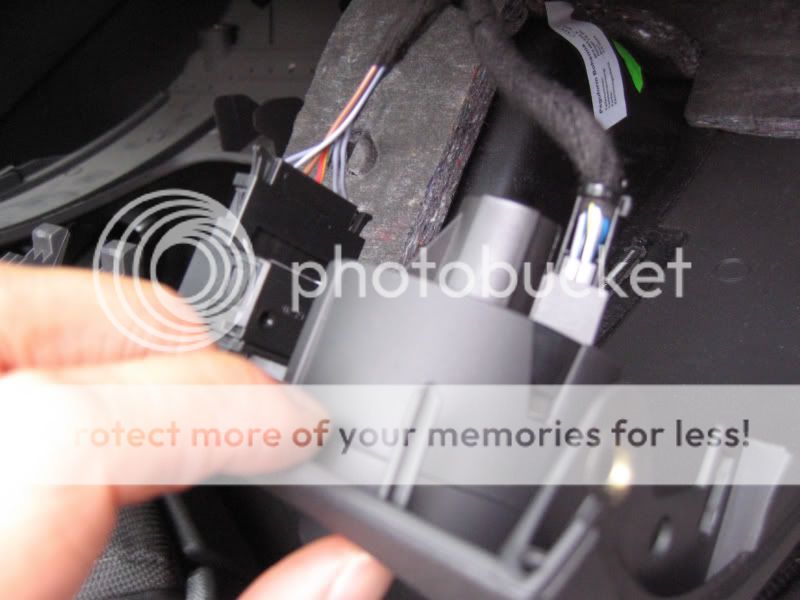
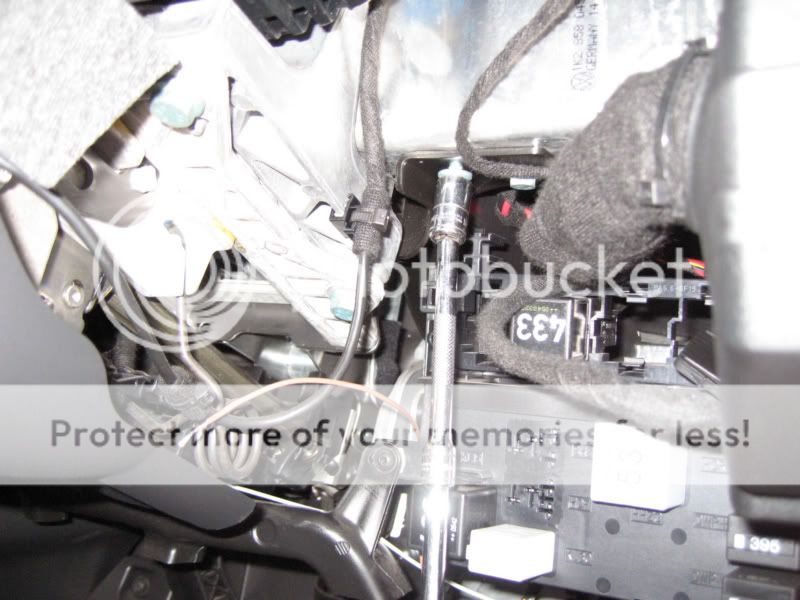
Stick your head up and you will see this module (lots of little relays on the front), its just to the left of the fusebox:
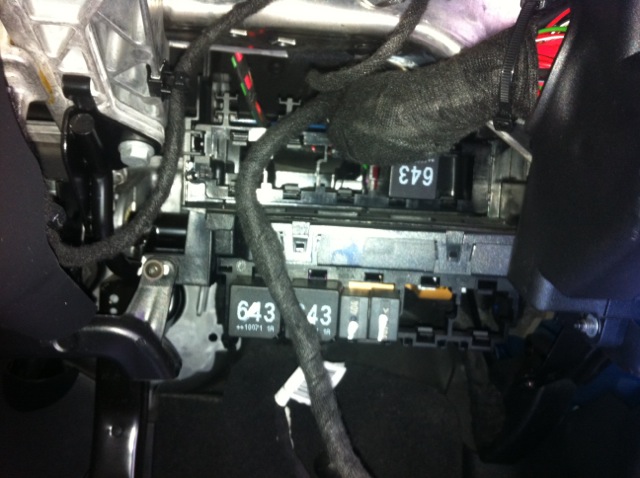

Now if you stick your head right under this module and look underneath/behind it you will see 3 x big 52 pin connectors:

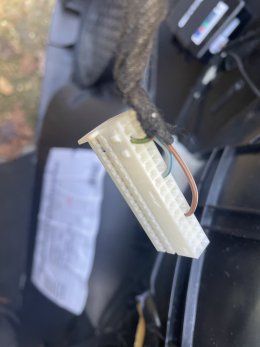
So you have black, white and yellow. We need the middle white connector, so press in the little tang, and pivot down the locking bar and pull out the connector:
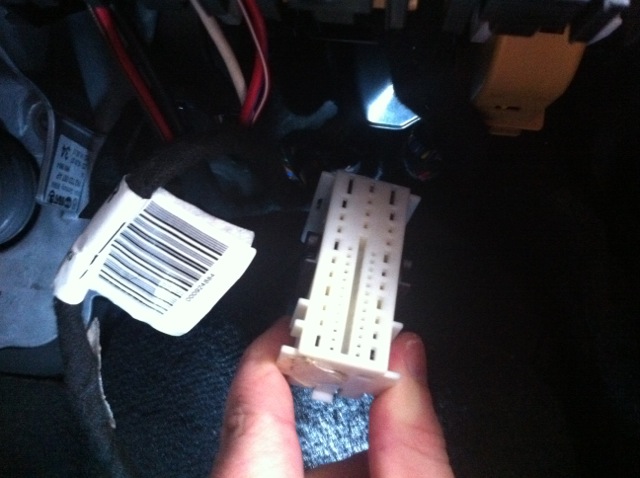

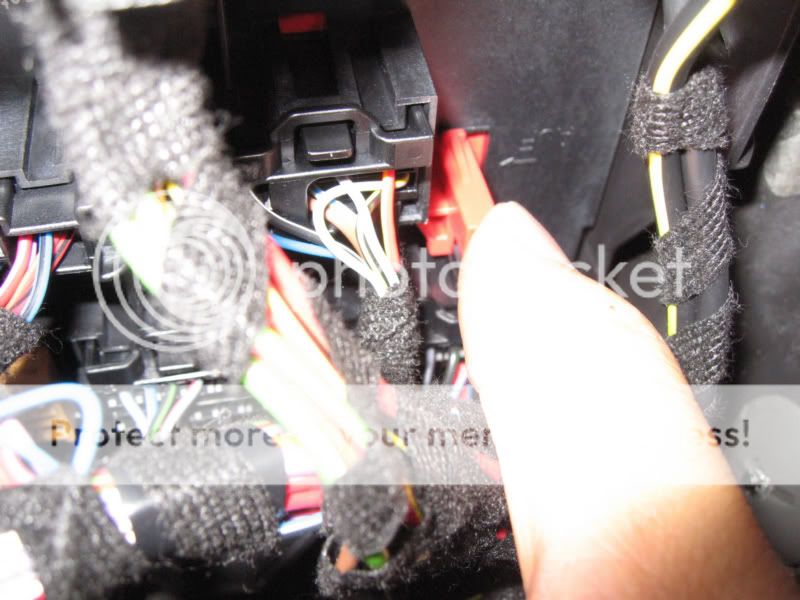
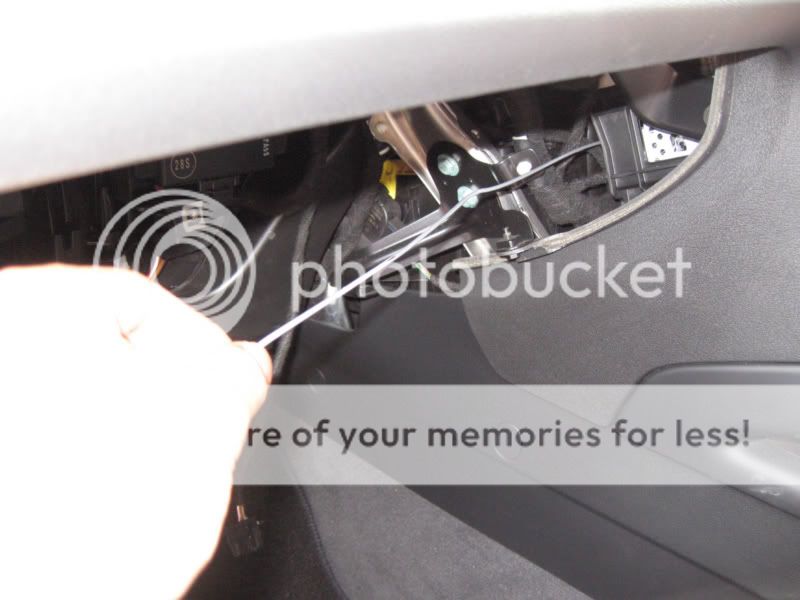
So we now need to remove the outer casing of the connector so we can get to the pins, do this buy cutting the zip tie at the top:

and press in the two tangs that hold the pin block to the outer casing, slide off the outer casing:
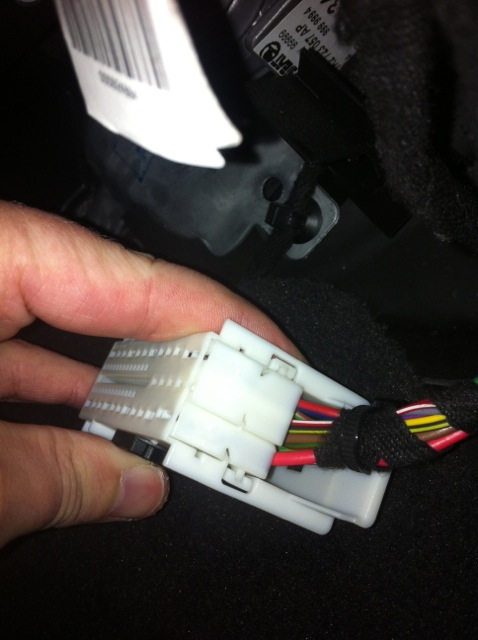
Once off you are left with the outer case and the pin block:
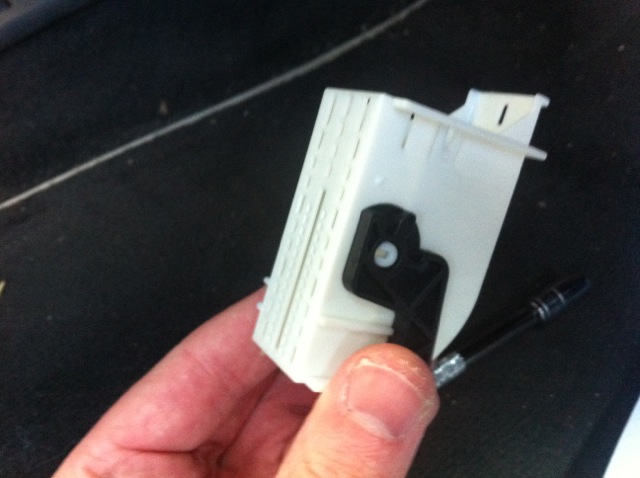

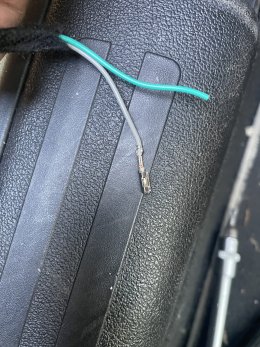
Now we need to insert the feed (+ve) from the footwell light loom into PIN 50. This is the 3rd pin up from the bottom on the left side (next to the blue/white wire on the pic above), but all the pins are numbered on the outside of the pin block, so its easy to find which is the right pin, again PIN 50 is what you need. The pin will only slide into the box one way, thats the right way.
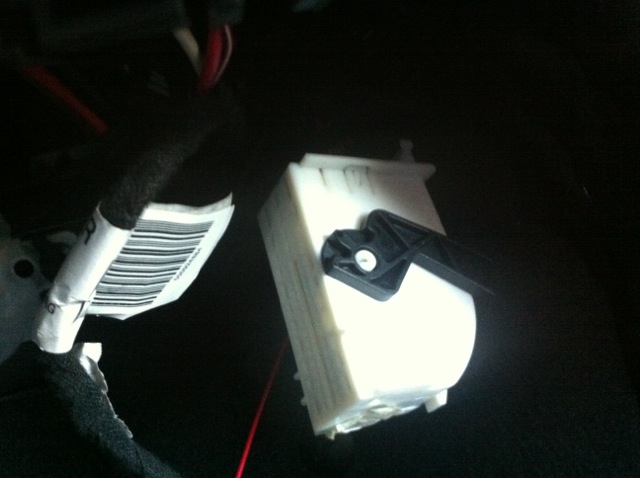
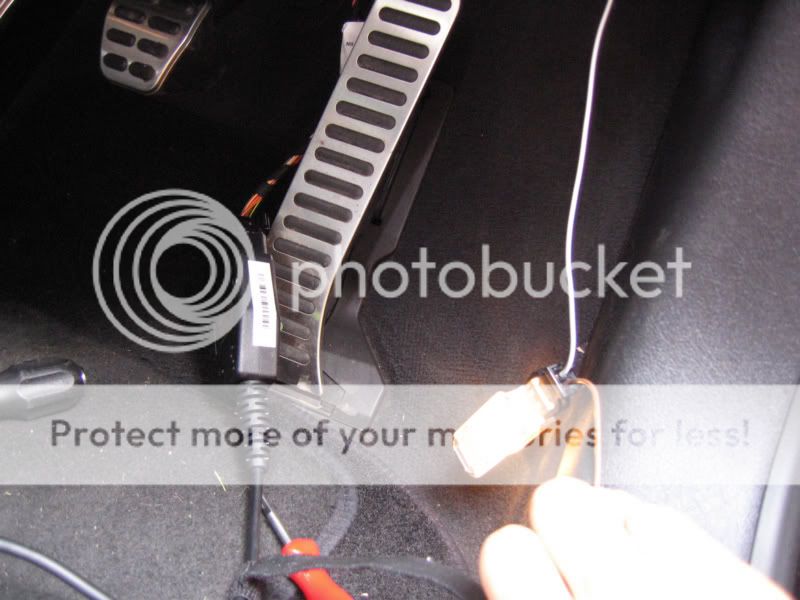
Once you have put in the pin, slide the outer cover back over the connector and click it in to place. If you like you can also replace the zip tie but I did not bother as its solid without it. So thats the feed sorted, now just for the earth. I used a bolt up near the fuse box here:


Then as long as you have done the VCDS coding (see below for that) you should have light once you close and open the door!
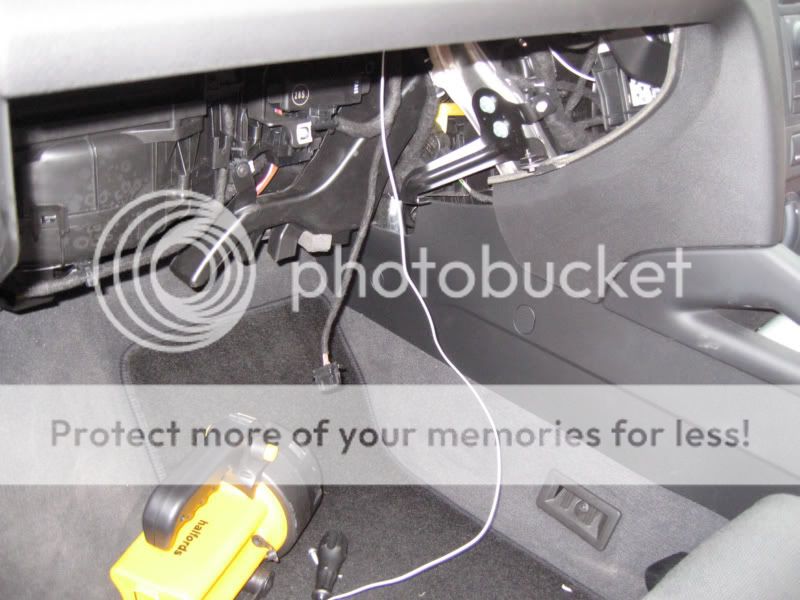
I then slid the RNS-E forward, to allow me to push the other side wire/light across, and then dropped the glovebox to pull it through and put the light into place (see Robins instructions above for removing glovebox etc) Pass side done:
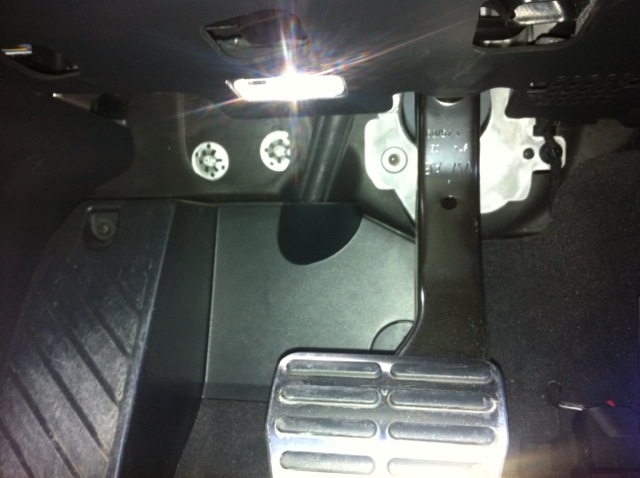
Then as above refit the the drivers side knee panel and then its all done:
With regard to VCDS coding, if you are fitting LED lights you need to change it in 2 places in Module 09. Byte 20, Bit 0 and Byte 25, Bit 3:

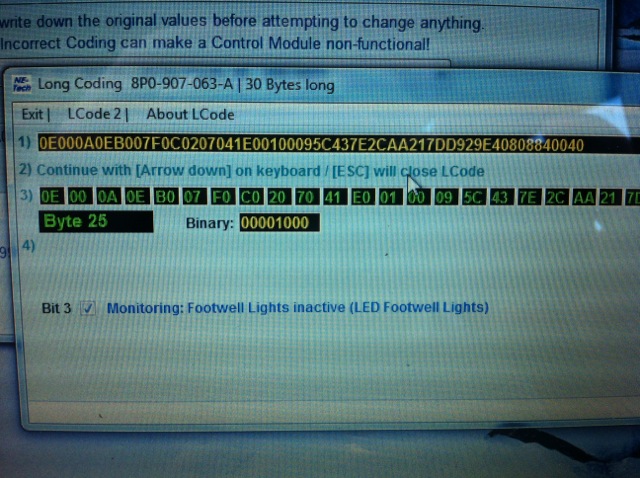
Make sure you tick the LED monitoring inactive if you have fitted LED ones otherwise you will get bulb errors.
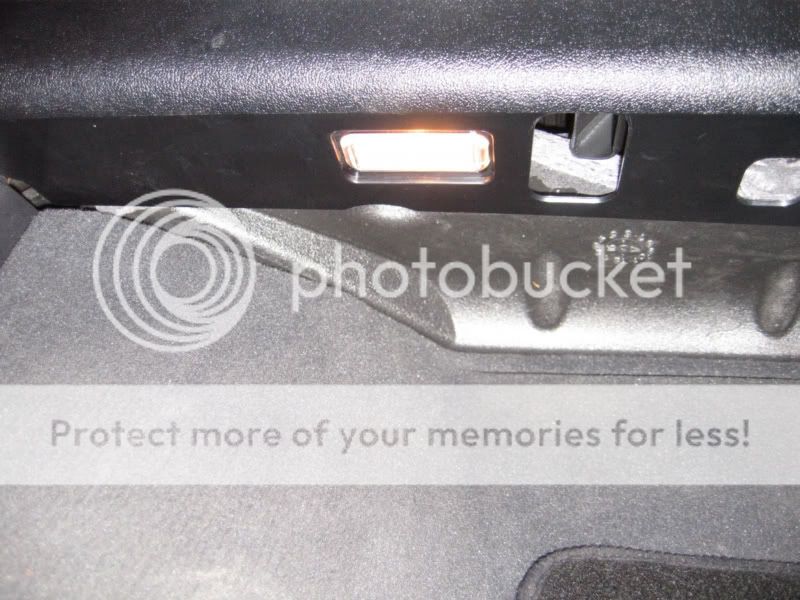
Some final pics:

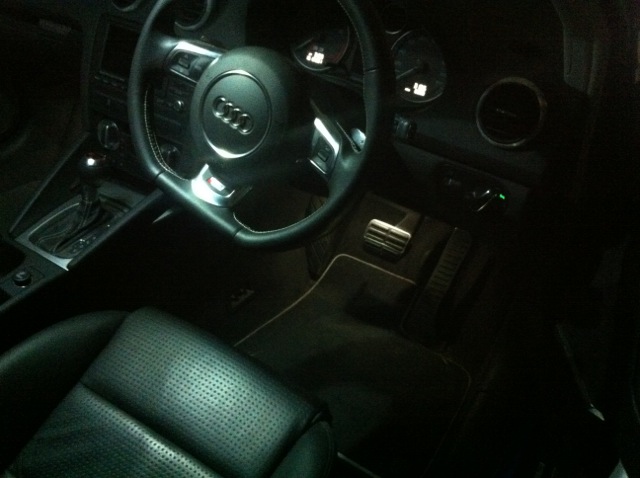
So thats its soft start/stop OEM LED footwell lights fitted to a 2010 S3.
Any questions let me know!")
Are you able to fit non-oem lights this way?
- Joined
- Sep 12, 2010
- Messages
- 34,881
- Reaction score
- 15,945
- Points
- 113
You don’t have access to pm for sending or receiving as you don’t have enough posts@RobinA3 can you message me please, looking to buy some kits, thanks