S2 Coupe restore thread.

B5NUT

Well-Known Member
VCDS Map User
Joined
Feb 6, 2010
Messages
5,560
Reaction score
1,606
Points
113
Location
Darlington
For many many years I've been wanting an S2 coupe, I had a standard Coupe 2.6E about 15 years ago but only kept it for 3 months. I also had a test drive in an S2 about 16 years ago and I so wish I had a bought one back then. Anyway over the last year I've been thinking about getting one, but it's been a tough decision as it would mean getting rid of my A6 which I got from new, was under 5 years old and had 37K on the clock and had no faults whatsoever, and I would be buying a car that would be around 25/26 years old with over 100K on the clock, and which ever way you look at it was going to need work.! I must be mad.

So with the current silly used car market I decided to sell up, I found the A6 had gone up by about £3K from the start of the year, and once all these shortages have been sorted out the used car market will take a bit of a tumble at some point so the A6 was sold. I had been looking around for S2 coupes and I knew they were a bit thin on the ground, in fact there is only 108 registered on the UK roads, and finding one in good condition body work wise, late model (95/96) lowish miles and unmodified was top of my wanted list. There were a couple of early models, and was offered a later model which was completely rotten, with almost every panel damaged and the seller wanted £15K:laugh::laugh: so that was out. Found a nice blue one but that sold by the time I had called. There were plenty of nice S2 Estates around but I've had Avant's for the last 20 years so fancied something different, so it had to be a Coupe.

A few more weeks past and I found a nice one down near Plymouth, so after arranging to meet up with @ScottD3 and I took the train down and picked up this.
1635963332137


It's a 1995 S2 Coupe for 106K miles on the clock, I would have preferred a black interior but the cream is growing on me! it's just going to take a lot of cleaning...
The car came with 2 sets of wheels, ones that are fitted which I just don't like and the original S2 Avus wheels which are going back on the car.

Theses are for sale if anyone is interested. Genuine Audi wheels manufactured by BBS. tyres are around 6mm looking for £450
1635963550822


As you can see from the brakes behind the wheel, they are very crusty and in desperate need of replacing but that is only the top of a very rusty scrap pile called the S2 running gear... More on that later.

So first job on the list was the glovebox it's been bodged at some point with a nut & bolt and did not close properly, well not without a fair amount of help..
With half the plastic missing and a rusty nut & bolt had been used as a bodge, it was at this point I figured the last owner had tried to spend as little as possible on servicing & repairs.
1635963959269


So a replacement glovebox has been sourced and in the time being a more simple an nicer solution was used. Simple plastic clip that was the same dimeter as the hole in the glove box, and a self tapping screw to allow the hinge to pivot.
1635964141129

1635964176083

1635964210304


So that was the glove box fixed.

Next up was oil & filters. Now this car you could almost class as a barn find. It was last run in 2016, then stored away, so it was in desperate need of a good service. First up the pollen filter.
I would say this is over 7 years old.. :laugh::laugh:
1635964467831

It just fell apart when removed.
1635964533548

Found this on the Sunday so Monday morning this lot was purchased.
1635964618683


So along with the new pollen filter new air filter was fitted and the 13 year old K&N (which had never been cleaned since fitted) was also dumped
1635964714049


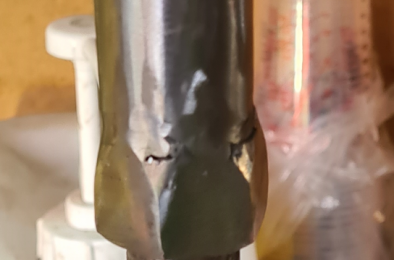
Next up was to change the oil, the sump plug was just about welled on and took a breaker bar to remove it.
1635964848193

Looking at the service history the oil was changed about 8 years ago. With that done I moved onto the exhaust. The last owner changed for a stainless system, but they must have used the old hangers as they were completely shot.
1635965105030

Mid section had failed completely.
1635965197660

New rubbers look a little stronger than whatever was fitted before.
1635965286644


Next up thermostat. Noticed on the long drive home the car never got up to temp it was always around 70deg. So the thermostat was swapped out.

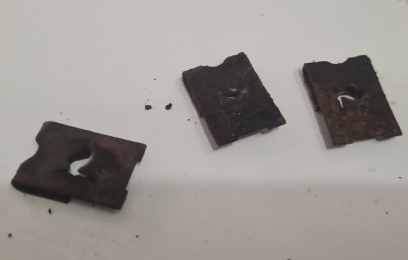
Picture below shows the original OEM from the car on the left, new OEM in the middle and an aftermarket on the right. For god sake don't bother with the aftermarket, it does not give the amount of flow required to cool the engine and it easily over heats. So that went in the bin and a new one from TPS was fitted.
1635965484248


So changing the stat was the tip of the cooling issues with the car. If left at idle for a long time the car would over heat and yet the fan would not kick in, so after a lot of head scratching and flushing the system another 3 times. I decided to replace the main rad. I found the AUX rad was getting very hot and the main rad was not getting hot enough for the temperature switch to activate as its located at the bottom of the main rad. So the old rad and coolant bottle was chucked. and new ones ordered.
1635965892171


1635965948196


So the replacement radiator fitted 80% and you cannot by new ones from Audi anymore, it was a good few mm narrower than the genuine rad so the top mount no longer reached.
1635966174894

Now I could have packed it out with spacers but I was in the mood for a bit of welding so off to B&Q for a bit of flat bar to extend the bracket

So chopped the end off and welded in a 8mm section
1635966314542

Then added a washer on the end otherwise it fouled on the lower screw
1635966386349

Don't laugh too much at the welding, I only whip the welder out about once a year at most!

So bracket refitted, will be getting rid of the rust once I do some other painting when I start on the front end.
1635966530550


Thats it for this post, more later.
 
Last edited:
  • Like
Reactions: bobby singh, Jassyo06, RS5 JON and 2 others
Really liking these threads atm, shows some real gritty work, keep it going.
 
  • Like
Reactions: bobby singh, B5NUT and Sandra
Great work @B5NUT - bringing an old girl/boy back to life with TLC - kudos!

Keep posting on the restoration.
 
  • Like
Reactions: B5NUT and Sandra
Next up was to look at the aircon system, I know that was not working when I picked up the car, so when I took the radiator out the condenser fell apart, so new condenser and dryer was ordered as I've no idea how long the system has been exposed to the open air.

Ignore the hacked off pipe at the top, it was easier to take a grinder to the condenser, and remove the sensors off the car.
1635971982045

New condenser was fitted however as usual with "non-genuine" parts they need a slight modification before they would fit. So whipped out the Dremel so the mounting hole aligned
1635972254901


While there was a big hole in the engine bay another little job was done, and this ones has got a bit of a story behind it! So when I first drove the car the brakes were absolutely shocking, however the car had passed an MOT a few weeks earlier. Now how the hell this car passed an MOT god only knows, it must have been done by a "mate" of the seller as there is no way in hell this car should have passed an MOT.

Now when got the car back home one of the first things I did was to take it to a friends garage so I could take a look at the car on the ramps and also get him to MOT the car but not register it as it were. So as I expected it failed. Shocks, brakes, steering rack gaiter, exhaust hangers, and a few other issues... So in essence the MOT was not worth the paper it was printed on, and no use as toilet paper as it's too hard... Now I don't have too much of an issue with this as I was planning on ripping the underside of the car apart anyway, but I was now going to have to do it sooner rather than later as it were. However it's worrying than this practice still goes on, someone could be driving that death trap around the road without even known what horrors lie beneath.

Anyway here's the big hole
1635973079379


And the first of the MOT failure items, the rubber gator should have been attached to the other end as you can see the remainder of the boot on the left but had long since departed, it was rock hard and look like it had failed years ago.
1635973186204

New one fitted.
1635973330120

While I was in there a new steering damper was fitted, the old one had become incontinent and sprayed it's contents over the engine bay and it's self. Due to the lack of oil it also had about 3" of play before it did any damping, so was about as much use as an X6 (god I hate those cars).

Nice shiny new one fitted and the rusty piece of junk in the bin.
1635973486455

1635973578060


Back to the aircon a new dryer was fitted as the old one was well passed it. It was a ****** to remove the big old nut were well seized
1635973977073


Few minutes with the MAPP gas torch they shifted and a new one fitted.
1635974076062

Also found a bit of oil in the aircon pipe to lubricate the new o-rings. Nice.
1635974117690


So while I was working on the above task I sat down with a large cup of coffee, and started to work through ETKA and look for all the parts I would need to sort out the running gear. Few hours later and more cups of coffee that I will admit to. Ebay, autodoc, local autoparts store and a few other sources a hole host or parts were ordered and a week later this lot turned up. Note that this is nowhere near all of the parts required to complete the rebuild. You have got to love shiny boxes of car parts. Hmmmm

1635974355746

1635974387645

1635974420631

My workshop looks like a local branch of TPS at the moment.

Note the complete lack of OEM parts that's due to the fact that 98% of the parts on this car have been made obsolete by Audi, and almost 80% are almost impossible to find. Joy!

Final job to complete on the aircon system was to fix the low speed fan, this should come on when the aircon system is switched on, and on my car this didn't work. So a new resistor was required. It's an obsolete part what a surprise, so after a quick google search I found 2 new ones in America for $20. Result. Same the shipping was another $40. Still a week later a new resistor was fitted.

Old crap one.
1635975117816


Nice shiny and new working one (hopefully)
1635975170753


You have to love some of the weird old tech in this car. Or maybe I'm just strange!

Just before I ripped the front suspension out I wanted to take a quick look to see what horror awaited me. However even I was take back by this stupid modification.

So these non standard Audi wheels have been fitted to the car, now to make them fit the previous owner has used spacers, and not the hubcentric well engineered spacer, just some double sided taped on spacer with more holes in it than a bath sponge. Even with the gash spacer fitted the wheels did not fit 100% as they rub on the arch liner when on full lock.. However what really got my goat was the wheel nuts. Now when I removed the wheels I got the breaker bar out as I figured they would be well on after god knows how many years, but how wrong I was. They were just barely tight, as the sodding bolts were too small for the wheel/space combo and so were held on by 3 ish threads. To say I was upset after finding this ****** dangerous mod was an understatement. For god sake if your fitting spaces to your car then buy longer bolts if you don't then your a ****** idiot.

The biggest bodge spacer I have ever seen, 1 guess where they went.
1635976058853


You can just make out in this image the amount of clean threads in the hub looks like 2-3 rest are covered in rust.
1635976136188


Right rant over next up to rip the stuffing out of the front suspension.
 
Last edited:
  • Like
Reactions: bobby singh and Sandra
Before I move on to ripping out the suspension, someone on another forum noticed something strange on the wastegate of the car. Now I asked the seller if the car was standard and had not been remapped, to which they said no it was a standard car.. You know where this is going!

However this little modification to the wastegate would indicate someone's been playing around.
1636009322303


Also found the N75 valve was unplugged and there was an error code on the ECU about communication to the valve.

A somewhat rusty & broken N75 valve
1636009413625


And the connector which has been tapped up. O dear.
1636009461419


So off to look at the ECU and sure enough someone's been in there. ******.
1636009533866

Tell tail screwdriver marks
1636009569415

I've been told this is a superchip modification which would have been done in the late 90's. It's a crap way of modifying the car and has long been obsolete.
So next step was to reverse all of these modifications.
First up a replacement N75 valve, the old one was damaged where the metal & plastic meet and the rust had got in and cracked the plastic hose connector.
1636009758720

Next was to look at the wastegate, thankfully the base of the wastegate had not been mucked around with so just needed a new spring cap.
1636013026381

The standard spring on the left has far less strength in it, and it's not adjustable.
1636010077235

Next up was to replace the map chips in the ECU with Stock versions, however I've not gotten to doing that yet, as I'm waiting on the chips to be delivered.

Finally getting around the to suspension, which is all in a rusty & very sorry state
1636010335178


There is even small amounts of rust on the body work as you can see near the flexi pipe which needs to be addressed. Not totally happy about all the black underseal that has been painted over the rust which will all need stripping back to get to the original paint.

Nasty.
1636010632618


These mud flaps are for the bin, god only knows what they are from but they have seen better days, and it's been held on a a bunch of nasty clips.
1636010755479

Everything got a layer of black underseal, why you would paint underseal over rust I have no idea.
1636010821864

Driveshafts also thick with rust and it's had CV boots before
1636010933740


Here is the nasty brakes, they worked kind of! They were in a very bad condition, took nearly 100psi to remove one of the pistons.
1636011036121

Calliper mounts also in a sorry state, but someone has been in there recently as there was fresh copper slip on the slider pins. My guess is they were seized so the place that did the MOT greased them up to get the brakes working again, if you could call that working.
1636011060315


Other side was also stripped down, and the shock had failed badly on this side. It was amazing how much oil is inside the shock as it was dripping of the suspension parts.
1636011427797

Anti roll bar out, not in too bad a condition
1636011530957


Now I had not planned to take the front subframe out this year but seeing this rust it also got ripped out Good condition subframes are expensive for the S2. You can no longer buy them new so good condition used one sell for silly money.
1636011598202


6 bolts later the front subframe was removed. The picture above was the worst of the rust so it was not in bad condition.
1636011722588


one very failed shock absorber.
1636011839322


Next up was the strip down so all the parts could go for blasting and powder coating.

First problem was removing the strut cap so I could get the knackered shock out. This is torqued to 220mn and has been on there for 26 years and rusted solid!
1636012145705


So I make a quick tool using pipe grips and 1.5 meters of scaffolding tube. That did the job.
1636012233745

Then press out the bushes on the lower arms
1636012331808

Then remove the hubs and the bearing from the housing. However at this point my press gave up so off to a garage and get them removed.
1636012499789


So with that lot sorted off to the shot blasters and get all that lot cleaned up. A week later all this turned up.
1636012629546

1636012654301

1636012695566

Nice clean and shinny parts. Lovely.
 
  • Like
Reactions: tr7, bobby singh, JohnM100 and 2 others
Awesome work as usual. The car will look awesome after you have fixed the many issues. :friends:
 
  • Like
Reactions: B5NUT
Problem with these old cars is you need some special tools to service them, and due to their age most of the tools you cannot buy anymore. So one of the the required tools is to tighten the suspension strut cap. To remove it I used the pipe wrench and 1.5 meters of tubing. However I would like to put it back on with the required torque of 220nm. So what I need to do is make a tool like this.
1636141108238


So started with an old spark plug socket, mainly because I appear to have about 3-4 of the same socket from different sets over the years, and it was an almost perfect fit for the tube I got! First was to ground back the plating from the socket.
1636141233352

Next up a 30cm bit of tube from a local supplier, I then drilled 4 holes at the top so when the socket was inserted it plug weld to it as well as the weld along the top.
1636141397184


1636141453972

With that done, the next stage was to weld a nut to the base of the pipe. I was not able to find the right size so got one slightly bigger and just ground down each side until I had the right size.
1636141648237

Finally a quick lick of paint to cover up my dubious welding skills!
1636141719590

Total cost was £2.50 for the bar, and £1 for the nut. Nice cheap £3.50 tool that would have cost about £50 if I was able to buy one new.

Now I need a crank locking tool, which is one of these.
1636141974065

However that tool needs to deal with forces between 450-500nm! the crank bolt on the S2 is on tight, and I'm not sure my welding skills can handle that level for force. So will most likely bite the bullet and buy one of these.
 

Attachments

  • 1636141591535.png
    1636141591535.png
    476.5 KB · Views: 137
  • Like
Reactions: bobby singh
While waiting for the shocks to turn up lots of little jobs to get on with. First rebuild the brakes.

They came back from the powder coating looking like this
1636231309745

I've left the old pistons in so the blasters would not damage the inner bore.

I purchased new pistons as the old ones were rotten. So to prevent the rust on the new pistons they were painted with epoxy
1636231555438

Along with the new pistons a new seal & covers were ordered.

The inside of the brakes was then cleaned up to remove the rust, so the new seals would fit perfectly.
1636231694495


Once most of the rust was gone assembly grease was applied and new seals fitted.
1636231781936


Then new dust covers fitted and the new pistons were pushed in
1636231850227


Then on to the mounts.

I did not provide the guide pins to the plasters, I just cleaned them up my self and yes they are a different colour but your never going to see them with the wheels on. Also had to clean up the boots. Was going to buy new ones but they were almost £35 from TPS for 4 boots. So the massive amount of copper grease inside them was cleaned out and reused them as they are still in very good condition.
1636231942305


Only takes a few min to re-grease the slider pins and refit the boots.
1636232224226


Next up wheel arches.
 
  • Like
Reactions: bobby singh
So this was a job I was planning to do some point next year with better weather. However I just could not live with the bodge job that some has done. Who he hell sprays underseal over rust!

So this is what I had to deal with black rattle can under seal covering a fair amount of surface rust
1636234097634

1636234196901

1636234249008


So underseal was removed by standard thinners, you can buy 5 litre can of the stuff for around £15. Unless you want to get high as a kit then I would recommend sticking a mask on when using this stuf.

Once the wheel arch was cleaned of underseal & 26 years of dirt, it was time to get out the grinder using twisted knot wheel, and a few smaller wire wheel brushes attached to a drill. At this point you spend the next 2-3 hours removing most of the rust and getting absolutely covered in crud, and you start to end up with something like this. Point to note is if the paint is sound then there is not not much point removing it, just look for all the rust and paint bubbling and grind that back.
1636234872965

1636234938053

Once I'm happy I've found 99% of the rust, I treat all the ground back rust with fe-123 molecular rust converter (from rust.co.uk) as unless you get the area blasted you are never going to get rid of all the rust from all the tiny little rust holes. You could use a far more abrasive way of cleaning up the metal like a flap wheel, put there is a danger of cutting through the metal or leaving it very thin! I've used this molecular rust converter on other cars, and many years later the rust has not come back.

Next up is to again clean the area with thinners, or panel wipe. For the under arches I prefer thinners as that cuts through oil & grease and you not bothered if you cut through the paint as you are about to paint it.

No surprise I'm again reaching for the epoxy as the initial primer coat, it can be over painted and it goes on lovely and thick and will keep the rust away. It's simple to mix add 1 part component A to 1 part component B, then add between 5-20% thinners depending on how your going to apply it.
1636236083188

For under the arch a brush will give you a good enough result, with around 10% thinners
1636236111832


1636236144332


Next up is the base coat, now as much as I would like to you just cannot brush some metallic colours, and this metallic green looked ****** awful applied with a brush so it was time get out the masking tape and the HVLP gun. Have to say I hate masking up cars it's one of the most boring jobs going. So the arch had 2 coats of base then 3 coats of 2K clear. Then you end up with something that looks like this.
1636236504155


1636236579696

1636236613646

I know I could have got a better finish if I has sprayed the epoxy but there are so many different textures from seam sealer, underseal and normal spray paint it's impossible to get a perfect finish unless you strip back the entire area. In my view for the wheel arches, if the paint, sealer & underseal is still in good condition and it still rust free then leave it alone.

Next up will be to kill some bushes while trying to press them into the subframe, yet another awful job the S2 had in store for me.
 
  • Like
Reactions: tr7, bobby singh and RS5 JON
Another little job done while I've been waiting on shocks to turn up. Spark plug change. Now I was unsure how this was going to turn out as I was expecting the plugs to put up a bit of a fight to get them removed turns out I was wrong. They were all very loose! Apparently this is a common issue on the S2, and they should be checked every service.

This is what the tip of each spark plug connector looked like, so have ordered replacements
1636453374267


All the plugs had a lot of melted rubber on them, but on the plus side they are all in good condition with no fouling.
1636453468136

So if you own an S2 check your plugs every year. The torque setting is 30nm looking at this site http://www.s2-audi.co.uk/tech_articles/useful_torque_settings.htm however when I check them I'll set the torque wrench to 25nm as I don't what to damage the threads from over tightening.
 
  • Like
Reactions: tr7, bobby singh and Sandra
Excellent work - not exactly sure how I missed this thread :)
Its nice to see another S2 build thread.
Im glad you mentioned this Air con resistor thing - I did wonder what it was.
Keep up the good work
Bobby
 
  • Like
Reactions: B5NUT
Another couple of small jobs done, first to sort out the front washer system and then the boost pipes.

I started by removing the tank and binning the screen washer pump as there was very little flow from it and the case was trying to split apart so something was wrong with it. Then to test the headlight washer pump, and that was working very well.
1637006855121

Next up was to clean the tank and refit.
1637006874385

However while fitting the tank the black plastic hose snapped as it had gone very brittle, so placed an order with brickwerks for some replacement pipe. To replace the front pipe section you need just under 3 meters.

It's so easy to remove as you could just snap it off the car
1637006900246

To remove the end bits left in the washer jets a wood screw was used
1637006931421

The new hose ran in and an ear clip on the motor side, not sure why that is needed as the rubber L shaped hose is not crimped to the pump, or at the washer jets. Anyway that's what it came from the factory.
1637006950133


Also today got a bunch of parts back on the car, which at the moment is a good thing, as I'm sick of just removing bits. When I removed the N75 valve & the DV valve I noticed all the clips holding the boost pipes look at bit crusty, and I was concerned about boost leaks, so it was time to rip it all out.

First issue was the airbox bolt that had rusted on the other side of the nut so when I tried to remove it it just got stuck. After a little while of faffing about I found the nut is just clipped to the car so a quick smack with a hammer and it popped out so I can deal with what's left of the rusty bolt in the vice
1637007018786

Also going to need to give it a lick of paint
1637007035660


So with that done back to what I was trying to do in the first place the boost pipe. Once they were all removed the first job was to deal with the rust pipe sticking out of the turbo, it was so bad with rust it has split the rubber pipe going to it so that is going to be replaced.

It was wire bushed as best as I could with the limited access covered in rust converter and then painted with epoxy.
1637007063246

Then it was time to clean up the alloy of the turbo, both the inlet & outlet were cleaned as there was a fair amount of corrosion to the alloy
1637007068934


Once that was done all the boost pipe were washed, as I really don't like putting dirty parts back on the car.

Only issue with putting the pipes back is to make sure the clips are on the right way so you can get a 7mm socket on them.
1637007096435

Fitting the vacuum hose to the DV was a pain as I could not get the crimp tool in there, so made a tool from a old pair of wire cutters, just made the cutters blunt.
1637007117886

1637007136861

At some point I'm going to replace the all the vacuum hoses.

Finally get to put the air box back in and a far smaller bolt. That's just big enough to to be flush with the body mounted nut.
1637007163795


Air box back in with all the boost hoses.
1637007173114


I had also removed the intercooler, it was first flushed out out with thinners. Bit black but not bad after 26 years

There was no oil poring out of the intercooler it just had a thin film of oil over it. Now the down side of using thinners it also removed most of the paint, as I was getting thinners on my hands.
1637007219580

So it was given a quick lick of spray paint.
1637007238283

Now just waiting on a new o-ring for the intercooler. However before it's refitted the timing belt has to be done. A hole world of pain awaits me!
 
  • Like
Reactions: RS5 JON
Few more tasks done while I wait for the shocks that should arrive this week.

Drive shafts are the first up, as usual with this car they were covered in the crusty stuff, and the grease had started to get a bit thin so at the gearbox end there was quite a bit of grease all over the place, as the seals were also a bit tired after 26 years.

I never bothered sending the drive shafts away to be blasted, even though the company that does all my shot blasting & powered coating is very good. The blasting is done by a machine and I did not what the internals damaged if the masking or whatever they use to protect the parts not to be blasted fails. So it was out with with twist knot wheel, and various other wire brushes to sort this lot out.

Yes I know it's the hub but it got done at the same time.
1637007367362

1637007376031

1637007380473

1637007386257

So before the parts were stripped all the old grease was removed from the inner and outer joints. Have to say it was a bit of a sod getting the inner joint off the shaft! All my other Audi's have been easy once you remove the circlip. Had to press these things off...

So all stripped & cleaned ready for epoxy.
1637007408331

1637007413218

To protect the threads I just use ear plugs they do a good job, and they are cheap enough.
1637007425552

Quick application of Fe rust converter as you can never get it all removed, even more so with the ABS rings.
1637007440740

Few good coats of epoxy, and yes the ABS rings got paint as well. I've done this on many Audi's over the years and never had any ABS issues with paint on the ABS ring. The rust on them was far thicker than the applied paint.
1637007461692


Also I did not paint the wheel side of the hub, just the inner side that you can not see but you know it going to be covered in rust when you remove it, so it gets a lick of paint.

All done apart from one o-clip that I made a mess of some how and had to buy a new one!
1637007491733

The masking tape was to remind me which side is which. I know they are different lengths, but I've made that mistake before, and wondered why the gearbox did not fit...

Next up some new brake pipes. The ones that get rapped around the strut where on solid, and looked a bit nasty so they the chop!

Had plenty of VW brake pipe from replacing all of the brake pipes on my B5, include a 3 meter run which had about 30 bends to it. That was fun to make!

So these were the old pipes.
1637007513170

New pipes cut to length & coating removed from the ends
1637007533987


I've got a hand flaring tool, but it's very hit & miss. Vice mount tools works every time first time.
1637007553746

Made sure I put both connectors on before flaring the other end. Made that mistake a few times.
1637007573667


New V old.
1637007590509


Next up the passenger side wing to sort, another job that was going to be done next year but, thought sod it I may as well get it done!
 
  • Like
Reactions: tr7, RS5 JON and bobby singh
So one of the only rust problems on the car was the passenger side wing, and it's completely shot near the bumper. Now I got a "good" wing with the car but in my opinion use of the word good is a bit of a stretch!

So issues with the "good" wing

Dent
1637007644150


Stuck on nut/bolt, with damaged threads
1637007660838

And finally rust, lots of rust.
1637007678303

1637007686824

1637007694957

1637007702844


After that a good wash & degrease.

So first up was to remove the dent. Think I got about 95% out. After sanding back there is only a small bit left which I should be able to remove with high build primer.
1637007724996

Next up stripping the rust away, I use the nylon brushes as they don't damage the surface of the panel and remove paint & rust nicely. Down side is they are not cheap.
1637007742194


I've removed about 20% of the rust so far and the rest will be sorted tomorrow
1637007756742

1637007765759

1637007774663


It's no wonder when I ever I go and get a quote from a body shop the price always appears to be very high. So far I'm about 4 hours into a single panel. what with removing all the rusted nuts & rivets, trim pieces, clear plastic strips, wash & degrease, dent removal and I've no where near removed all the rust. which I think will be at least another 2 hours. Then the hole panel will need to be rubbed down which will be another 1-2 hours. So I would say it's going to take the best part of a day just to prep this one panel for paint!
 
  • Like
Reactions: tr7, RS5 JON and bobby singh
Excellent work keep it up.
Getting hold of parts for these cars is a bit of a pain like you said, its a good job most of the parts are just regular Audi 80 items.
Cheers
 
So after almost 9 hours of prep work I got to this point.

All rust gone and some FE converter on the area rust has been removed.
1637082945216


Then 100ml of epoxy brushed & sprayed to the rear of the panel.
1637083049128

It's on nice and thick so hopefully that should stop the rust coming back and give it some protection.
1637083110733

Once that's dry tomorrow I'll flatten back any overspray on the outer panel and get the high build primer on.
 
Well good news for me the Koni shocks have arrived and they fit.
1637429360390

Even got to use my new tool.
1637429366679


Started the painting on the wing. Applied the etch primer on the bare metal sections, before applying the high build primer. Just hope the primer colour is somewhere near the factory primer otherwise the colours going to be out and I'll have to start all over again. It's a light grey but the camera on my phone makes it look white.
1637429374860


Will be left overnight before being rubbed down in the morning before the base colour goes on, then a good few coats of clear which I will be able to cut back and polish.
 
  • Like
Reactions: tr7
So after many many weeks I finally have some shocks on the car.
1637429485143


Also fitted the first of the 2 flexi pipes.
1637429491129
 
Was also working on the wing over the last few days after applying a guide coat
1637429583192


blocked back the initial coat of primer and found what remained of the dent.
1637429589451


So a bit of this stopper was applied. Excellent stuff if you have very minor imperfections to fix.
1637429595835


Apply like normal filler and leave to go hard, then sand back with your required grit
1637429603132


So final primer has been applied. That will be smoothed back tomorrow before before the base & clear coats are applied.
1637429607798
 
Next up on the rebuild list is the drive shaft covers. They are looking a bit worse for wear to my astonishment
tongue.gif
no longer available from Audi.
1637429687173


After an removing underseal, carefully cutting the foam away then degreasing and finally a bit of sanding & scraping your left with these slightly less scabby bits of plastic
1637429694645


Found some neoprene foam 10mm foam from the arch & 5mm foam for the sides. Now I'm not sure how well the neoprene will hold up over time but like the old stuff it can be cut back and replaced.

To stick the foam back to the plastic I used this stuff. Zap superglue. It was the superglue of choice to glue the tyres onto the rim for 1/5 large scale petrol r/c cars. The tyres used to get a lot of abuse from performing burnouts to get heat into the tyres and they would last a 30minute of racing without any problems. I performed a quick patch test and the foam had to be cut and sanded back for it to be removed.
1637429710259

So gluing the foam and fingers to the plastic (will buy the thicker Zap next time) they were finished.
1637429718331


I know the cut outs look a bit rough and I would have preferred cutting them with hot wire rather than scissors, but I think they will do the job and will be better than the foam that was stuck to them. Also made it difficult get a template out of them.
1637429732597


Did these last last night so still waiting to see if they fit on the car.

Was also hoping to get a lot further with the front-end build but my daughter was not felling well and I looked after her yesterday, so just managed to get these bits on early in the morning before the Mrs went to work
1637429760278


For the bottom ball joint, I managed to find some of these plates (old stock febi) as the last joints were just held on with individual nut & bolts.
1637429767297

1637429772096


So today it's brakes and anti-roll bar back on the car. Also going to try and get the rotten oil cooler off the car which I wanted to do yesterday.
 
So where I got to this morning. Brake lines fitted started to blead the brakes.
1637429830405


Does anyone know how much brake fluid is need to completely flush the entire system including what fluid is in the reservoir. Was thinking 2 litres should do the job. At the moment I'm just letting gravity do the work, I think if I applied pressure to the 26 year old reservoir it's just going to burst apart so will be replacing that soon.
1637429837859


Covers look OK, think the side pieces of foam are a bit thick, will look around for some 3mm stuff.
1637429843946


Need to find a solution to this clip that goes on this nut as the cable is rubbing against the bolt. Ones on my car were both damaged
1637429854572


One thing I have done is to cover all the nuts, bolts and metal brake connections in a 2k clear etch lacquer, this is the same stuff you paint diamond cut alloys with. It won't 100% stop the rust but I've found it keeps most of it away, and it far easier to cut through a thin layer of paint than thick layers of rust.
1637429861812


Next up is to fit the ABR parts.
 
  • Like
Reactions: tr7
Well, had enough for the day. what a sod to remove one of the oil cooler pipes
mad.png


First of all got the ARB fitted which was easy enough. Need to sort that downpipe at some point!
1637429902288


So next was to remove the old cooler it's been dangling down for weeks, and it needed to be removed. So as the pipes going onto the cooler were stuck solid, the only option was to remove the top pipes, and tackle the cooler off the car. First pipe was easy enough but the second was a complete and utter pig. Got creative in the end with a pair of adjustables, that just fitted inside the engine bay.
1637429912140


With the cooler now free from the car the pipes going into the cooler were removed using the following tools mapp gas torch, Self-locking pliers, adjustable spanner and a length of scaffolding pole. Oil cooler is totalled...
1637429923926


However the pipes are saved, one less thing I need to buy!
1637429929790


Tomorrow something nice and easy paint the wing.
 
  • Like
Reactions: tr7, bobby singh, RS5 JON and 1 other person
So it's been a bit quiet on my thread due to mainly waiting on parts and tools (torque wrench). Anyway I got an almost new oil cooler the other day and was also provided a home made bracket but it was just not OEM enough for my liking, and I'm trying to keep the car as factory as possible..

Now this is what I had to work from, the original bracket from the car that has almost dissolved!
1638388979333


After watching far too much project Binky, I decided to have a go at CAD, and have to say it's not as easy as it looks! Think this was template number 5 and even that was wrong as I forgot the extra few mm for the speed clips that would be clipped to the tabs on the cooler..
1638388991047

Sounds daft but this took about 4 hours to complete.
1638389000614


Local metal shop provided a 1mm sheet steel for £5 and using the templates started to cut out the shapes with the grinder, which did not go well! So got out the jigsaw which made the job a hell of a lot easier.
1638389009444


After bending the metal using a bit of flat bar, vice and a hammer the top and bottom sections were complete. It was then I found the sides were to small due to forgetting about the speed nuts.
1638389017564


So new CAD templates made and more hacking around with the sheet of metal, the sides were made and got the welder out. Now I'm no professional welder! Hell I'm not even an armature welder that's for sure, but the welded edges turned out Ok, after a bit of grinding back!
1638389024836

1638389032068


So the final section to complete is the mounting plate. Thankfully this was still in one piece on the old bracket.
1638389047858

It just needed cutting out and the rust removing.
1638389070975


Then it was welded to the bracket. Now, don't know if it's my poor welding skill's or it's this mystery welding machine for which I cannot find a manual for, but I always get a lot of little hole in my welds. I was given the machine years ago, but I would like to improve my welding skill's and not sure this machine going to help with that. I've also no idea on the quality of the wire I'm using. I'm not using gas and I was told the wire I'm using does not require gas.
1638389079682


See all of the little holes... or craters as you professional welders would call it!
1638389087191


So the finished bracket
1638389094489


Just needs several coats of epoxy to protect it from looking like the old bracket.
1638389106106
 
  • Like
Reactions: RS5 JON
Test fitted the bracket before it was painted.
1638389584590


However it looks like I missed a mounting point for the oil pipe.
1638389592657


So back out with the drill & welder to attach an M6 bolt to the side
1638389600259


Drilled new holes in the plastic duct & bracket that will hold them together and finally a few thick coats of epoxy. May have put it on a bit too thick as it's got a hell of a lot of orange peal (not that you are ever going to see it).
1638389614244


Also applied 2K etch clear coat to the oil cooler, I know it will take some of the performance away, but it cannot be any worse than what was fitted to the car, cannot see how the old cooler was providing any form of cooling with it full of dirt and most of the fins been corroded away. Difficult to tell from the picture but the cooler now looks very shiny
lmao.gif
Anyway the clear coat should give some protection for the alloy. Will also remove the plastic duct once a year and clean the cooler out.
1638389625825
 
So another small update.

Went to start the timing belt change today, got the belt off and first replaced the idler pulley
So then took the old belt pulley off and it looks like the seal had been leaking, how much I'm not sure but there was fresh oil around there.
1638389736728


So a new seal was fitted, not as easy as it sounds as the old seal gave up a hell of a fight, but eventually it was removed..

So with that little job done it was time for the water pump. ******. I've been sent the wrong pump!
1638389746319


Now it's understandable that I have been sent this pump as Valeo claim it's for the ABY model. With the "lid" sticking up 15mm I don't believe the timing cover would fit, so have ordered a replacement which should be with me tomorrow.
1638389754396


Still it gave me the chance to clean, strip, de-rust and paint another sodding bracket, there's more brackets on this car than binky, and they are all covered in crud & rust
banghead.gif

1638389765661
 
  • Like
Reactions: tr7 and RS5 JON
Also fix a couple of clips that hold the ABS wire on the front suspension cleaned them up first so I could see how bad they were
1638390156751


Drilled a hole to stop the crack going any further. Then tried various forms of glue to fix them but they all pulled apart again as there is just not enough material to bond to. So used the hot knife attachment om my soldering iron to melt them together which worked well.
1638390165675


Then on the one with the broken off clip I heated up a metal clip and push it into the housing which appear to have done the trick. Not the best looking repair in the world but your never going to see them.
1638390172578
 
  • Like
Reactions: tr7
Excellent effort mate
My oil cooler acceptable condition but they are not cheap to replace thats for sure.
Keep up the good work
 
So a little further today, correct water pump arrived so I was able to get on with the cambelt. Started the day with the car looking like this and to be fair is still does, except it has the water pump, belt, lower belt cover & bracket went back on as well as the oil cooler.
1638477334893


Belt on with the painted bracket & cover, still cannot refit the pulley as I need to repair the thread for the PAS bracket, for which the parts should have turned up today, but won't be with me until tomorrow.
1638477355435

Finally fitted the cleaned up oil pipes, oil cooler and bracket to the car.
1638477363133


With the oil pipes being off the car for so long I decided to drop the oil & change the filter. Just need to refill the coolant system now.

Also I hope the alternator case is ready tomorrow, so the alternator can be rebuilt and get back in the car for the weekend. Reason the Alternator case was sent away, was due to a crack in the housing
1638477494018


I found this as I was stripping the alternator down as the bearing are shot, it spins far to freely and you can hear the bearing rumbling. Think the grease has long since departed.

I didn't notice the crack at first it only when I removed the last screw on the case did I notice it. I tried to push the winding out will little success, so rammed a screwdriver in the crack to open it up, and the winding finally came out.
1638477722667


Think these two large crusty patches of corroded alloy that may have caused the issue, they stick out a good .5mm
1638477573279
 
  • Like
Reactions: bobby singh
While you have the timing belt cover off could you get me the part number please?
Also if you come across a spare ABY ECU Im interested :)

Cheers
 
If I see one will let you know.

Does this help
1638480525273
 
  • Like
Reactions: bobby singh
So today I completed the rebuild of the alternator, as I got the case back from the welders and the rebuild kit arrived. The old bearings sounded like a pair of maracas, it was surprising how bad they were.

In the kit was a replacement slipring, which I was not going to fit as there was very little wear on the one fitted, however when pressing in the new bearing I damaged the slipring so it had to be replaced. It was a sod of a job to remove as it's glued in place so was chiselled out with a hammer & screwdriver.
1638654543687


Even the top section was glued in
1638654550035


New slip ring fitted and this time I did not damage it while pressing the bearing in.
1638654558262


The kit came with replacement bushes but the old one are fine and have plenty of life left in the bushes.
1638654567045


Complete and ready to fit into the car. and hopefully last another 100K but seeing as the bearing were shot about a 100K I'll look at doing them between 50-70K.
1638654574137


Next up is to deal with the PAS bracket, that also came back from the welder after the bottom section where the bolt goes through snapped of. It's was snapped off due to this sodding bolt (Reminds me of the pinch bolt on the A4, A6 models).
1638654579910


with the support & bracket off the car it took 5 ton of pressure for the bolt to move, and I wondered why I could not move it on the car! So to solve the problem, I got a stainless bolt and painted it in 2K etch.
1638654585879


Also painted the support & bracket just where the bolt goes through so to limit any further alloy corrosion.
1638654592723


Again this bolt will be checked every few years as it caused me so many problems.

Now today I got very lucky. I've used my local VW dealer for many years and the parts department have been very good and give me a good discount due to the many cars I've rebuilt over the years. It was annoying that Audi no longer allow VW dealers to sell Audi only parts, so I have to drive almost 40 mile round trip to get to TPS, and thankfully they also gave me a trade account due to the large quantity of parts I was buying from them. Last year the VW dealer gave me a load of brake pipe they never used, and told them I would be interested in buying any old nut, bolts, washers & seals etc that they have lying around and what rid of, as that sort of stuff always comes in useful .

So went in this morning to collect the 1 litre pre-mixed coolant bottles that VW now only sell (why the hell they stop selling the 1.5 litre concentrate I will never know) and they said they had completed a stock take and had a load of old bolts & other stuff and would I be interested in taking them. Said yes and they handed over this lot over.
1638654600953


Also this lot.
1638654608940


Total cost for all these parts was £0.00
lmao.gif
beerchug.gif
Happy days, so I'm hoping some of that lot will help rebuild the rear suspension.
 
  • Like
Reactions: tr7
Tomorrow's job will be to start stripping the center lock carrier
1638654651552

Yet more crud & rust to deal with.
1638654658802

1638654664387


Also going to remove the left & right lock carrier tomorrow as they also look scabby, and it's one of the first things you look at when opening the bonnet.
 
I've not posted any further update on the painting of the wing, as I was hoping this would have been completed last week. However the base coat went very very bad, and I had no idea why but I was getting far to much paint on the panel and got too close to the panel in a couple of points and ended up with strips in the base coat. This would not have been a problem if it was a solid colour but shows up on the metallic colours, also had some sanding marks that were visible so it was at this point I gave up and left the wing for a few days as I was a bit annoyed and did not understand what had gone wrong!

Yesterday I went back to the wing and sanded down the base, and to be fair it had dried OK, but was still patchy in a couple of places. Today I had another bash at the base coat, was about to fill the gun again when I noticed the wrong tip was fitted. I had left the 1.8 tip (Used to spray primer) on the gun and I wondered why I getting a horrible result (What an idiot)! So fitted the 1.4 tip, cleaned and tacked the panel then sprayed on the paint. With the 1.4 tip fitted the result was soo much better, so left that to dry for 10 minutes then put on 4 coats of clear with a 1.3 tip, and was happy with the result. There are a few bit of dust stuck to the top of the clear but a rub down with 2000-3000 and a good polish should remove them.
1638654708392


Only a very slight orange peal that I will need to remove
1638654714061
 
  • Like
Reactions: tr7
If someone told me my car would look like this after 3 months of ownership I would have laughed at them
coocoo.gif

1639780164631


These were all the issues with the front.

Dirty, rusty & damaged.
1639780175490

Cage nuts on the rear got completely mangled when removing the intercooler bolts, also some scabby rust at the bottom
1639780190865


No picture but they were straitened out then welded up so hopefully that will not happen again.

Rust, rust and even more rust
1639780215189

1639780223409

1639780235991


Also the grease on these parts was unbelievable, I know the latches need a bit of grease but not this much.

1639780250258

1639780264730

1639780272693


So after degreasing, rust removal, expoy, etch primer, dark Gray primer, base and clear coat the panels looked like this
1639780299324
1639780291596


O yes and lots more brackets were cleaned, stripped & painted.
1639780313662


With the front end removed I did another job that I'd been putting off for a while which was the PAS fluid change, but as the pump pulley had no belt attached it was the perfect time to flush the system.

So sucked out the old fluid from the bottle, fitted a bung and attached the return pipe to the extractor. Yes it's a wheel bolt shoved into a bit of pipe, but did the job.
1639780342851


With that done filled the reservoir with new fluid and used a rubber fitting on my drill to run the PAS pump.
1639780353494

Once the fluid in the return line had gone from a nasty brown to a nice green, the reservoir fluid was extracted and the return pipe refitted.

The filter was also cleaned, as is was filled with crud.
1639780367544


Also completed the clutch fluid change which was a pig of a job, what a place to put the sodding bleed nipple. No pictures of that I was too busy swearing!

After the strip down my frontend looked like this. Very Mad Max...
1639780569280


After 6 hours of work it looked like this.
1639780537862


There is still a fair amount to do, but I'm getting near the point where I can start the engine again.

However there are job like these vac lines to replace. Have ordered some more pipe so hope to have that early next week
1639780520481


After talking about the steering I decided to remove the steering track rods and inspect them. Thankfully they were Ok apart from looking rusty. I also made a quick jig so when I rebuild them so they will be in a near as dam it the original length. It will still need a full tracking done but it helps to be somewhere near.
1639780506805


However as usual with this car stripping them down was not straight forward. First the nut was rounded and damaged on both sides on the tie rod adjusting bolt, so will need to be replaced.
1639780491245


Then one of the nuts refused to move so that was cut off. So the track rods were painted with epoxy
1639780478374


Also received the Lemforder track rod ends, one of the few parts Lemforder still make for this car.
1639780464427


I'm now waiting on more parts so I can refit the steering and finally get the wheels on the car.
 
Yesterday evening I sorted out the headlights, I say sorted more like a dam good clean as looking at the chrome on the lights it going to have to be stripped and re-chromed which is not something I can do.

First thing I noticed was yet again was rust, the clips to hold the top of the lights in place had rusted and cracked the plastic. Will see if I can find these if not these will need to be cleaned up and painted.
1639780744931

1639780754469

Next job was quiet easy pop the clips and remove the glass, just note this rubber dome gets in the way so the glass has to be tilted to get the lip of the glass over it.
1639780770344


The glass was given a good wash as it was dirty.
1639780780155


The main seal between the housing & the glass had plenty of dirt & mould on it. Dirt was easy enough but the mould was proving difficult to shift until I tried this stuff. It got rid of 95% of the mould and was very impressed. I will be buying new seals but for the moment just wanted a temporary fix.
1639780797707


For the plastic housing I just cleaned it out as best I could with class cleaner. As I did not strip the light down completely I used cotton wool buds to clean the inside of the projector lens, you have to bend them a bit to clean the lens but it did the job.
1639780820008


For the chrome trim there was nothing I could do with that, even slightly abrasive or solvent based cleaner will remove the coating so just gave it a wipe down with Windolene, which remove the dirt but that was about it.
1639780830932


The reflector lens cleaned up well using Windolene, however one of the reflectors is not in the best of condition so again will need to be sent away for re-chroming.
1639780843861


1639780856438


Final job was to put them back together
1639780869674


They look a hole lot better than before so was please with the results. However I'm left knowing the lights will need sending away to be fully restored and I need to find or clean the metal clips and I also need to find this cog, as yet again rust has damaged the plastic.
1639780880069


So now on the lookout for a replacement cog or a damaged unit I can salvage a cog from.
 

Attachments

  • 1639780736409.png
    1639780736409.png
    119.1 KB · Views: 103
Early start this morning, got the aux rad fitted and the centre slam panel fitted.
1639780966653


Looks so much better, just need to sort out some of the scabby fixings
1639780974651
 
  • Like
Reactions: voorhees, tr7, bobby singh and 1 other person
Love seeing your progress on the S2, keep up the good work.

Sent from my Pixel 6 Pro using Tapatalk
 
  • Like
Reactions: tr7

Similar threads

M
Replies
30
Views
32K
Replies
0
Views
5K
Replies
6
Views
11K
Replies
0
Views
3K