could still lick the car inside and out
Is that something you do often?

could still lick the car inside and out
All I know is that's one very sensitive alarm! Wow! Top marks to audi security team on that one!could still lick the car inside and out and set the alarm off .
Is that something you do often?
All I know is that's one very sensitive alarm! Wow! Top marks to audi security team on that one!
Seriously though, not sure on why that fuse is so highly rated if it is just for the washer pump... Maybe it does something else too? I imagine that there is some other cut-off down the line somewhere (like the wiper stalk) so the washer doesn't actually work when the car is off.
And yeah depending on the fuse you're tapping you probably need a full size tap not mini blade tap. Be prepared to fall over in shock when you see the price of them at Halfrauds compared to online
O yes
Just seen the Halfords price and went straight back to Amazon! Haha.
No way was I paying around £8 for one lol
No, not really. Just like them better. Works either way.OP - it appears you removed the connections that came with the add a fuse and placed your own spade terminals on.
Was there a reason for this? I have access to the add a fuse with a bullet type connection.
Also may have already been mentioned but just in case make sure you put the fuses in the add a fuse in the correct way - the original fuse goes closest to the spade connections of the add a fuse and the dash cam fuse at the top so you see it when the fuse tap is plugged in.
Didn't know this, thanks for the tip!Not only that, but the add-a-fuse needs to be put the correct way round into the fuse box. If you get it the wrong way around, you'll be pulling the current for your dashcam through both fuses instead of just one. Could be enough in some cases to blow the original fuse due to the extra load.
The 'powered' end of the fuse slot needs to be the side of the add-a-fuse that the cable DOESN'T come out from.
This is often different in other car makes/models etc. so on another one but might need to put it the other way aound. Always use a multimeter to measure what the hot and cold side of the slots are.Didn't know this, thanks for the tip!

Not only that, but the add-a-fuse needs to be put the correct way round into the fuse box. If you get it the wrong way around, you'll be pulling the current for your dashcam through both fuses instead of just one. Could be enough in some cases to blow the original fuse due to the extra load.
The 'powered' end of the fuse slot needs to be the side of the add-a-fuse that the cable DOESN'T come out from.
See attached a photo I have copied from dash cam talk to show how the add a fuse works. Was very useful for me.
View attachment 115127

I'm going to be installing my F770 soon under the rear view mirror. Does anyone know what the vent holes under the mirror holder are about? I'm planning to mount the camera fairly close to that but don't want to cause any issues.
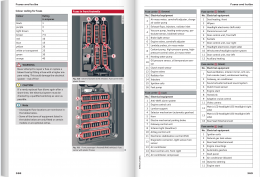
I'm having some trouble getting my camera to work, I'm not sure if the unit is faulty or I'm wiring up wrong. I've uploaded images from my manual of the fuse descriptions, what would you recommend for Live (Red ACC wire) and the ignition only power (Yellow Wire), unfortunately I cannot test if the unit is faulty as its only come with the Hardwire kit.
If anyone lives close to Derby or Peterborough and has the 12v lighter connector and doesn't mind me quickly testing on that to see if my camera is a fault I would be truly grateful
I have installed about 6-8 of the Thinkware kits F750/F770 and all bar one of the hard wiring kits were good. So you can get the odd faulty cable. Unlikely to be a faulty physical unit but I would check cable first as per below....
When I had issues they suggested the following method to check cable.
You can check the hard wire cable as follows.
View attachment 118806
First i would check the permanent power with a paperclip poked up the centre of the connector to the red of digital meter and put the Negative of the digital meter to earth part of that connector.
Then move the red digital meter wire to the ignition part of the connector, just holding it on with your fingers. (As per picture above - this one is a bit tricky to hold)
Assuming you get a voltage reading off at least one of the above that means the earth connection at the camera end is fine. If in any doubt you could connect the negative digital meter wire to another earth point on the car (Door hinge, door catch or metal part of cigar lighter socket).
Another problematic area for Thinkware dashcams is their Fussyness of SD cards. So could be an area to double check if anyone has a camera which powers up but then almost immediately turns off.
Hope that helps
Jungle
I'm pretty sure you have red and yellow the wrong way around. It's counter intuitive, they are the other way round to what you expect they should be. ACC is red and 12V is yellow I believe.
I installed my Thinkware F750 dashcam today, as mentioned, red is for permanent live fuse and red for switched. Though I had a faulty cable too as I had a 12v cable supplied with my dashcam and worked fine but didn't with the hardwire. Went back and made sure I crimped the wires together tightly and in my case, the problem was I connected my ground wire to a bolt that for some reason wasn't grounding the connection. Switched to another bolt and all works fine now including parking mode.
I can try swapping them, however theres a small label on the red wire that says ACC, would it cause any damage to the device if it trys to power the cable with the wires the other way around?
You definitely have them wrong then. ACC means Accessory mode - ie, only on with ignition (technically when your key is in ACC mode, ignition doesn't have to be on but it powers up most of the bits in the car)
Sorry I meant yellow for permanent power. I think the black bolt your speaking off is the same one I tried. You can see it on the top right on the pic that Gazjs posted above. The two bolts that worked for me was a black bolt in the glove box (top left) and a silver bolt under the A pillar but behind the side trim. Couldn't reach it fully so stuck it on with Blu tac
Right its me being an idiot, You would think Red would mean Live power (always on), thanks for clarifying.
Yep thats the one I tried, I will go for the install again tomorrow using the other bolt and the wires in the correct way round, Just need to figure out whats accessory (ignition powered) fuses and permanent.
thank you everyone for the help, will update tomorrow
Dan. Could you take a photo of the dash cam in your screen and also the fuses/connections please?
I've got an A5 coming and wanting to fit the F770 2 channel kit.
Thanks
Dan. Could you take a photo of the dash cam in your screen and also the fuses/connections please?
I've got an A5 coming and wanting to fit the F770 2 channel kit.
Thanks
I should have taken photos when I installed mine, but forgot! I've installed my Thinkware F770 + Cellink B battery pack now though.
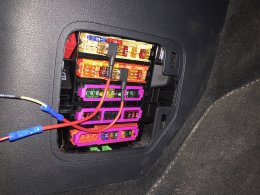
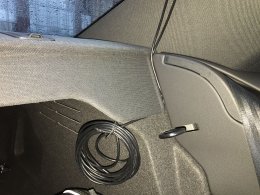
My replacement camera arrived yesterday and I installed it today and it works as expected, First thing this isn't the neatest install, all of the wires minus the areas shown in the pictures are all tucked away under the trim and can't be seen, however in the A5 coupe at least due to fuse types and length of cables I've had to hide open wires under the glovebox/footwell (Can't be seen when sitting down normally) and back seat.
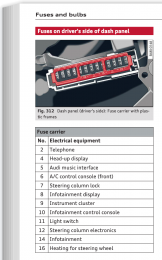
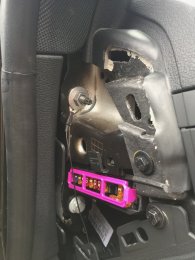
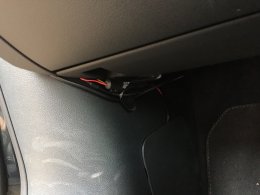
So I used my multimeter to determine what fuses were live and which were ignition only, I was hoping for the fuses on the passengers side dash panel to be a mix of live and ignition but they all stay on all the time so these were no good to use, the footwell fuses are suitable however and I ended up tapping into fuse 5 in carrier A (brake light sensor) this was for the Red ignition only wire and for the Battery always on Yellow wire I tapped into fuse 7 in carrier B (Gateway control unit) no idea what this is! The earth cable I've had to attach to the screw near the fuses on the passengers side dash panel (see picture) this is only because the frame holding the fuse carriers in the footwell have no screws and seems to be plastic so a self tapping screw won't work.
One thing to note if you use the same method, parking mode activates around 2 minutes after locking the car, so if your testing this parking mode won't activate straight away, I would assume the car is still powering these fuses for while once you lock up. You'll see in the photos the rear camera cable is far to long so for now I've wrapped up the cable and I have it hidden behind the back seat, when I get some time I will measure how much of the cable I've used and try a find a similar length cable online, I can't find no where else to tuck that much cable into so temporarily this will do.
Hope that helps
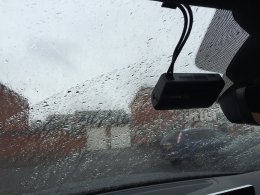
Edit: since installing I've had to move the dash cam further up the screen, I noticed my automatic wipers stopped working and I remembered behind the mirror is a little sensor and the original dash cam position was blocking it, moved it further up and everything is back to normal.
Don't know, haven't really checked it out yet. It's difficult to tell as it only records on motion detection mode while parked so could vary depending on what it detects.
Thanks Dan that's really helpful
What does the camera look like from the driving seat - how visible etc.?
Also, from your description, the fuses in the A5 are the mini type (just thinking of pre-ordering a couple of the piggy back fuse holders)
PS the gateway control unit is the unit that exchanges data between various control units in the car.