

Modded my headlight switch using the Golf MK5/6 brushed aluminum look dial.

What have you done to your Audi A4 B7 today?
- Thread starter Dani_B19
- Start date
You are using an out of date browser. It may not display this or other websites correctly.
You should upgrade or use an alternative browser.
You should upgrade or use an alternative browser.
How did you do this?
Bought a switch from breakersHow did you do this?
Then removed the dial from this switch, removed my dial added a suitable washer held by a smidge of super glue over the centre shaft to space it from the rotary shaft, then apply 2 blobs of super glue to either side of the dial shaft then put it onto the rotary shaft. Getting the dials off is the tricky part if i did it again id probably do a better job as i broke mine but fixed it with some plastic welding and the spring loaded pins from the breaker switch lol
it works and looks the part which is main thing just no release function so if you wanna remove it its done by the fuse panel access as if the switch release is broken.
Next im doing all the window switches to the B8 ones and also the mirror switch

Today the new Meyle header tank and cap arrived, revamped fbsw trims arrived too, just waiting on the replacement heater matrix on monday.
piccy of the trims though.

make a change from silver, and when fitted with switches etc back on should look ok, well i like it.
piccy of the trims though.
make a change from silver, and when fitted with switches etc back on should look ok, well i like it.
Treated the B7 to a radio upgrade, thought it was about time to get something modern and touchscreen that supported CarPlay! Wanted to try and find a radio that was minimalist and looked OEM+, think it looks really clean and almost factory. ")

It will give the old wheel a new lease of life really .
It looks like the unit is sitting out from the surround, it might just be the picture.Treated the B7 to a radio upgrade, thought it was about time to get something modern and touchscreen that supported CarPlay! Wanted to try and find a radio that was minimalist and looked OEM+, think it looks really clean and almost factory.
The radio and frame do sit slightly proud from the backing surround but I don't mind that, draws your eye to the screen nicelyIt looks like the unit is sitting out from the surround, it might just be the picture.
Today the new Meyle header tank and cap arrived, revamped fbsw trims arrived too, just waiting on the replacement heater matrix on monday.
piccy of the trims though.
View attachment 248510
make a change from silver, and when fitted with switches etc back on should look ok, well i like it.

As promised, here’s my first attempt at the forged carbon skinning on a test piece. I’m pretty happy with the effect with only top coat epoxy - will be wet and dried back to flat through the various grits and then lacquered, either Matt or glossy.
Sent from my iPhone using Tapatalk

what sort of final thickness are you expecting to see with it?
As promised, here’s my first attempt at the forged carbon skinning on a test piece. I’m pretty happy with the effect with only top coat epoxy - will be wet and dried back to flat through the various grits and then lacquered, either Matt or glossy.
Sent from my iPhone using Tapatalk
what sort of final thickness are you expecting to see with it?
On the edges, maybe 0.5mm or less. But if you base coat with black you can get away with less around buttons etc.
This is a test piece and I’ll try Matt lacquer and gloss side by side to see the effect difference.
I’m doing a heater vent for the R26 next I’ll send some images when that’s done. Just gotta wait on curing times - no point in rushing it!
Sent from my iPhone using Tapatalk

Looks really nice chap, love the colour.Sex on wheels is that love her lol.
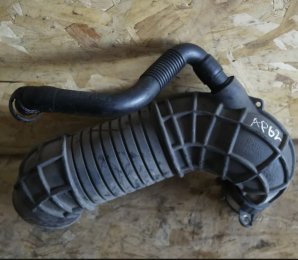
Thanks love the colour. Also whilst I’m here does anyone know what this second pipe does and can I just use a straight flow air intake pipe for induction kit?Almost forgot, welcome to the club.
Attachments
After a cheeky little Bay purchase and it arriving today, i started a job that i assumed was going to be pretty easy.
So i it began like this.

I thought the pedal covers were going to pull off with a little bit of a tug here and there, but after what must be 15 years they weren't budging.
I then used a heat gun to try and soften the rubber, which it did but they still stayed put.
Out came the stanley knife and off they came.
The foot rest was easy, just a screw then slide up and reverse to put new one back on.
The brake and clutch covers went on quite quickly after a bit of heat, but the accelerator was being stubborn even with heat, eventually got it on with a sliver of washing up liquid.
In the end i got there but was a bit slower than expected and ended up like this.

I know it needs a clean
So i it began like this.
I thought the pedal covers were going to pull off with a little bit of a tug here and there, but after what must be 15 years they weren't budging.
I then used a heat gun to try and soften the rubber, which it did but they still stayed put.
Out came the stanley knife and off they came.
The foot rest was easy, just a screw then slide up and reverse to put new one back on.
The brake and clutch covers went on quite quickly after a bit of heat, but the accelerator was being stubborn even with heat, eventually got it on with a sliver of washing up liquid.
In the end i got there but was a bit slower than expected and ended up like this.
I know it needs a clean
Looks good, im fitted a set before Christmas and im chuffed with them, i must have been lucky too as mine weren't too bad to fit either. Happy daysAfter a cheeky little Bay purchase and it arriving today, i started a job that i assumed was going to be pretty easy.
So i it began like this.
I thought the pedal covers were going to pull off with a little bit of a tug here and there, but after what must be 15 years they weren't budging.
I then used a heat gun to try and soften the rubber, which it did but they still stayed put.
Out came the stanley knife and off they came.
The foot rest was easy, just a screw then slide up and reverse to put new one back on.
The brake and clutch covers went on quite quickly after a bit of heat, but the accelerator was being stubborn even with heat, eventually got it on with a sliver of washing up liquid.
In the end i got there but was a bit slower than expected and ended up like this.
I know it needs a clean
I’m looking at doing this soon such a nice upgrade to the car Can I ask where abouts you purchased it from as I can only find one place that does the surround and wiringTreated the B7 to a radio upgrade, thought it was about time to get something modern and touchscreen that supported CarPlay! Wanted to try and find a radio that was minimalist and looked OEM+, think it looks really clean and almost factory.

Best upgrade you can do getting rid of the stock audio system… Give these guys a call, they can supply all the steering wheel adapters, surrounds and hardware. Been using them for years, always good advice, will post all over the UK and open to doing deals tooI’m looking at doing this soon such a nice upgrade to the car Can I ask where abouts you purchased it from as I can only find one place that does the surround and wiring
CEN | Audio Specialist | Apple CarPlay
CEN is the UK's leading Audio Specialist and Authorised Dealers for Alpine, Sony, Pioneer, Audison, Helix, Match, Thinkware, BlackVue, Hertz, JL Audio, Focal, Morel, Dynamat, Dodo Mat and many more fantastic brands.
 www.carelectronicsnottingham.co.uk
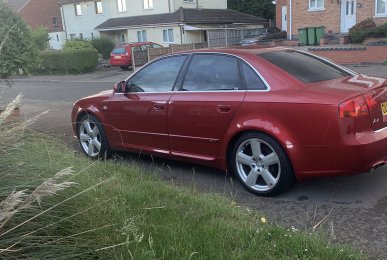
Spent a couple of hours this afternoon doing some more upgrades to the old bus. Finally got round to fitting the B8s allround which was a nice easy job thanks to the preventative maintenance to the front pinch bolts. Took me around 2.5hrs including a burger king dinner break which wasn't too bad at all.


So far I've not felt any substantial improvements in the Bilsteins, but i have only trundled home from work, i will give it a spirited run tomorrow and see how they perform.
Also swapped the 034 engine mounts for some OE replacement Febi ones. Thankfully order is restored in the cabin and its now a nice pleasant place to be.
All in all a nice bit of improvement.
Alex
Are you still running the OE rear springs?Spent a couple of hours this afternoon doing some more upgrades to the old bus. Finally got round to fitting the B8s allround which was a nice easy job thanks to the preventative maintenance to the front pinch bolts. Took me around 2.5hrs including a burger king dinner break which wasn't too bad at all.
View attachment 248880View attachment 248881
View attachment 248882
So far I've not felt any substantial improvements in the Bilsteins, but i have only trundled home from work, i will give it a spirited run tomorrow and see how they perform.
Also swapped the 034 engine mounts for some OE replacement Febi ones. Thankfully order is restored in the cabin and its now a nice pleasant place to be.
All in all a nice bit of improvement.
Alex
So far Rob yes. I don't think i can manage going lower for logistical reasons, plus im happy with the ride height.Are you still running the OE rear springs?
You'll notice the improved damping etc over the OE units once you get some miles covered on differing road surfaces.So far Rob yes. I don't think i can manage going lower for logistical reasons, plus im happy with the ride height.
I think the OE springs will spoil some of the advantages of the Bilsteins though, the OE springs are a bit on the stiff side, well mine were very stiff compared to the H&R prior and KW's fitted now.
You'll have to do some miles to get a full feeling for the setup.
let us know how you find them.

So far I've only covered a 7 miles steady run home from work so its not a fair test for them. As you say I'll get some miles on them and see how they go. I might slip the springs in at some point and see how i get on, but thats a job for another day. The mounts made the biggest difference!You'll notice the improved damping etc over the OE units once you get some miles covered on differing road surfaces.
I think the OE springs will spoil some of the advantages of the Bilsteins though, the OE springs are a bit on the stiff side, well mine were very stiff compared to the H&R prior and KW's fitted now.
You'll have to do some miles to get a full feeling for the setup.
let us know how you find them.
I bet you really noticed going back to the OE mounts, the performance ones are good for performance but do nothing for daily driving /comfort.So far I've only covered a 7 miles steady run home from work so its not a fair test for them. As you say I'll get some miles on them and see how they go. I might slip the springs in at some point and see how i get on, but thats a job for another day. The mounts made the biggest difference!

Picked my grille up from the painters yesterday stuck it on this morning,still undecided on the black rings may go back to chrome
Got a spare sline grille and frame ,will be putting in classifieds if anyone’s interested
Sent from my iPhone using Tapatalk
There's a Superseded Part number now Alex, don't buy the original part numberIts been the first time out for me in my Avant for over a week due to Covid isolation and the first things that immediately struck me where the vibrations from the engine mounts and also the rev hanging issue seems to have snuck up on me again, which is annoying. Going to swap the aftermarket clutch switch i fitted a couple of years back for a genuine item and go from there. Hopefully its just a faulty cheap part at fault.
I'll take a look at my invoice and see if I can get it.
Should start with an S if I remember correctly
Cheers fella that would be perfect. Am i right in thinking there is 2 switches? I only replaced the 1 last timeThere's a Superseded Part number now Alex, don't buy the original part number
I'll take a look at my invoice and see if I can get it.
Should start with an S if I remember correctly
There is more than one switch up and under there but fairly sure the other is for the brake pedalCheers fella that would be perfect. Am i right in thinking there is 2 switches? I only replaced the 1 last time
here's the details. Old switch is white and black plastic. New part is all dark/blue-ish?
Today i fitted a coin/card tray in the dash instead of 2 blanks and an airbag light.

Also replaced my 17" alloys with a set of 19" from an S5.


Also replaced my 17" alloys with a set of 19" from an S5.
I fitted them last year Ricky, very pleased with themYou fitted the big brake set up yet @AvantAlexB7
Oooo perfect colour and decal combo, very nice mate.I fitted them last year Ricky, very pleased with themView attachment 249020View attachment 249019
Cheers fella, i was thinking of going yellow but went for an Audi ceramic theme instead with similar style decals. I will taking them back off at some point in the future and getting them professionally refurbed i think. The powdercoating job was a bit poor and is chipping and i have a weepy n/s piston seal too, and tbh i haven't got the time to sort it myself.Oooo perfect colour and decal combo, very nice mate.
My coin tray is one of my favourite featuresToday i fitted a coin/card tray in the dash instead of 2 blanks and an airbag light.
Also replaced my 17" alloys with a set of 19" from an S5.
Yeah i remember you saying about the Audi ceramic grey, looks spot on mate, like the rest of your car very oem+Cheers fella, i was thinking of going yellow but went for an Audi ceramic theme instead with similar style decals. I will taking them back off at some point in the future and getting them professionally refurbed i think. The powdercoating job was a bit poor and is chipping and i have a weepy n/s piston seal too, and tbh i haven't got the time to sort it myself.
Similar threads
- Replies
- 42
- Views
- 4K