Youth Restoring an A4 DTM TFSI

DTM Tom

Registered User
Joined
Dec 24, 2019
Messages
22
Reaction score
21
Points
3
Location
Alfreton DE55, UK
I've owned this a few months, you can see my other introduction threads on the car itself. Basically 2 owners (both brothers) before myself. 50k miles and a heap of paperwork. The last owner was on the forums and did loads of maintenance so the car was mint.. Until he fell ill and since then the car has become, well, rather unused. I'd seen the car on gumtree so went for a veiw

Ad 0 1575758632547
Ad 2 1575758632551


Ad 5 1575758632557

As this thread suggests I fell in love with her, knew there was a large amount of work ahead, no mot, sorn, needed a full service and the cambelt was due. But the car was going to be mine before I even said hello to the seller.
 
  • Like
Reactions: THQuattro
With all the work needing to be done, decided that I'd transport the car back home. Got the car transported up to me (was rather cool)
Received 393232518000992 2120

IMG 20190829 172333 1084
 
  • Like
Reactions: THQuattro
First thing on the list was remove all the underbody guards clean them all, clean all the wheel Wells, paint the disks and paint the wheel nut caps. (faded grey wasn't looking good)
IMG 20190908 142532

IMG 20190908 142541

IMG 20190908 142552
 
  • Like
Reactions: THQuattro
Had the paintwork fixed on the OSF wing today, plus the rather subjectively fitted Sharfin removed. Much better. Wheels will have to wait a while yet.
IMG 20191101 162511 7912
 
  • Like
Reactions: THQuattro
Full service time, bought all the parts decided to go with nanodrive oil after reading up on countless hours of reviews and dyno sheets.
IMG 20191116 235835 590

Also included were uprated sparks, coolant tank, snub mount and a wrong size screen wash cap (Doh)

Removed the spark plugs that were not in bad shape at all I believe they had been changed roughly 8k miles ago by the last owner, that didn't bother me I simply wanted to replace it all, the gti guys on the forums sempt to recommend the BKR7EIX for fast road daily driven cars
IMG 20191116 154019
IMG 20191116 155125


Id been dreading replacing the cam follower, in reality it was a doddle. The old follower had no viable wear, the cam lobe looked mint. So I covered the follower in oil and put it back in. I'll check it again in another 5-10k miles.
IMG 20191116 165037


As you can see the snub mount was shrunken, perished and overall past its use by date. Luckily powerflex do an easy replacement polybush kit. 5 minute job tops, all you need is an Allan key and a mallet.
IMG 20191116 143758
IMG 20191116 144256

IMG 20191116 144608


I decided to leave the coolant tank to do when I was doing the cambelt, also I found quite a substantial leak from the back of the engine. From the looks of it, it was the vaccum pump seal. Ordered an ELRING o-ring so we'll see if that solves the issue.
 
  • Like
Reactions: Meemo and THQuattro
IMG 20190831 124359
Next up on the list was Cambelt, drivebelt and coolant tank. Removing the front end was a pretty straight forward process. I didn't remove the air con pipes put 2 tie wraps through the service position holes and gave myself a good few inches more working room.
IMG 20191122 192129

The hardest part was removing the rubber coolant pipe running across the front of the timing belt cover. Once the cover was off everything removed simply.
Snapchat 1149248829
IMG 20191124 151418


All was going well til I opened the Cambelt box and discovered I had the wrong pack (mix up at auto factors, surprise!) it took a few days for the new parts to arrive and so in the mean time I decided to strip and de chrome the headlights (see more in my next post). Once the parts re-arrived I could crack on with the Cambelt change. Everything was easy going, although reminder to myself to order some new pulley bolts for the crankshaft pulley next time. New coolant tank looked the biz. Car started perfectly ran up and bled the system of air. Although that took quite a while.
 
  • Like
Reactions: Meemo and THQuattro
Snapchat 1001956841

Whilst the delay with the cambelt parts was going on and the front end remaining removed I took the time to crack open my headlights and sort out those nasty noughties looking headlamps. I didn't want to go full NFS Underground but more of an OEM+ look.
IMG 20191124 111609

First steps were buying the paints and the sandpaper, I found the finest grit wet and dry paper in Halfords and grabbed 3 of there spray cans. Grey plastic primer, satin black paint and clear lacquer. That's it that's all you need.
Equally heating the headlight around the lense allowed me to pull off the cover. I removed the rubber weather strip to clean the mould whilst it was in pieces.
IMG 20191124 113212

Once the lense was removed I got my small torx set and removed the 2 chrome trim pieces. The lamp base removed just as easily and all that was left to do was remove the sidelight chrome reflective projector and paint the rest.
IMG 20191124 113316
IMG 20191124 114118

After stripping both headlights I now had 6 pieces to paint. I lightly sanded the items. Cleaned them of dust and dirt and hung them so I could get equal paint across them. I did 4 coats of primer, 4 coats of paint and 3 coats of lacquer. 20 minute gap between coats making sure the previous layer was dry to the touch. Now the paint job won't be winning any awards but to the eye they look good, no runs, no bubbling.
IMG 20191124 120732
IMG 20191124 141613

As most DIY programs say the opposite of removal for reassembly. I cleaned the lense and re-heated the sealant to create a waterproof seal.
IMG 20191124 202839 404
MUCH BETTER!

Refitting the bumper was not as fun as removal and it still requires some tweaking to get it sitting OEM, but the lights looked fab. And with new 8k bulbs they also shone much better.
IMG 20191127 222049
 
  • Like
Reactions: Meemo and THQuattro
Insurance bought today, 50 quid more than my 320d. Result! 2 weeks to get her on the road.
 
  • Like
Reactions: THQuattro
With my 'On the road' date fast approaching I finally decided to tackle the vac pump oil leak that I'd been putting off for absolutely ages. Apparently its a rather common fault and the best solution is to replace with the newest revision part.
This newest revision OEM part however is 300 quid! A bit out of my range at the minute so I went online and found the elring O ring kit. Removing the part was as fun as expected. But even more annoyingly once removed i discovered that the oil feed pipe for the pump had broken off...
IMG 20200108 202736


After a few choice words and realising that I'd have to be pushing the DTM around for a few days I managed to find a new aftermarket pump and seals kit on amazon for £44 next day delivery. Mint, we'll see how long it lasts but its a brilliant bit of kit for the price. It arrived and I swapped over the vac pipe.
IMG 20200110 174721
IMG 20200110 174724

The fit was perfect and it looks the part. Saved my *** as well definitely don't want to be forking out 300 quit at the minute. Cars running fine with no issues touch wood. I'll post the link when I find it again.

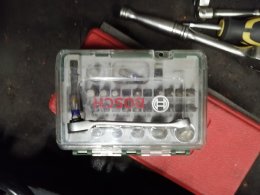
Quick shout out to this tool kit as well. Wouldnt have been possible without it. Borrowed from a mate with an S4 B5 and he uses it all the time as well.
 

Attachments

  • IMG_20200108_202748.jpg
    IMG_20200108_202748.jpg
    246.6 KB · Views: 381
  • Like
Reactions: Charlie Farley
With my 'On the road' date fast approaching I finally decided to tackle the vac pump oil leak that I'd been putting off for absolutely ages. Apparently its a rather common fault and the best solution is to replace with the newest revision part.
This newest revision OEM part however is 300 quid! A bit out of my range at the minute so I went online and found the elring O ring kit. Removing the part was as fun as expected. But even more annoyingly once removed i discovered that the oil feed pipe for the pump had broken off...View attachment 196241

After a few choice words and realising that I'd have to be pushing the DTM around for a few days I managed to find a new aftermarket pump and seals kit on amazon for £44 next day delivery. Mint, we'll see how long it lasts but its a brilliant bit of kit for the price. It arrived and I swapped over the vac pipe. View attachment 196243View attachment 196244
The fit was perfect and it looks the part. Saved my *** as well definitely don't want to be forking out 300 quit at the minute. Cars running fine with no issues touch wood. I'll post the link when I find it again.

Quick shout out to this tool kit as well. Wouldnt have been possible without it. Borrowed from a mate with an S4 B5 and he uses it all the time as well.

That is the very same kit i used to do my coolant flange and vac pump a few years ago , very good bit of kit and highly recommended by myself then and now.