Retrofit puddle lights & door warning lights to 8V - help please.

I've tried to do this mod and it's been quire straight forward until I got to the front doors as unless I've gone mad it seems that the slot where the power should come from is already filled by what looks like lead going to tge b&o speakers.. Should I just splice in that or is it different with 2017 cars?

@jdjames13 I got the parts from the german seller on ebay, the lights seem to be exactly the same as that aliexpress set
 
I've got these parts now and have connected the one plug to the LED puddle light which is white (Big arrow) . I'd then expect the red warning lights to connect to the cables (1) on the other side however they don't seem to fit.

I suspect that (2) is earth and needs to be grounded to the metal framework?


2018_01_25_1444.png
I think the red light is the thicker plug and the white light the skinnier one. The brown wires (2) are all ground and cable (1) are the ones that'll be connected to modules. I can't pinpoint which ones exactly but they should be in this thread.

Sent from my SM-G930T using Tapatalk
 
Going to attempt the front doors today.

Silly question though how do I know what pin is what. (pin 16 and 5 (earth) in the t32 connector)
 
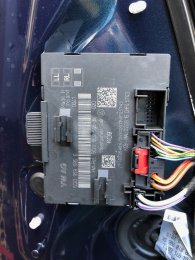
Can't edit my old post but here's the door control unit, can anyone advise on where these pins are located? Reading previous posts i don't think i plug anything into here.. Instead it is on the connector which is plugged into this control unit (aka the blue and pink clip) am i right?

26129758538_942fe79c14_z.jpg
There are tiny numbers on the clips letting you know the pin location.

The t32 is the plug with 32 pins connections, so it's the blue one with pink/maroon locking clip (it's been awhile since I've done this).

Post #120 has wiring diagram with pin numbers (put into slot 16 and just ground the brown wire) and post #130 has the coding needed to let the car know to enable.

Sent from my Pixel 2 XL using Tapatalk
 
Last edited:
So the weathers crap so i decided to have a look at this again whilst cleaning the interior.
40024048852_553aabfb5e_z.jpg

Just to confirm so i don't break anything, i have a brown wire already in position 5 if i am going across in numbers (there's nothing written on the connector to indicate which pin is which number).

Do i take this one out and wire them both in together or is there another pin available?

And is number 16 the 16th across in the above photo (second arrow)?
 
So the weathers **** so i decided to have a look at this again whilst cleaning the interior.
40024048852_553aabfb5e_z.jpg

Just to confirm so i don't break anything, i have a brown wire already in position 5 if i am going across in numbers (there's nothing written on the connector to indicate which pin is which number).

Do i take this one out and wire them both in together or is there another pin available?

And is number 16 the 16th across in the above photo (second arrow)?
That should be it, but the numbers are somewhere, albeit super tiny. I had to use my phone to zoom in to see them.

Sent from my Pixel 2 XL using Tapatalk
 
  • Like
Reactions: jdjames13
If my memory is correct I think the PIN numbers are identified at the top and bottom of each row.
 
I've got my fronts all sorted now, but the ground is on the door panel which just looks a bit unprofessional.

I tried to splice it into the 5th pin which was already ground but there just wasn't enough space. Does anyone know from that diagram if there are any other grounds in the 32 pin connector or ways i can wire them in together so it looks clean?
 
I spliced in to the Brown wire which is the common ground on my 2014 car. I cut the fabric tape back to expose some more cable and taped it back up when spliced using black fabric tape.
 
I've tried to do this mod and it's been quire straight forward until I got to the front doors as unless I've gone mad it seems that the slot where the power should come from is already filled by what looks like lead going to tge b&o speakers.. Should I just splice in that or is it different with 2017 cars?

@jdjames13 I got the parts from the german seller on ebay, the lights seem to be exactly the same as that aliexpress set
Have you made any headway on this? I also have the facelifted car with b&o speakers and am interested in this retrofit.
 
Decided to just plug the puddle lights into it and remove the original wire, not been able to code the lights yet so not sure if it works. Removing the wire doesn't seem to affect anything on the door nor the b&o light so I'd figure it should still work as in pfl.
 
Coded the lights and they work as they should, so facelift wiring is the same even if you have to remove existing cable to do it, could ofc just splice into it.
 
  • Like
Reactions: Dunedin
Bumping an old thread from the dead...several weeks back, I purchased a set of lights and wiring for my S3 8V. Over the weekend, I can confirm that using this as a guide, I was successful in having ALL the puddle/emergency lights working. I will perform a full video DIY guide to unclutter some of the information on this thread within the next week or two.

In the meantime, if you guys need help with other ambient lighting DIYs, please view and subscribe to my YT page: The Audi S3 Fanatic
 
  • Like
Reactions: Mylee, LJP Quattro and AL_B
Ok guys, I successfully completed this project and put together an easy to follow DIY video. Without the information on this thread, I could not have done it. Thank you to the pioneers who started this project.


Please follow me on YouTube ( The Audi S3 Fanatic) if you want more DIY videos for our wonderful S3 8V chassis.
 
Well I just want to mention I was able to activate it with the obdeleven, they helped me, basically it is the same steps.

If someone needs some help I am more than welcome to help.

Thanks to all that helped me!

Btw, I forgot to change one of the lights, because I placed LEDs and I need to do it again but it is way easier!

I know this was a long time ago for you, but did you mean you got the rears to work using OBDeleven? From what I understand, the rears can only be done with VAGCOM.
 
Ok guys, I successfully completed this project and put together an easy to follow DIY video. Without the information on this thread, I could not have done it. Thank you to the pioneers who started this project.


Please follow me on YouTube ( The Audi S3 Fanatic) if you want more DIY videos for our wonderful S3 8V chassis.
Is this the same for 2011 a3 8p sportback

Sent from my SM-G935F using Tapatalk
 
Is this the same for 2011 a3 8p sportback

Sent from my SM-G935F using Tapatalk

the "process" is the same, but you need to determine what plugs you need access to for power. Unfortunately, I don't know the 8P chassis well enough and do not have the plug numbers for you.
 
  • Like
Reactions: leonwilliams
the "process" is the same, but you need to determine what plugs you need access to for power. Unfortunately, I don't know the 8P chassis well enough and do not have the plug numbers for you.
Thanks mate I've been told it's 18.19 fronts 1.2 rears

Sent from my SM-G935F using Tapatalk
 
For those asking for the obdeleven coding for the REAR doors, here's how I did it:

First, enable the rear door modules:
Gateway (Module 19) --> Adaptations --> Installation List, Specified Installations --> Door Electronics, Rear Driver/Pass Side --> set both to "coded"

Then I had to disconnect/reconnect the obdeleven app, and I also turned the ignition off, then on but I'm not sure that was necessary. You should now see the rear door modules (BB and CC) at the bottom of you modules list.

In modules BB and CC go into "Long Coding" and activate "ambient_light" and "door_exit_light".

These steps worked for me.


@DudeAbides @jdjames13
 
  • Like
Reactions: DudeAbides
@billp25

I can't thank you enough! I had been able to find the the modules in the install list and change them both to "coded", but then the modules wouldn't actually show up in the list. Turns out, all I needed to do was disconnect and reconnect like you suggested and and there they were. I'm a little embarrassed that doing that never occurred to me.

As soon as I was able to get to the modules, everything was simple. Thanks again!
 
  • Like
Reactions: billp25
For those asking for the obdeleven coding for the REAR doors, here's how I did it:

First, enable the rear door modules:
Gateway (Module 19) --> Adaptations --> Installation List, Specified Installations --> Door Electronics, Rear Driver/Pass Side --> set both to "coded"

Then I had to disconnect/reconnect the obdeleven app, and I also turned the ignition off, then on but I'm not sure that was necessary. You should now see the rear door modules (BB and CC) at the bottom of you modules list.

In modules BB and CC go into "Long Coding" and activate "ambient_light" and "door_exit_light".

These steps worked for me.


@DudeAbides @jdjames13
Am I missing somthing I have just followed theses steps with an OBDeleven and have activated ambient lighting on the rear door modules . But the ambient door trim and B&O lighting I have installed doesn’t work I have pinned them to pin 3 and ground on the 16 pin connector on the door module

Thanks
 
Are you trying to get just the ambient portion to work that is controlled via the mmi?

If so, I was trying g to get mine to work and never got very far. I think the actual door module needs to be updated with software.

Sent from my Pixel 2 XL using Tapatalk
 
Are you trying to get just the ambient portion to work that is controlled via the mmi?

If so, I was trying g to get mine to work and never got very far. I think the actual door module needs to be updated with software.

Sent from my Pixel 2 XL using Tapatalk
I was hoping that it would be controlled by the background lighting control in the MMI . It’s working to some extent as I can turn them on with the test function .
 
I was hoping that it would be controlled by the background lighting control in the MMI . It’s working to some extent as I can turn them on with the test function .
Mine does the same. Either you can find door modules from a b&o car, then it will work. I spent months, with no success with door modules from a prestige car, but without b&o

Sent from my Pixel 2 XL using Tapatalk
 
I have B&O from the factory but the car came without ambient lighting in the door trims I am adding this as a retrofit also the rear speakers like all B&O cars are missing the ambient lighting in the trim I have seen people just wire it into the door Handel lighting but then it is controlled by the master dimmer next to the headlight switch I wanted it to work factory. The door modules I have have a pin for ambient lighting and it works as they turn on with the test function it’s just the MMI isn’t driving them .I’m sure there is just a software tick somewhere ....
 
I have B&O from the factory but the car came without ambient lighting in the door trims I am adding this as a retrofit also the rear speakers like all B&O cars are missing the ambient lighting in the trim I have seen people just wire it into the door Handel lighting but then it is controlled by the master dimmer next to the headlight switch I wanted it to work factory. The door modules I have have a pin for ambient lighting and it works as they turn on with the test function it’s just the MMI isn’t driving them .I’m sure there is just a software tick somewhere ....
It's unfortunately software that needs to be downloaded on the actual module. Vcdpro or odis is what is required. I just used the dimmer switch as I couldn't find a place willing to do it.

Sent from my Pixel 2 XL using Tapatalk
 
It's unfortunately software that needs to be downloaded on the actual module. Vcdpro or odis is what is required. I just used the dimmer switch as I couldn't find a place willing to do it.

Sent from my Pixel 2 XL using Tapatalk

Oh well I’ll have to get that done then ....
 
@rcnacura The latest OBD11 update gives full access to the rear door modules, I see "ambient lighting" and "speaker grill illumination" options under long coding, but I haven't have time to rewire and try them yet....
 
  • Like
Reactions: rcnacura