I've used Audi Sport loads for helping me out (I've sent way more private message than I remember!) and there are some great people with 3.0 TDI's out there who we are lucky to have on the forum .... but I thought it was about time I give something back.
Firstly just to make clear - I'm nothing to do with these, I do not sell anything on ebay (or anywhere else), I paid for them so this as about as an honest review as you'll get. I work in IT and I just like playing with my car and not a particularly good mechanic
So I got my A4 B7 Avant 2 years ago at 130k miles and have put a lot of effort into getting slowly back to her (mechanical) glory after some rather choice decisions by previous owners - plenty still to do tho. When I took her on she had some obvious problems in a significant amount of black smoke, but no engine management light. The swirl flaps where fine....
So a brief synopsis of this particular issue: Fix fuel temp which reduced a lot of smoke, then as I had an EGR fault code anyway - I took all the air intake off, replaced the EGR, cleaned everything as per the A6 3.0TDI threads, then went to put them back in. Clean had to be better. Now the Audi engineering glory that is the metal oil pipe that goes tight over the top of the passenger intake completely stuffed me. I spent about an hour slowly wiggling the unit back in but had forgotten the advice given on the A6 thread of taping the flaps open so the plastic knob stay up. Mine was down and as I celebrated getting the unit back in at all, I look at the back and realised I had squashed the knob slightly on the heat shielding. Back together - and yup worst nightmare. Now I had the engine management and the dreaded fault code. There is a list of common ones but I had P1018 - Lower Limit not reached on Bank 2. It was at this point a bit intermittent. It seemed to be most effected by ambient temperature and in spring and autumn (about now) it would periodically clear the error so it couldn't be far out. I tried everything - greasing the knobs up, moving the servos around slightly, even changed the arm just in case.... Nothing worked and the repeat taking off of the arm slowly made the problem less intermittent and more permanent. I stopped and gave up on it. I had a Vagcom so could check it every so often anyway and lived with the management light (I know!).
Last years MOT I didn't even get an advisory for it despite it clearly being on but I guess that was a careful choice of a large UK brand to do it. This year the MOT rules have obviously changed and after 18 months I'm getting sick of the light. MOT due end of Oct so need to get on with it.
What to do?
Looking through the forums you can find some common options which are:
1) Replace the unit -
a) Through Audi (if you like massive bills)
b) Some sort of re-manufactured ones - There is the people in Poland who have been mentioned before and I also found some interesting strengthened ones from Germany but the company look quite new and their gearbox rebuilds get a hammering on Germany review sites so not sure. They look good.
2) Repair kits -
a) Arms - if you have old ones but not an option for me as done. About £10 from Audi for those.
b) The flaps themselves - so kits for this seem to vary from £50 - 90 for a pair and reviews seem to have the same sort of divergence on longevity. This was going to be my route and I was going to opt for the higher priced one as they looked more genuine.
3) Map it all out - but I have always felt a bit ecologically guilty there so didn't really want to do this. Plus not that cheap to do.
I had always been torn between getting a re-manufactured unit or just replacing the flaps, but costs as I am having EBC brakes fitted soon meant I was going to opt for the flaps as it was cheaper. Annoyingly my fault is with the passenger side which is definitely the harder to change so there was a risk of having to drain the oil (money) and a load of work/time I don't really have currently. As I know it is only a tiny bit out it is also a bit frustrating to have to do all of it....
Just before I was about to buy the flaps last Sunday I spotted something which I had never seen before to fix the problem listed under the P2015 fault code - a bracket which keeps the servo arm between the correct limits physically. It can be fitted with a 5m hex bit and a long flat head screwdriver, and was claimed to take 30 mins. I couldn't really find anything about them (wait for the forum to prove me wrong.... ) so hence me writing this. There were some reviews which where nearly all very positive. It seemed worth a punt. ( Search ebay for "P2015 Repair Bracket 3.0" to find them). So there appears to be two/three sellers one in the UK, one/two in Poland. The pictures look identical and I suspect they are manufactured in Poland and the UK seller is only acting as a re-seller. Price difference is negligible really. I paid £25 for the pair from the UK seller, Poland would have been about £23. They were "in stock" but not shipped until Wednesday, arrived Thursday.
So they look like this:
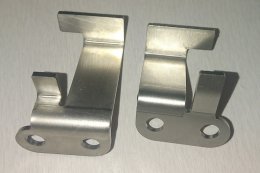
Not sure what I expected but they feel weighty and it gives you some confidence. I was guessing the tolerances would have to be good to work. They are clearly very well made and finished with clear bending marks and smooth edges. They were not "straight" at all which did worry me but they looked accurately not straight. You can see better what I mean here:
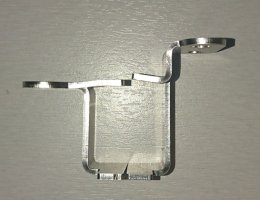
The smaller bracket is the drivers side, the larger one is the passengers side.
The drivers side top bracket is bent in two places and the vertical section is angled back. The passenger one the vertical section is square and the top section is bent upwards quite distinctly.
Didn't come with instructions but seemed pretty straight forward. Took me 15 minutes and at least 5 of that was trying to get the drivers side one under the bracket already in place. If it helps anyone here is what I did (to be honest with these anyone can do this even if you have no experience at all):
1) Open bonnet, remove engine cover.
2) The bolts in orange are the ones that the brackets go under. I have already taken out the turbo connection (red) and moved it to the side.
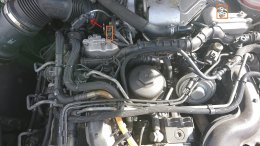
3) So on the passenger side it is the longer repair bracket. If you have the the cross piece (marked blue) you need to undo all the bolts. As you have to fit the bracket under load I would recommend leaving at least one bolt tightened to keep the servo in place. So I popped the arm off by gently pushing from behind with a flat head screwdriver, removed the purple bolt, moved the cross piece, and re-tightened the purple bolt before removing the two green bolts:
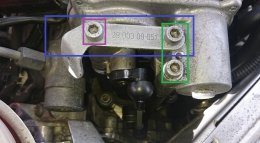
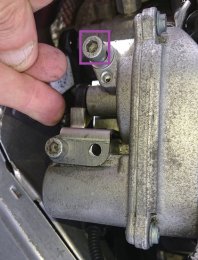
4) The repair bracket goes at the bottom (so against the servo) on both sides. The bracket holds the arm between the two operating points which is less than the servos at rest position - so you have to put it under load to get the bracket in the right place and keep it under load while you tighten the screws. On the passenger side this is pushing it down which is relatively easy. So I am pushing down in this picture, the purple bolt highlighted for reference and one green bolt back in:
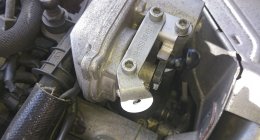
5) Once like this with one green back in, I took the purple bolt out, but the cross piece back, put both bolts back in and tightened it all up. Attach the arm back again (not shown in picture) That side is then done:
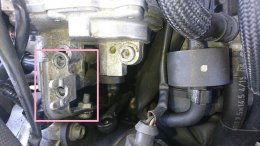
6) Drivers side I found more difficult because of this bracket marked in pink (possibly not helped by mine having I suspect a repair done on it hence the bolt). Less photos this time as you get the idea, but this is with the arm popped off, both bolts marked in orange from the first picture removed. On the drivers side you do not need to touch the 3rd bolt by itself. Just leave it alone:
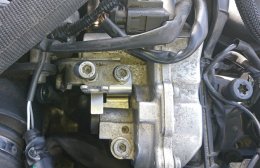
7) So this is the bit that took me the longest. The pink bracket moves a bit but not much and this time to tension the servo you lift it up which makes it more difficult. In the end I got the repair bracket under the main bracket when lifting the bracket as much as I could while keeping the servo up , and wriggled it over to the right place. To put the screws in straight however you must keep the servo lifted and I found it helped to wedge a screwdriver behind the main bracket to keep it in place. Took a bit of time, but just patience really. Once tightened it looks good and doesn't touch anything (one bolt back in, other half way through):
8) So tighten it up, attach the arm back to the servo, and put the turbo connector back in place. As mine is broken and still on my to fix list I put another piece of insulation tape around it, and pushed it in
Here is a done picture (not great I know). On both sides it is quite subtle and you wouldn't really notice them unless you were looking for them:
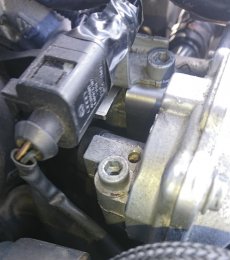
9) Pop the engine cover back on and close the bonnet.
10) Turn the engine on and off 3 times - on the 3rd time it should automatically reset the error and clears the engine light (assume of course your engine light is only on because of the swirl flaps!)
I was slightly skeptical it would work - but sure enough on the 3 time the light went out and it has stayed out. Normally if mine goes out it may last a few restarts. This time it has just stayed off.
Obviously only done in the last 2 days but I think it has done the job. If it comes back on I will report back
So all in all I am pretty pleased - £25 and 30 minutes well spent and of all the options I like the fact it should physically stop it happening again. It's quite a neat solution. It is well designed and when you put in the drivers side it does look to start with like it won't fit as the servo arm nearly touches the servo when moving but it is cleverly shaped so it does.
I suppose concerns maybe that the servo might not like being held like this? Will it cause more wear to the motor/cogs? Or will it cause less as it cannot hit the extremes? Interestingly it is sold as a "preventative" measure too so to stop the engine light coming on in the first place. Be interested to know peoples views on that?
Oh only last thing - there are two types for the 3.0TDIs. So the common 3 letter ones (ASB/BKN/etc) use a "4 pin" version which is what the photos are of above. The 4 letter codes (CANA/CDYA/etc) use a "5 pin" version. Would work with A4 and A6's with the engines. No idea if they are different as only seen one but I guess they are. Adverts have the engine codes listed so check before you get one.
Obviously as with anything on ebay I guess quality may vary.
Firstly just to make clear - I'm nothing to do with these, I do not sell anything on ebay (or anywhere else), I paid for them so this as about as an honest review as you'll get. I work in IT and I just like playing with my car and not a particularly good mechanic
So I got my A4 B7 Avant 2 years ago at 130k miles and have put a lot of effort into getting slowly back to her (mechanical) glory after some rather choice decisions by previous owners - plenty still to do tho. When I took her on she had some obvious problems in a significant amount of black smoke, but no engine management light. The swirl flaps where fine....
So a brief synopsis of this particular issue: Fix fuel temp which reduced a lot of smoke, then as I had an EGR fault code anyway - I took all the air intake off, replaced the EGR, cleaned everything as per the A6 3.0TDI threads, then went to put them back in. Clean had to be better. Now the Audi engineering glory that is the metal oil pipe that goes tight over the top of the passenger intake completely stuffed me. I spent about an hour slowly wiggling the unit back in but had forgotten the advice given on the A6 thread of taping the flaps open so the plastic knob stay up. Mine was down and as I celebrated getting the unit back in at all, I look at the back and realised I had squashed the knob slightly on the heat shielding. Back together - and yup worst nightmare. Now I had the engine management and the dreaded fault code. There is a list of common ones but I had P1018 - Lower Limit not reached on Bank 2. It was at this point a bit intermittent. It seemed to be most effected by ambient temperature and in spring and autumn (about now) it would periodically clear the error so it couldn't be far out. I tried everything - greasing the knobs up, moving the servos around slightly, even changed the arm just in case.... Nothing worked and the repeat taking off of the arm slowly made the problem less intermittent and more permanent. I stopped and gave up on it. I had a Vagcom so could check it every so often anyway and lived with the management light (I know!).
Last years MOT I didn't even get an advisory for it despite it clearly being on but I guess that was a careful choice of a large UK brand to do it.
What to do?
Looking through the forums you can find some common options which are:
1) Replace the unit -
a) Through Audi (if you like massive bills)
b) Some sort of re-manufactured ones - There is the people in Poland who have been mentioned before and I also found some interesting strengthened ones from Germany but the company look quite new and their gearbox rebuilds get a hammering on Germany review sites so not sure. They look good.
2) Repair kits -
a) Arms - if you have old ones but not an option for me as done. About £10 from Audi for those.
b) The flaps themselves - so kits for this seem to vary from £50 - 90 for a pair and reviews seem to have the same sort of divergence on longevity. This was going to be my route and I was going to opt for the higher priced one as they looked more genuine.
3) Map it all out - but I have always felt a bit ecologically guilty there so didn't really want to do this. Plus not that cheap to do.
I had always been torn between getting a re-manufactured unit or just replacing the flaps, but costs as I am having EBC brakes fitted soon meant I was going to opt for the flaps as it was cheaper. Annoyingly my fault is with the passenger side which is definitely the harder to change so there was a risk of having to drain the oil (money) and a load of work/time I don't really have currently. As I know it is only a tiny bit out it is also a bit frustrating to have to do all of it....
Just before I was about to buy the flaps last Sunday I spotted something which I had never seen before to fix the problem listed under the P2015 fault code - a bracket which keeps the servo arm between the correct limits physically. It can be fitted with a 5m hex bit and a long flat head screwdriver, and was claimed to take 30 mins. I couldn't really find anything about them (wait for the forum to prove me wrong....
So they look like this:

Not sure what I expected but they feel weighty and it gives you some confidence. I was guessing the tolerances would have to be good to work. They are clearly very well made and finished with clear bending marks and smooth edges. They were not "straight" at all which did worry me but they looked accurately not straight. You can see better what I mean here:

The smaller bracket is the drivers side, the larger one is the passengers side.
The drivers side top bracket is bent in two places and the vertical section is angled back. The passenger one the vertical section is square and the top section is bent upwards quite distinctly.
Didn't come with instructions but seemed pretty straight forward. Took me 15 minutes and at least 5 of that was trying to get the drivers side one under the bracket already in place. If it helps anyone here is what I did (to be honest with these anyone can do this even if you have no experience at all):
1) Open bonnet, remove engine cover.
2) The bolts in orange are the ones that the brackets go under. I have already taken out the turbo connection (red) and moved it to the side.

3) So on the passenger side it is the longer repair bracket. If you have the the cross piece (marked blue) you need to undo all the bolts. As you have to fit the bracket under load I would recommend leaving at least one bolt tightened to keep the servo in place. So I popped the arm off by gently pushing from behind with a flat head screwdriver, removed the purple bolt, moved the cross piece, and re-tightened the purple bolt before removing the two green bolts:

4) The repair bracket goes at the bottom (so against the servo) on both sides. The bracket holds the arm between the two operating points which is less than the servos at rest position - so you have to put it under load to get the bracket in the right place and keep it under load while you tighten the screws. On the passenger side this is pushing it down which is relatively easy. So I am pushing down in this picture, the purple bolt highlighted for reference and one green bolt back in:

5) Once like this with one green back in, I took the purple bolt out, but the cross piece back, put both bolts back in and tightened it all up. Attach the arm back again (not shown in picture) That side is then done:

6) Drivers side I found more difficult because of this bracket marked in pink (possibly not helped by mine having I suspect a repair done on it hence the bolt). Less photos this time as you get the idea, but this is with the arm popped off, both bolts marked in orange from the first picture removed. On the drivers side you do not need to touch the 3rd bolt by itself. Just leave it alone:

7) So this is the bit that took me the longest. The pink bracket moves a bit but not much and this time to tension the servo you lift it up which makes it more difficult. In the end I got the repair bracket under the main bracket when lifting the bracket as much as I could while keeping the servo up , and wriggled it over to the right place. To put the screws in straight however you must keep the servo lifted and I found it helped to wedge a screwdriver behind the main bracket to keep it in place. Took a bit of time, but just patience really. Once tightened it looks good and doesn't touch anything (one bolt back in, other half way through):

8) So tighten it up, attach the arm back to the servo, and put the turbo connector back in place. As mine is broken and still on my to fix list I put another piece of insulation tape around it, and pushed it in
Here is a done picture (not great I know). On both sides it is quite subtle and you wouldn't really notice them unless you were looking for them:

9) Pop the engine cover back on and close the bonnet.
10) Turn the engine on and off 3 times - on the 3rd time it should automatically reset the error and clears the engine light (assume of course your engine light is only on because of the swirl flaps!)
I was slightly skeptical it would work - but sure enough on the 3 time the light went out and it has stayed out. Normally if mine goes out it may last a few restarts. This time it has just stayed off.
Obviously only done in the last 2 days but I think it has done the job. If it comes back on I will report back
So all in all I am pretty pleased - £25 and 30 minutes well spent and of all the options I like the fact it should physically stop it happening again. It's quite a neat solution. It is well designed and when you put in the drivers side it does look to start with like it won't fit as the servo arm nearly touches the servo when moving but it is cleverly shaped so it does.
I suppose concerns maybe that the servo might not like being held like this? Will it cause more wear to the motor/cogs? Or will it cause less as it cannot hit the extremes? Interestingly it is sold as a "preventative" measure too so to stop the engine light coming on in the first place. Be interested to know peoples views on that?
Oh only last thing - there are two types for the 3.0TDIs. So the common 3 letter ones (ASB/BKN/etc) use a "4 pin" version which is what the photos are of above. The 4 letter codes (CANA/CDYA/etc) use a "5 pin" version. Would work with A4 and A6's with the engines. No idea if they are different as only seen one but I guess they are. Adverts have the engine codes listed so check before you get one.
Obviously as with anything on ebay I guess quality may vary.


