Since some people already reached out to me I thought let's make it into a general topic. Audi made different radio's with differt speaker/amp/sub setup (e.q. Chorus Sound System, Bose Sound System, Audi Sound System etc.)
I personally bought myself an A3 8P and thought what a simple sound it coming through these speakers, I opened up the reardoor panels and saw there wasn't any speaker at all. I did some research and found plenty of people discussing this topic of fitting a sub and speakers but not a clear how-to on the pinout and wiring of the original AMP and sub. The pictures in this how-to cover the retrofit of a Audi Soundsystem with Blaupunkt gear.
Please keep in mind i'm Dutch so my English won't be picture perfect") .
.
Abbreviations:
AMP = Amplifier
SUB = Subwoofer
RR = Rear Right
RL = Rear Left
FL = Front Left
FR = Front Right
GND = Ground
HU = Headunit
Situation;
I have an A3 8P with an Audi Chorus that I upgraded to an RNS-e High (193G). The Chorus soundsystem only has 2 front speakers and 2 tweeters in the A-pillars. I wanted to have a original subwoofer, AMP and reardoor speakers and tweeters.
What is needed:
Step 1)
- Demontage the doorcards or your rear doors.
- Demontage the sill trims by pullen them up.
- Demontage the lower B-pillar trim by pulling it towards you, it's hold by 2 clips.


Step 2)
This step can be done two ways. The original way or the "own-created" way. Since there are no speakers installed from factory the wiring loom doesn't have any cables for them included. This means that the connector in the rubber 1. Need to be pinned by you to connect it to a original doorloom that has speaker connectors on it. Or, 2. you will pull your own wiring through. I chose for step 2.
So I taped the cables on my screwdriver, went in the door with my arm and poked t small hole in the rubber to feed the cable through (it can be done neater, be my guest). I then pulled the cables through next to the door connector and pulled them inside the car. Obviously repeat this step on the other side aswell.


Step 3)
I won't go to deep into how to feed your cables through the car.. To feed the cables on a neat way to the AMP/SUB in the trunk you need to take your rear interior out. The rearsit will pop-out by pulling it up and the rear backrest are hold in place with a locking mechanism in the trunk. You can unscrew it using a TX25 and then you can unlock the backrest and slide it out.
To take the side cover off, the place where the sub is going, pull the plastic trim covering the trunk lock in the middle of the trunk upwards. It's hold by 4 clips so shouldn't be to hard.
The sidecover is hold by 1 screw next to the trunklight, it's a TX15 or 25. When that one is out gently pull the cover towards you from the outer side (see pic below). The clip should pop loose and before pulling any further get your hand behind it and take the trunklight out.
To completely remove the trim gently pull further. Audi shoved the trim behind a piece of plasic next to the rear left door so pull it out and wiggle it a bit, it came out very easy for me.


Step 4)
Place the subwoofer in the desired place. The SUB is hold by three bolts. The cut should be perfect for the subwoofer to fit in.
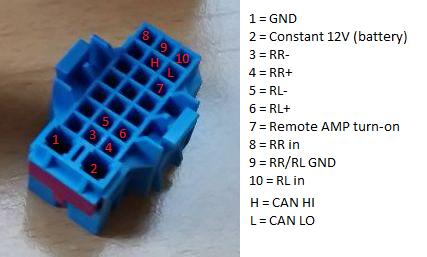
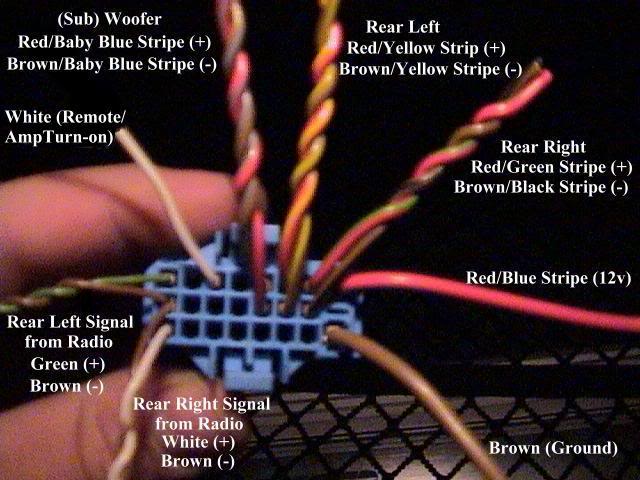
The cables that you run from the HU to the SUB need to go into the blue SUB connector. The pinout for this connector is shown in the table under the pictures.


Step 5)
Crimp the cables in the blue connector with the desired terminals and feed the cables through as noted below.
Note: the constant 12V and GND on PIN 1/2 are thicker then the other cables, I used 2,5MM cables for these.
I ran the cables as follows:
[1] GND = To a proper groundpoint under the steeringwheel column (RHD) for a LHD this will be under the glovebox A-pillar (see picture below).
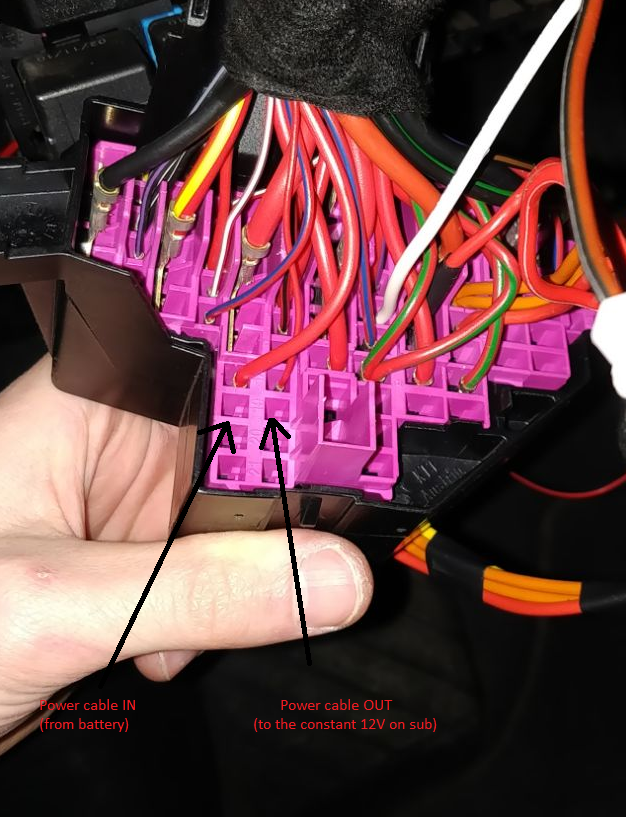
[2] Constant 12V = I've pulled a cable from my battery through the firewall into the fusebox, I've feed the 12V from the sub to the fusebox aswell and put both cables in an empty slot connecting them with a 10A fuse.
[3] RR- = speaker right door
[4] RR+ = speaker right door
[5] RL- = speaker left door
[6] RL+ = speaker left door
[7] Remote AMP = feed the cable under the sills to the back of your HU.
[8] RR in = feed the cable under the sills to the back of your HU.
[9] RR/RL GND = feed the cable under the sills to the back of your HU.
[10] RL in = feed the cable under the sills to the back of your HU.


Step 6)
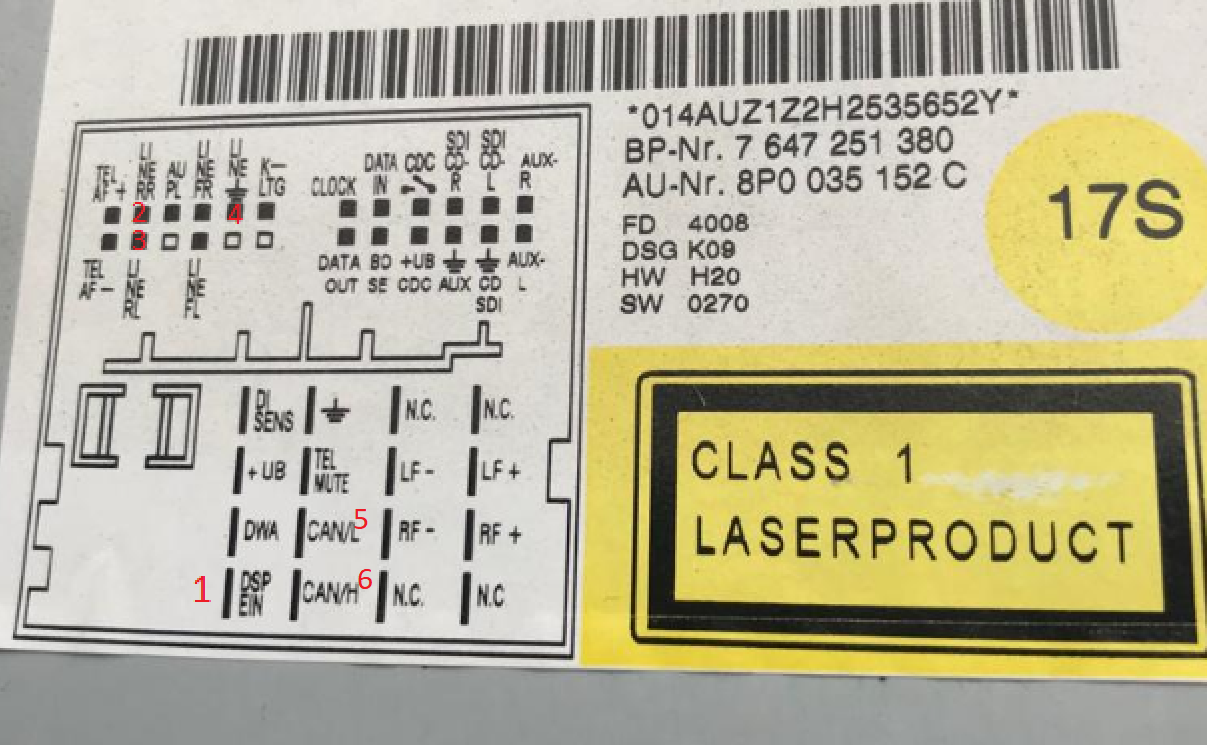
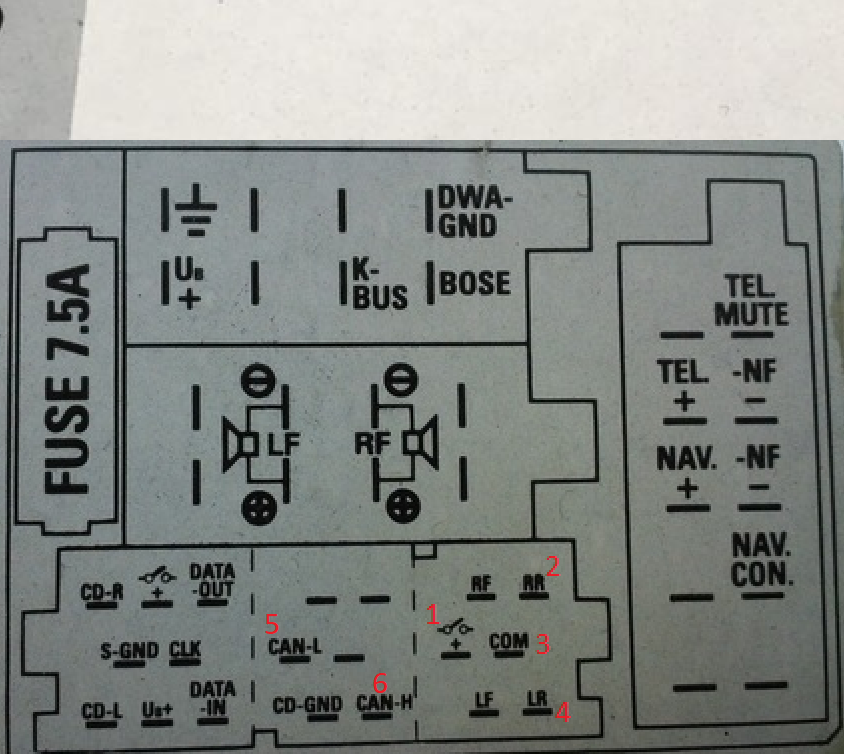
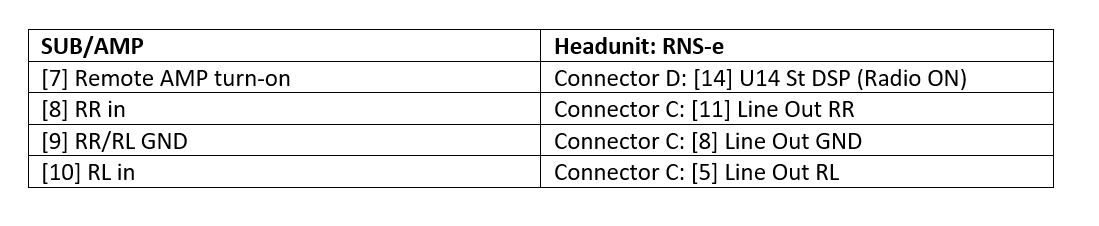
Now connecting the SUB wires to your HU. Every HU differs in pinout, I will try to cover most of the original HU's to connect the Blaupunk sub/amp to it.
RNS-e:

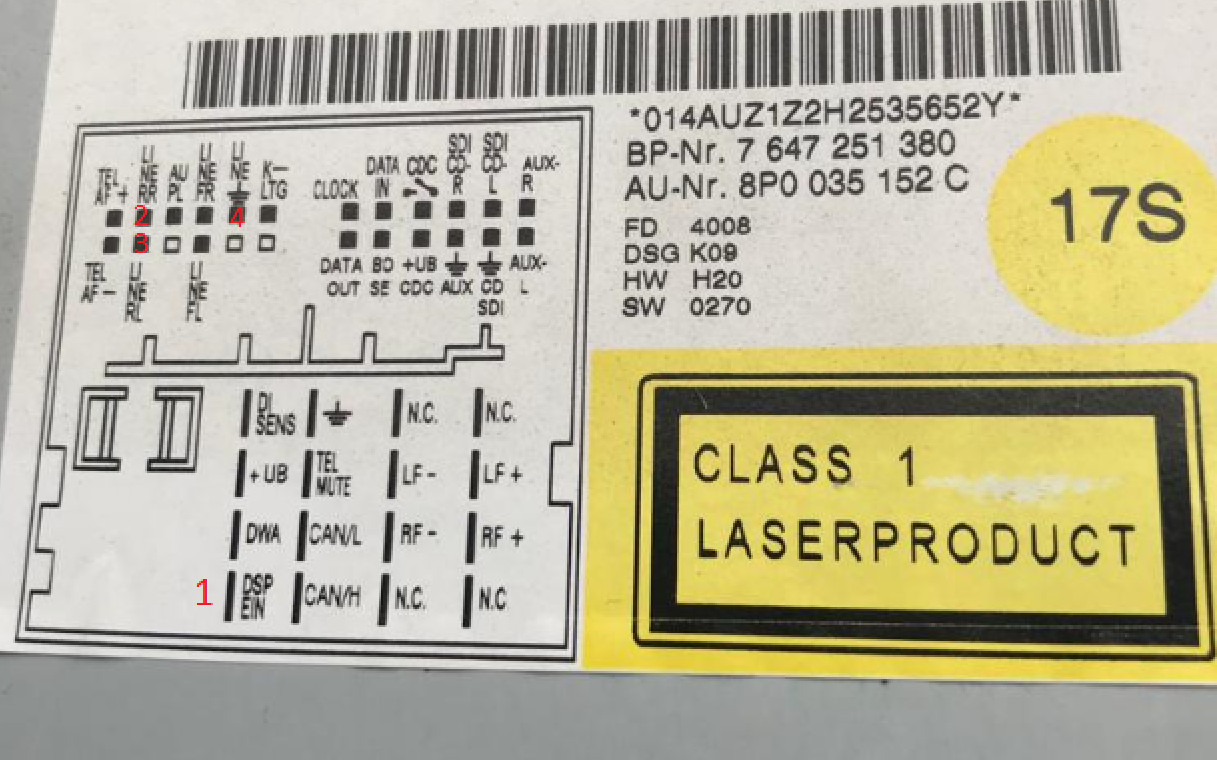
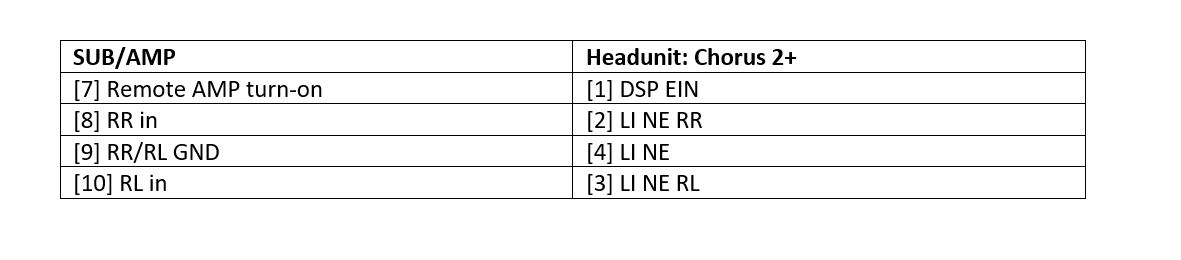
Chorus 2:
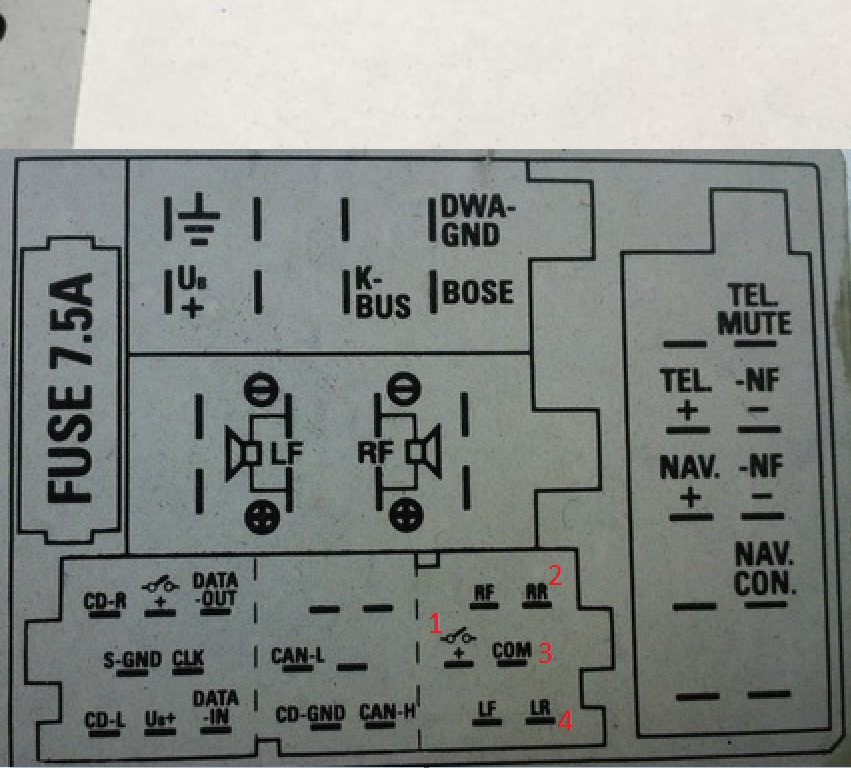
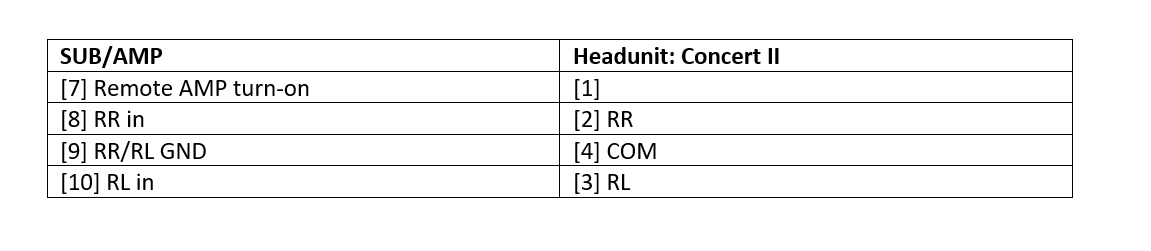
Concert II:
Step 7)
Make sure you crimped everything good and the copper and pins are making good contact. Now there is only one more thing to test, blast the speakers out!
I'm not god, can't know it all nor make clean how-to's. So if you spot something you doubt or know is entirely wrong please leave a message in this topic as I'm all about spreading the info. I'am struggling retrofitting some things and can't thank the people enough who made the information available for me to also succeed.
Good luck, and if you have any questions please let me know!
I personally bought myself an A3 8P and thought what a simple sound it coming through these speakers, I opened up the reardoor panels and saw there wasn't any speaker at all. I did some research and found plenty of people discussing this topic of fitting a sub and speakers but not a clear how-to on the pinout and wiring of the original AMP and sub. The pictures in this how-to cover the retrofit of a Audi Soundsystem with Blaupunkt gear.
Please keep in mind i'm Dutch so my English won't be picture perfect
.Abbreviations:
AMP = Amplifier
SUB = Subwoofer
RR = Rear Right
RL = Rear Left
FL = Front Left
FR = Front Right
GND = Ground
HU = Headunit
Situation;
I have an A3 8P with an Audi Chorus that I upgraded to an RNS-e High (193G). The Chorus soundsystem only has 2 front speakers and 2 tweeters in the A-pillars. I wanted to have a original subwoofer, AMP and reardoor speakers and tweeters.
What is needed:
- VCDS (optional, you will read about it in the how-to)
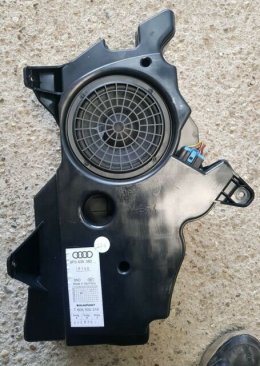
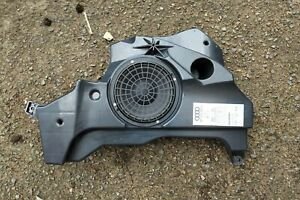
- Subwoofer (8P4035382D)
This is the Blaupunkt subwoofer, this sub has a build-in AMP. The Bose soundsystem has a seperate AMP. - Amplifier (8P4035223D)
Only needed when fitting a Bose Sound System - Subwoofer connector (V1J0962623 or 1J0962623)
Audi lists them as "V1J0962623A" they costs €5,- at the dealership. - 1,5MM cables to run from HU to SUB (trunk) and doorspeakers to SUB.
- Quadlock Connector C (exit connector) (optional, read step 6).
https://www.kufatec.com/en/accessor...-quadlock-connector-telephone-33369?tab=frage
- Terminals
You can buy them from Audi (very exspensive) or buy them from from our Chinese friends on Ali for much cheaper
Step 1)
- Demontage the doorcards or your rear doors.
- Demontage the sill trims by pullen them up.
- Demontage the lower B-pillar trim by pulling it towards you, it's hold by 2 clips.
Step 2)
This step can be done two ways. The original way or the "own-created" way. Since there are no speakers installed from factory the wiring loom doesn't have any cables for them included. This means that the connector in the rubber 1. Need to be pinned by you to connect it to a original doorloom that has speaker connectors on it. Or, 2. you will pull your own wiring through. I chose for step 2.
So I taped the cables on my screwdriver, went in the door with my arm and poked t small hole in the rubber to feed the cable through (it can be done neater, be my guest). I then pulled the cables through next to the door connector and pulled them inside the car. Obviously repeat this step on the other side aswell.
Step 3)
I won't go to deep into how to feed your cables through the car.. To feed the cables on a neat way to the AMP/SUB in the trunk you need to take your rear interior out. The rearsit will pop-out by pulling it up and the rear backrest are hold in place with a locking mechanism in the trunk. You can unscrew it using a TX25 and then you can unlock the backrest and slide it out.
To take the side cover off, the place where the sub is going, pull the plastic trim covering the trunk lock in the middle of the trunk upwards. It's hold by 4 clips so shouldn't be to hard.
The sidecover is hold by 1 screw next to the trunklight, it's a TX15 or 25. When that one is out gently pull the cover towards you from the outer side (see pic below). The clip should pop loose and before pulling any further get your hand behind it and take the trunklight out.
To completely remove the trim gently pull further. Audi shoved the trim behind a piece of plasic next to the rear left door so pull it out and wiggle it a bit, it came out very easy for me.
Step 4)
Place the subwoofer in the desired place. The SUB is hold by three bolts. The cut should be perfect for the subwoofer to fit in.
The cables that you run from the HU to the SUB need to go into the blue SUB connector. The pinout for this connector is shown in the table under the pictures.
Step 5)
Crimp the cables in the blue connector with the desired terminals and feed the cables through as noted below.
Note: the constant 12V and GND on PIN 1/2 are thicker then the other cables, I used 2,5MM cables for these.
I ran the cables as follows:
[1] GND = To a proper groundpoint under the steeringwheel column (RHD) for a LHD this will be under the glovebox A-pillar (see picture below).
[2] Constant 12V = I've pulled a cable from my battery through the firewall into the fusebox, I've feed the 12V from the sub to the fusebox aswell and put both cables in an empty slot connecting them with a 10A fuse.
[3] RR- = speaker right door
[4] RR+ = speaker right door
[5] RL- = speaker left door
[6] RL+ = speaker left door
[7] Remote AMP = feed the cable under the sills to the back of your HU.
[8] RR in = feed the cable under the sills to the back of your HU.
[9] RR/RL GND = feed the cable under the sills to the back of your HU.
[10] RL in = feed the cable under the sills to the back of your HU.
Step 6)
Now connecting the SUB wires to your HU. Every HU differs in pinout, I will try to cover most of the original HU's to connect the Blaupunk sub/amp to it.
RNS-e:
Chorus 2:
Concert II:
Step 7)
Make sure you crimped everything good and the copper and pins are making good contact. Now there is only one more thing to test, blast the speakers out!
I'm not god, can't know it all nor make clean how-to's. So if you spot something you doubt or know is entirely wrong please leave a message in this topic as I'm all about spreading the info. I'am struggling retrofitting some things and can't thank the people enough who made the information available for me to also succeed.
Good luck, and if you have any questions please let me know!